Here you can find Explanations for basic functionality and also some tips and tricks for more advanced users.
These pages are under construction. You can find the original, no longer maintained page here.
HELP! Everything looks different now!
Now, all instances have been migrated to Nextcloud.
Please find more information here: Nextcloud-Migration
1 - Getting started
Register your Sciebo-Account and begin to work.
1.1 - Create sciebo-Account
To register an account, please follow these instructions:
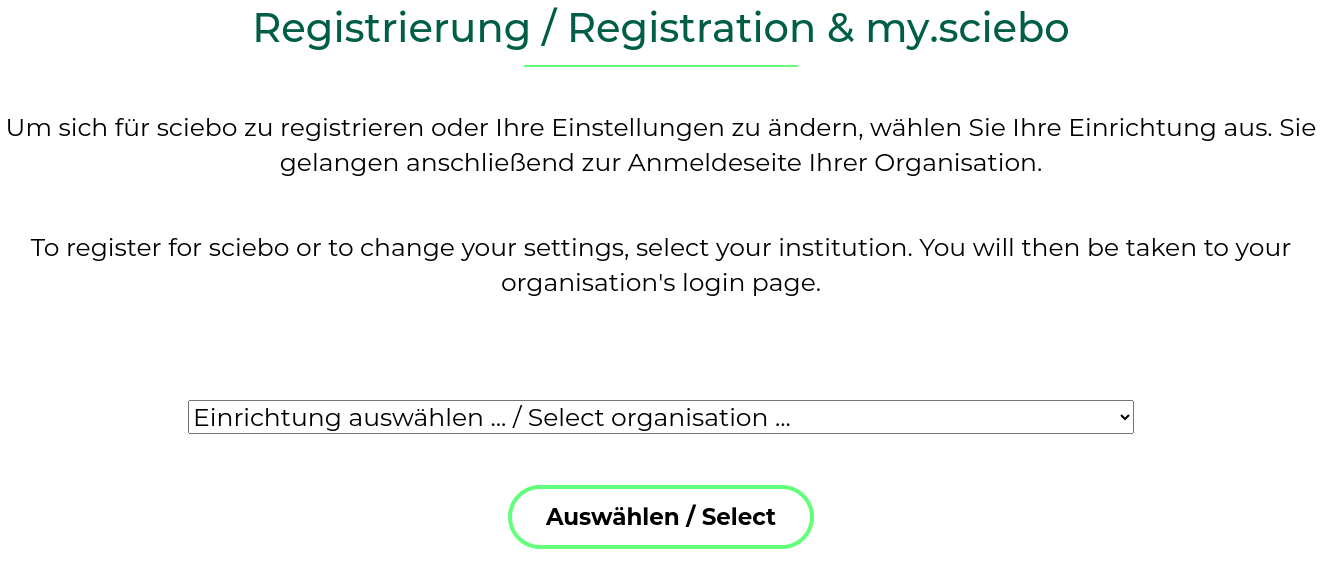
Click on the homepage of sciebo on “Registration”.
On the next page you will find a dropdown menu. Select your institution from there and click on “Select”.
You will be redirected to the Shibboleth login page of your institution. Please enter your username and password that
you use for your academic services there. Check the option “Die zu übermittelnden Informationen anzeigen, damit ich
die Weitergabe gegebenenfalls ablehnen kann” so that you can review the forwarded information again, and click on “Login”.
If all information is correct, confirm the registration by clicking on “Yes, I accept”. (If the information does not
match, please contact your local IT support at your institution.)
Next, you will be taken to the registration page, where you are asked to set a password for your sciebo account.
Within 15 minutes after setting the password, your sciebo account should be active and you should be able to log in
to the Sciebo server of your institution.
Notice:
Please note that service accounts are excluded from registering for a sciebo account.
If you are a member of multiple universities, please use the login details of your main institution when registering.
If data is to be shared with you, it is necessary that you activate your account through a first-time login at the web
interface. It usually takes a day until you can be found via the search in the address book 1, as the address books are
only synchronized between the instances once a day.
Please be sure to check whether you can receive messages at the registered email address. The system will send you
notifications this way if your registration needs to be renewed or if data shared with you might no longer be available
in the foreseeable future. This can happen if the sharer’s account or a project box expires.
Since Nextcloud version 31, searching the address book for shared folders with other institutions is no longer possible. We hope the manufacturer will improve this in the foreseeable future. ↩︎
1.2 - Webinterface
Access your data anywhere via web browser
With the web interface, you can access your data anywhere via web browser. No matter whether you want to upload, download,
edit, delete or share data or whether you want to work on a file with several people at the same time - in the web
interface, you can use all the advantages of sciebo.
1.2.1 - Deleting & Restoring Files & Folders
Files and folders that you no longer need should be deleted to make more storage space available again. If you have accidentally deleted data, you can easily restore it within a week.
Deleting Files & Folders
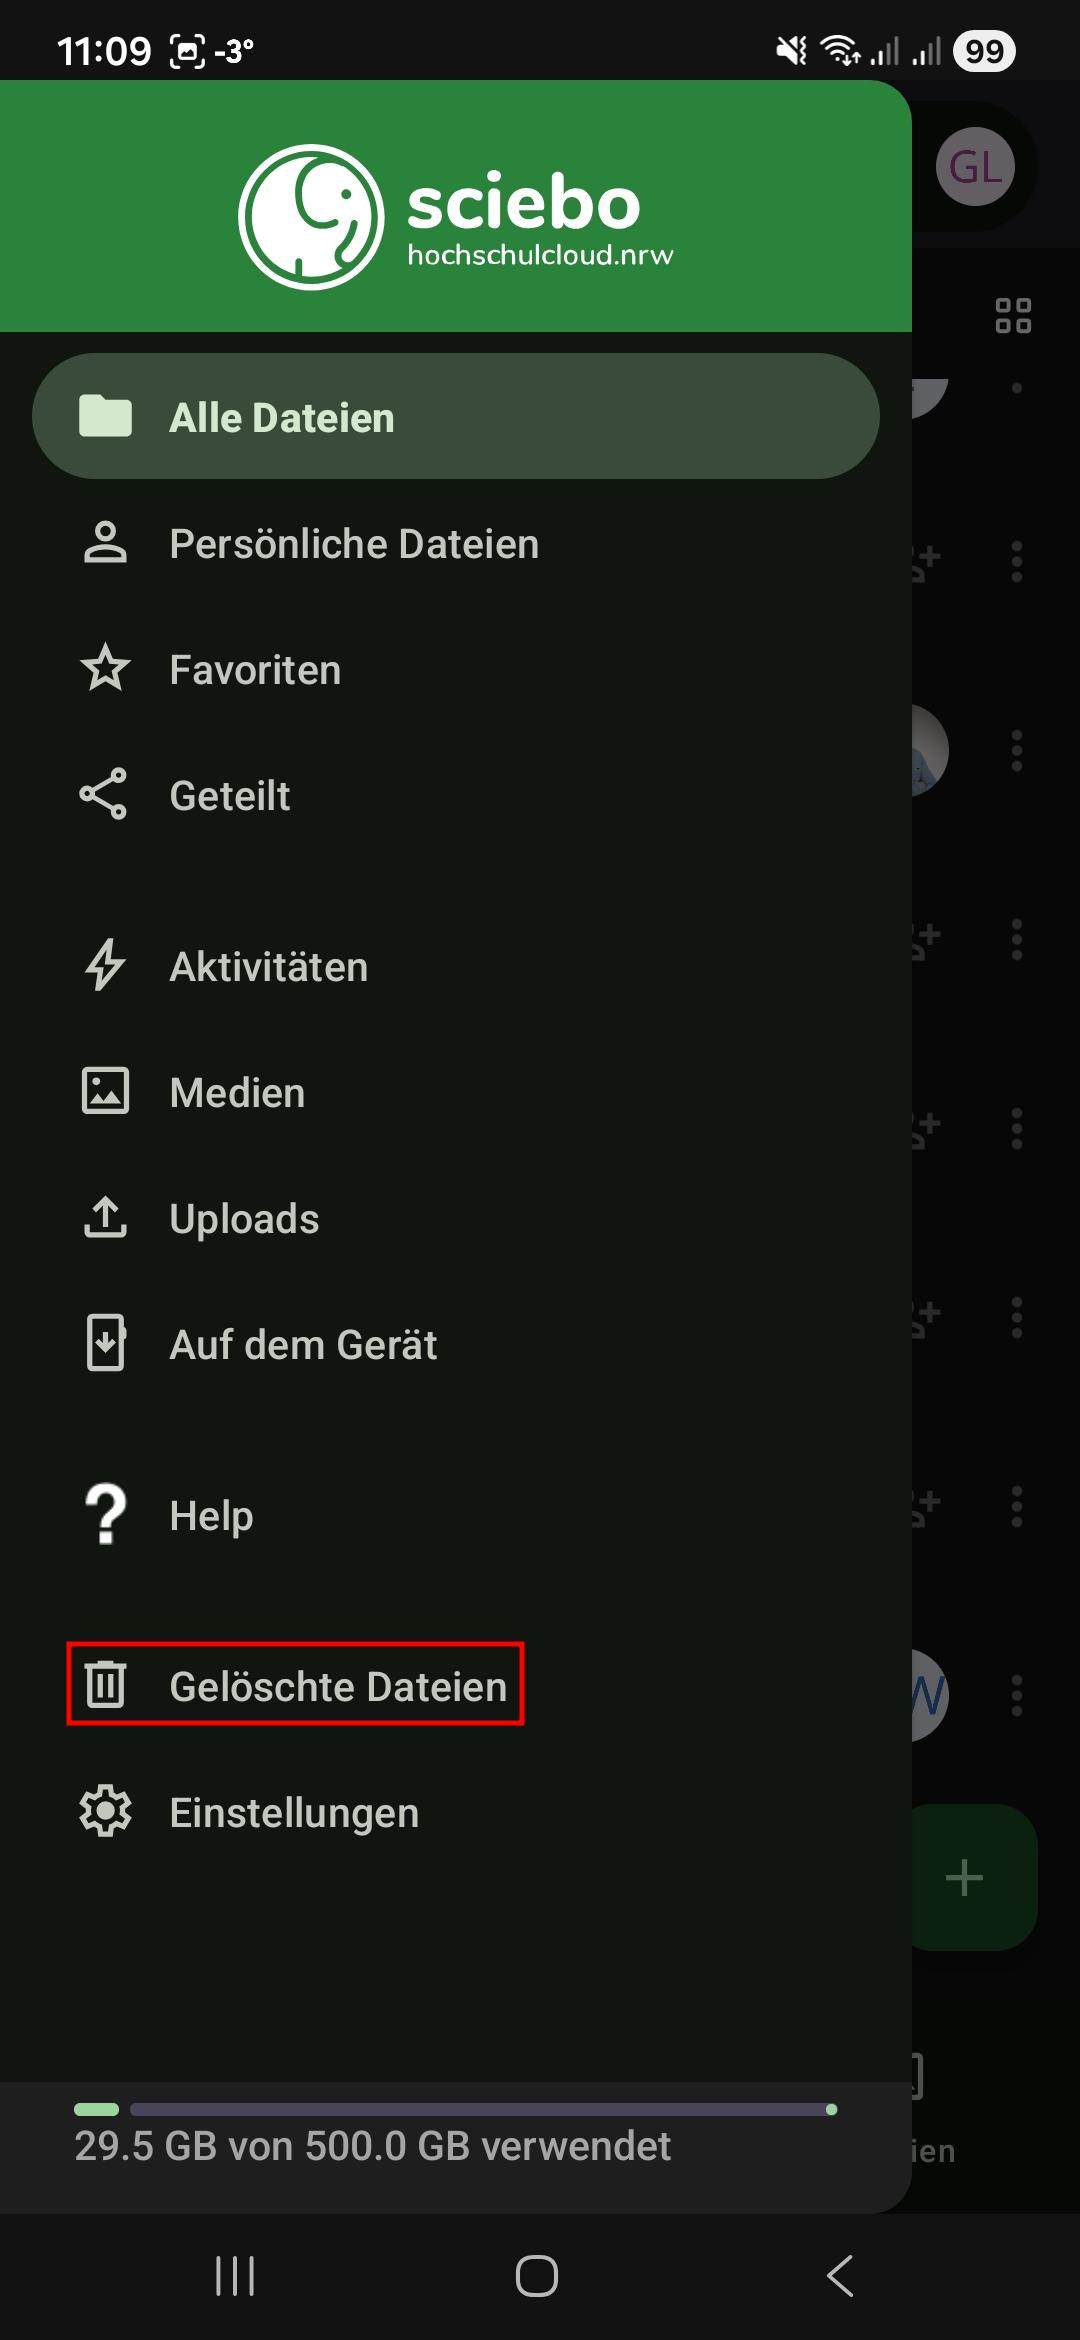
Deleted files/folders remain in your trash bin for at least 30 days before they are permanently deleted. You can view the trash bin under “Deleted files” in the left menu.
Delete Individual Files/Folders
Click on the three dots next to the file/folder and select “Delete file/folder”.
The file or folder is moved to the trash.
Delete Several Files/Folders
Select the files/folders you want to delete by checking the boxes on the file/folder icon.
Click on the three dots that appear in the top menu bar and select “Delete”.
The files/folders are moved to the trash.
Removing Files & Folders Shared with You
If you no longer need a file/folder that has been shared with you, you can delete the share. The file/folder is removed from your sciebo account, but remains with the owner.
Click on the three dots next to the file/folder and select “Leave this share”.
The file/folder is removed from your sciebo account. It is not moved to the deleted files to get it again; the person would need to reshare it with you.
Restoring Files & Folders
Restore Individual Files/Folders
Open the trash bin by clicking “Deleted Files” in the left menu.
Click on the “Restore” icon next to the file/folder you want to restore.
The file/folder will be restored to the location where it was last saved.
Restore Several Files/Folders
Open the trash bin by clicking “Deleted Files” in the left menu.
Select the files/folders you want to restore by checking the boxes on the file/folder icon.
Click on the “Restore” icon that appears in the top menu bar.
The files/folders will be restored to the location where they were last saved.
1.2.2 - Editing Files (Simultaneously)
Learn how to edit your files - even collaboratively!
Editing Files
Click on the file name to open the editor. Depending on the type of document (text, presentation or spreadsheet) you will be taken directly to the appropriate editor.
Edit the file. General information on how to use the editor can be found under “File > Help”. Changes are automatically saved temporarily.
To return to the file overview, click on the folder symbol in the upper menu bar of the editor. The file will be saved again.
Editing Files Simultaneously
In the web interface, you can edit files together with other sciebo users of your institution. The prerequisite is that
the file is shared with all of them and that the appropriate editing rights have been assigned. Simultaneous editing offers
simultaneous access to text, presentation and spreadsheet documents, a review function (visual marking of edited elements),
a comment function, and a chat function.
The number of users currently editing the document is displayed at the top right of the control bar. Click on the user symbol to find out the names of the persons editing the document.
Notes on Simultaneous Editing
Unfortunately, simultaneous editing is currently not possible with persons from other universities or guest accounts.
A co-edited document is only synchronised via the client when you close the editor.
Simultaneous editing may only be carried out via the web interface. Parallel editing via the desktop client leads to conflicts when saving.
The undo/redo function cannot be used.
1.2.3 - Further Functionality
More Sciebo usecases - What do the elements in the header mean?
In the header of the webinterface of Sciebo you can find different. Here you can find informormation on each of these apps.
Files
Here you can manage your files. Further information you can find here:
Here you can see the activity of your Sciebo-Account. The list of file changes is generated automatically.
Contacts
Here you can create and manage personal contancts.
Calendar
Add envents to this calandar. You can import calander data. If you are already using a digital calendar, it can usually export its calendar data. The file that is created in this way can be imported into the calendar app.
Notes
In the Notes app you can format and organise your thoughts with Markdown, a popular and simple rich text format.
Deck
Deck is a visual project management tool. For further information click here
Announcements
Here you can find important announcements from the sciebo-team.
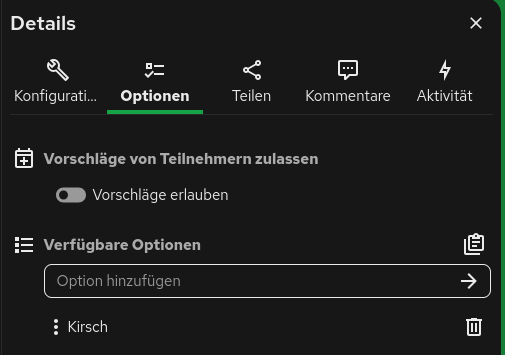
Polls
Create and share polls. For further information click here
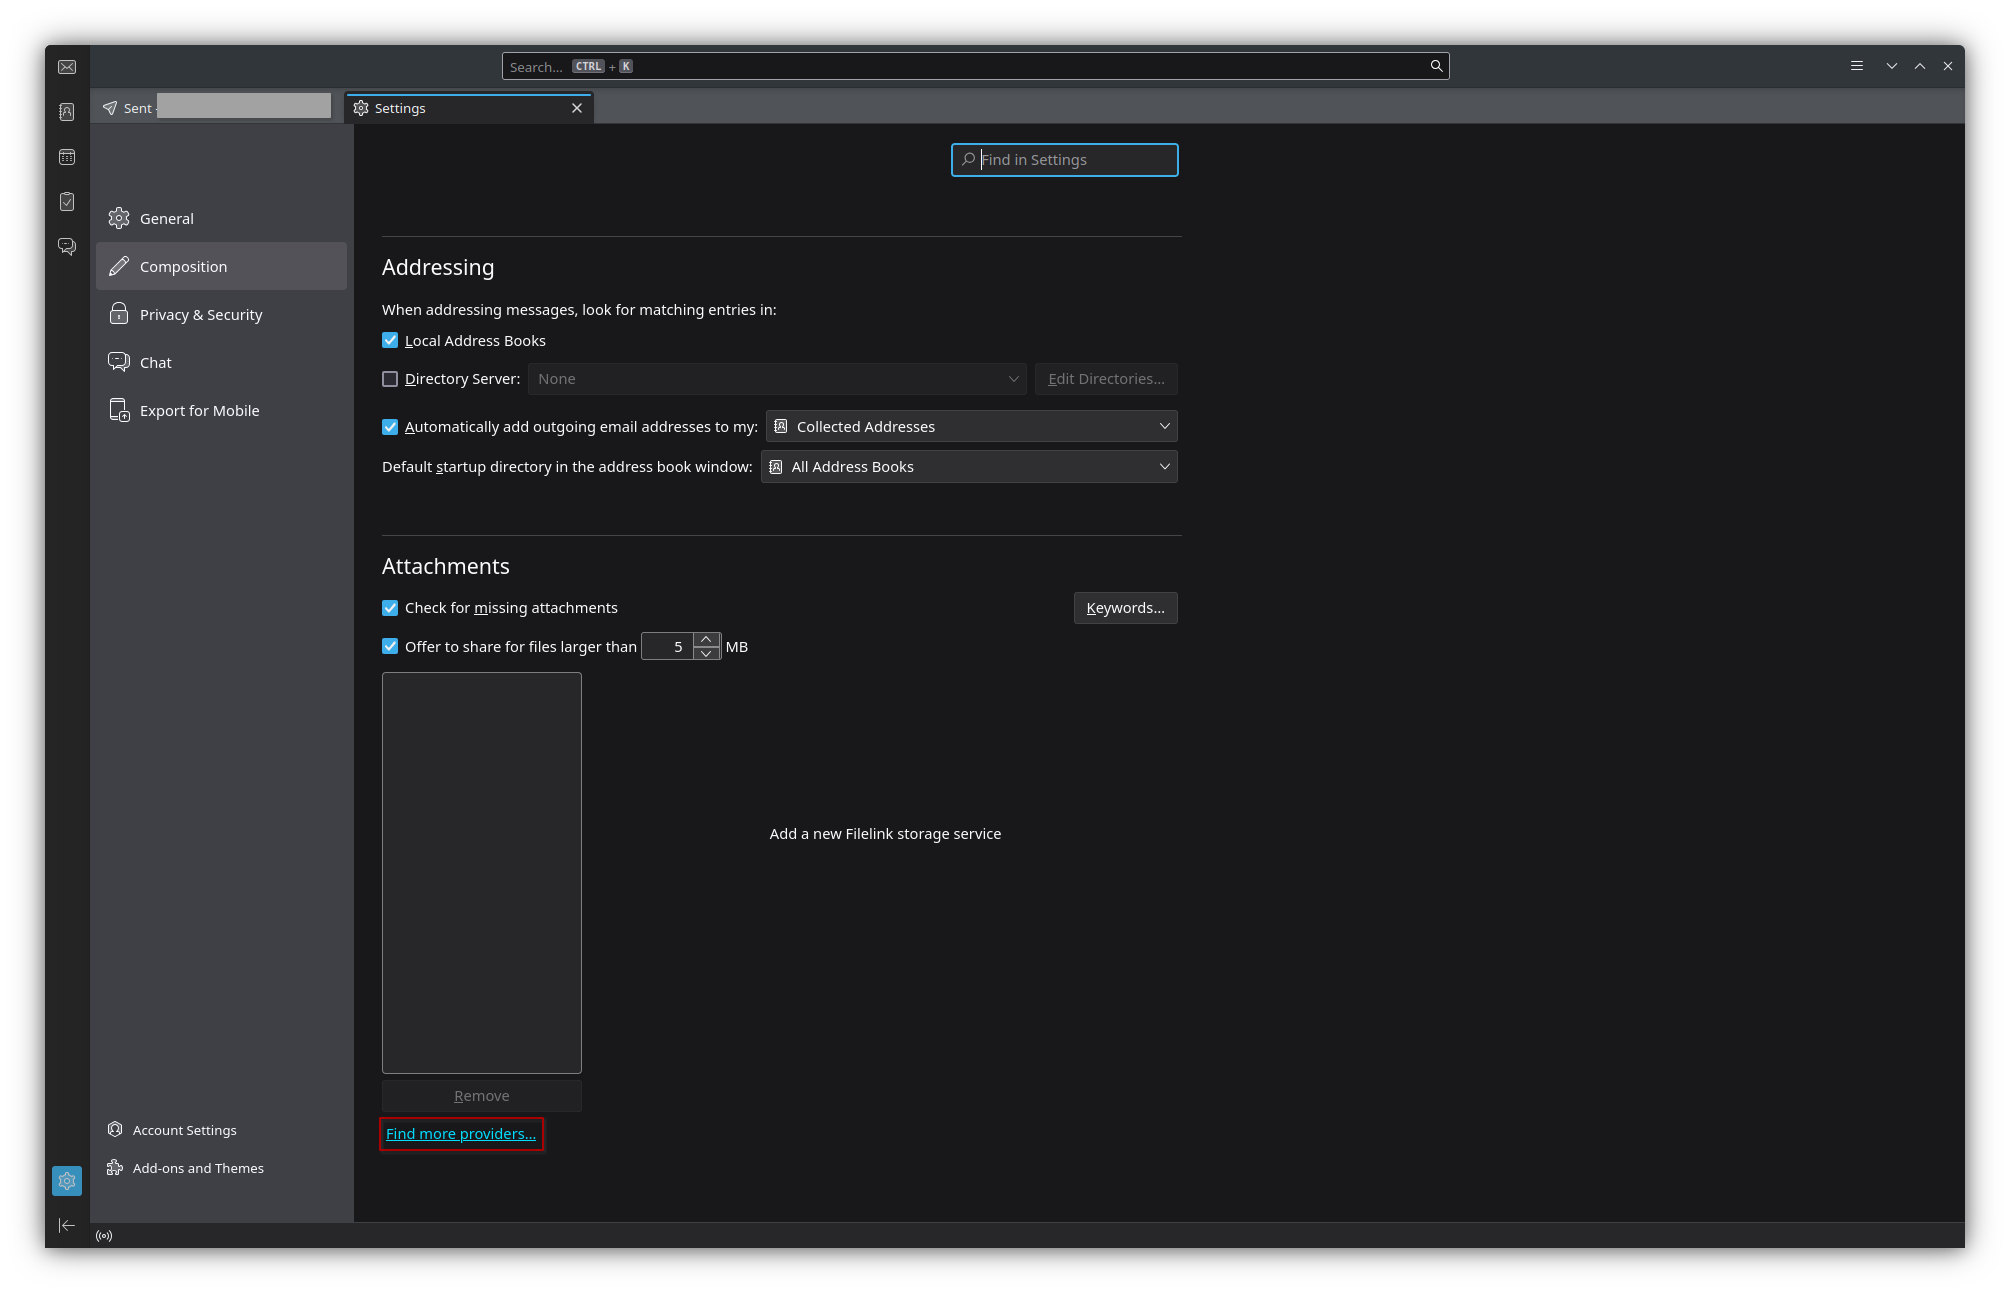
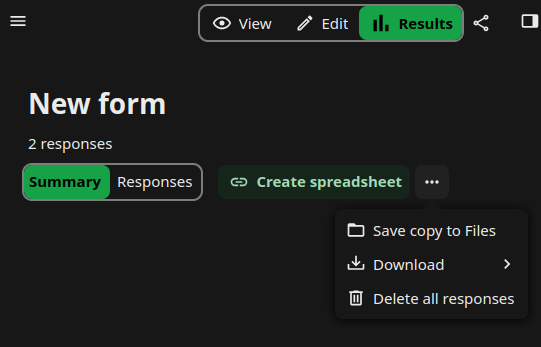
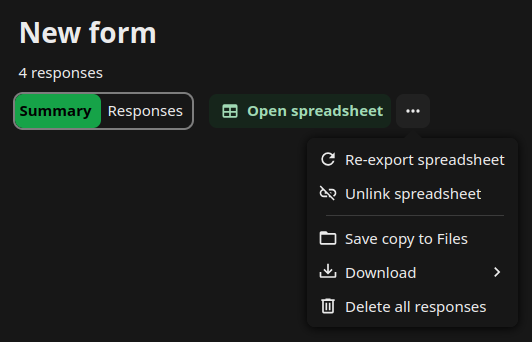
Forms
Create and share forms. Here you can create very intrecate forms and share them even with people that are not sciebo-users!
Help
Here you get to this page.
Tasks
Manage your todos in this application!
Overleaf
Sciebo hosts its own overleaf instance. For more information click here
1.2.4 - Organising Files and Folders
Learn how to organize and manage your files in the webinterface.
Creating, Renaming & Moving Files & Folders
Creating Files & Folders
Click on the “+ New” symbol in the upper menu bar.
Select “New folder” or the type of file you want to create.
Name the file or folder.
Press the Enter key. A new file or folder is created. (New files are opened directly in edit mode.)
Renaming Files & Folders
Click on the three dots next to the file and select “Rename”.
Enter a new name and press the Enter key.
Moving Files & Folders
Move Individual Files/Folders
Click on the three dots next to the file or folder you want to move and select “Move of Copy”.
In the opened window, select the folder to which the file should be moved and click on it.
Click on the “Move to …” button that appears at the bottom of the window. The file/folder is now inserted.
Move Several Files/Folders
Select the files/folders you want to move by checking the boxes on the corresponding icons.
Click on the “Move of copy” icon that appears in the top menu bar.
In the opened window, select the folder to which the file should be moved and click on it.
Click on the “Move to …” button that appears at the bottom of the window. The files/folders are now inserted.
Up- & Downloading Files & Folders
Uploading Files
Select “Upload files” under “+ New”.
Select one or more files and click “Open”. Alternatively, you can drag and drop the file(s) from your PC into the browser window.
The loading bar shows the upload progress.
Uploading Folders
Select “Upload folders” under “+ New”.
Select one or more folders and click “Open”. Alternatively, you can drag and drop the folder(s) from your PC into the browser window.
The loading bar shows the upload progress.
Downloading Files & Folders
Download Individual Files/Folders
Click on the three dots next to the file/folder and select “Download”.
Decide where the file/folder will be saved on your computer.
When saving folders, a zip file is created which you must unzip before opening.
Download Several Files/Folders
Select the files/folders you want to download by checking the boxes on the folder/file icon.
Click on the “Download” icon that appears in the top menu bar.
The download will be a zip file.
1.2.5 - Server List
List of universities and server URLs
List of Universities
Using the URLs from this list, you will gain access to the Sciebo web interface of your respective university.
Please use only your Sciebo-ID for login.
Notice: Since Nextcloud version V31, sharing content has been handled differently. The areas for sharing with users of the same institution are located
in the upper section, while the lower section is used for users of other higher education institutions and guests. Unfortunately, Nextcloud has deactivated
the address book search in the lower section. We currently cannot change this. Therefore, you need to search for the Federated Cloud ID here.
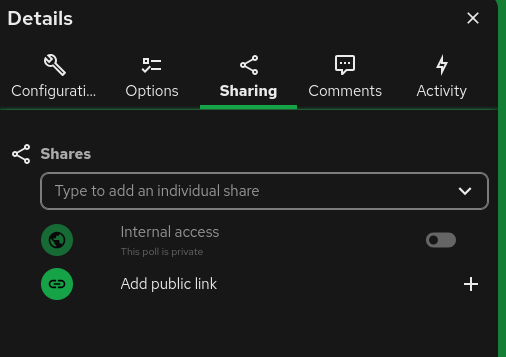
Sharing Files & Folders with Other Users
Sharing with Other Users
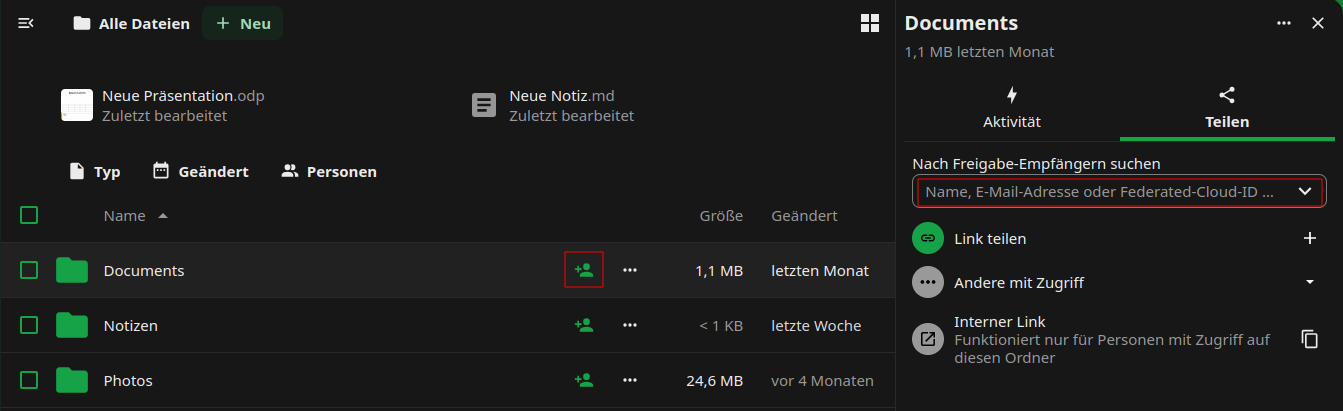
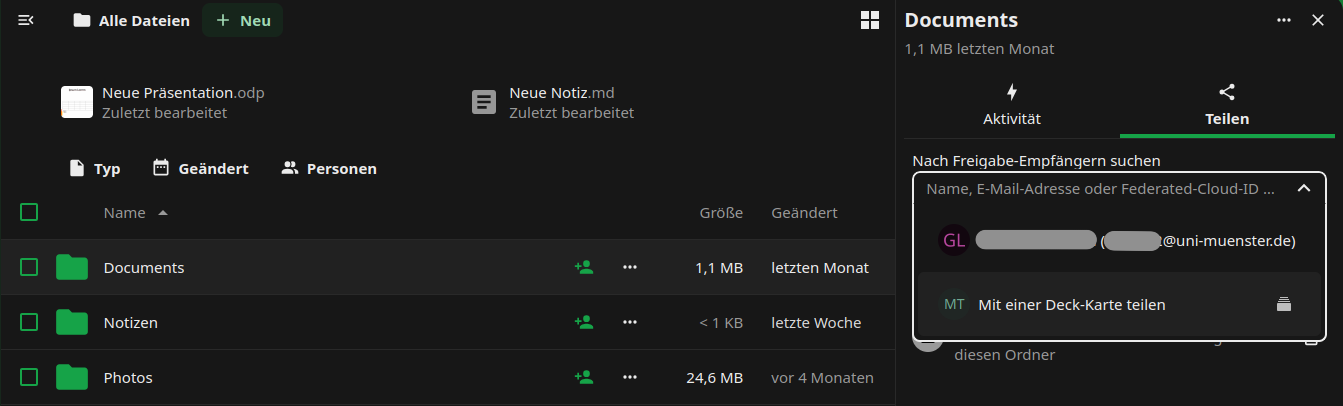
Click the head icon next to the item you want to share. You can share both, individual files and folders.
The share menu opens on the right.
In the text box, enter the name of the person with whom you wish to share your data, following the principle “last name, first name”. Select the person from the list that appears.
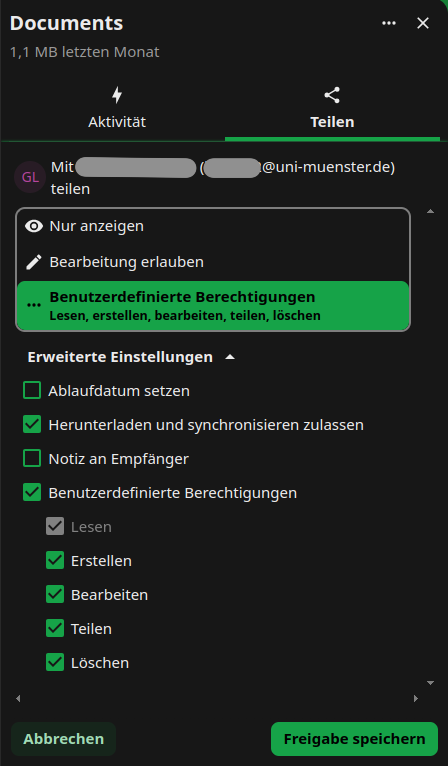
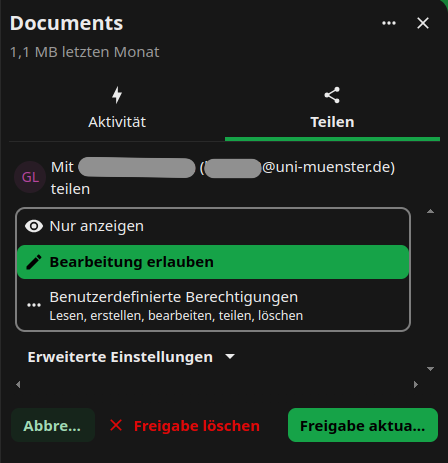
Decide what rights the person will have regarding the file or folder you shared. The write permissions include “create”, “edit” and “delete”. We recommend that you disable the sharing permission (“can share”). You can change the rights at any time.
You can delete the share by clicking on […] icon next to the person’s name and choose option “delete share”.
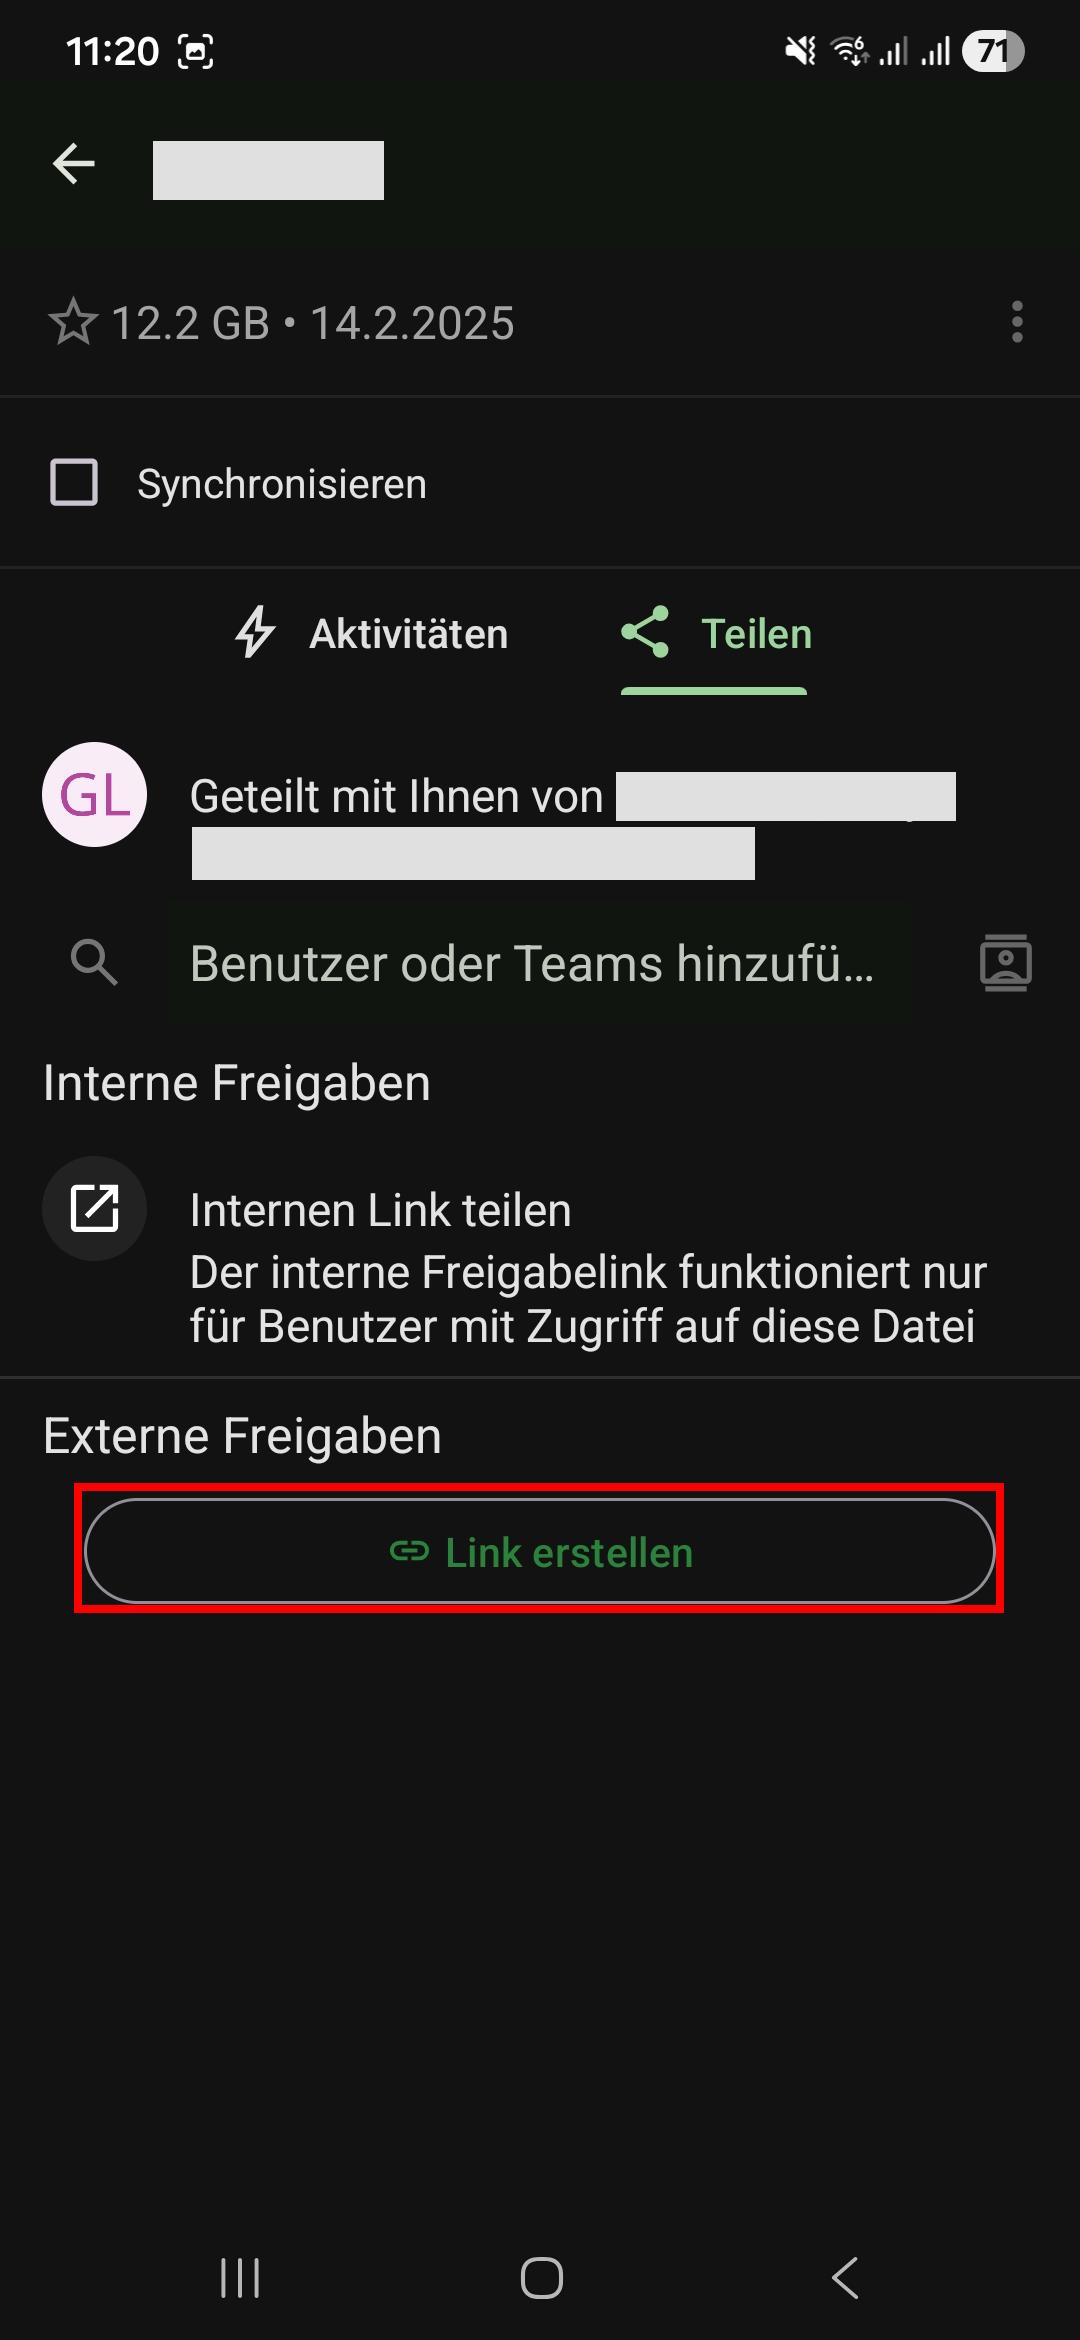
Sharing Files & Folders via Link
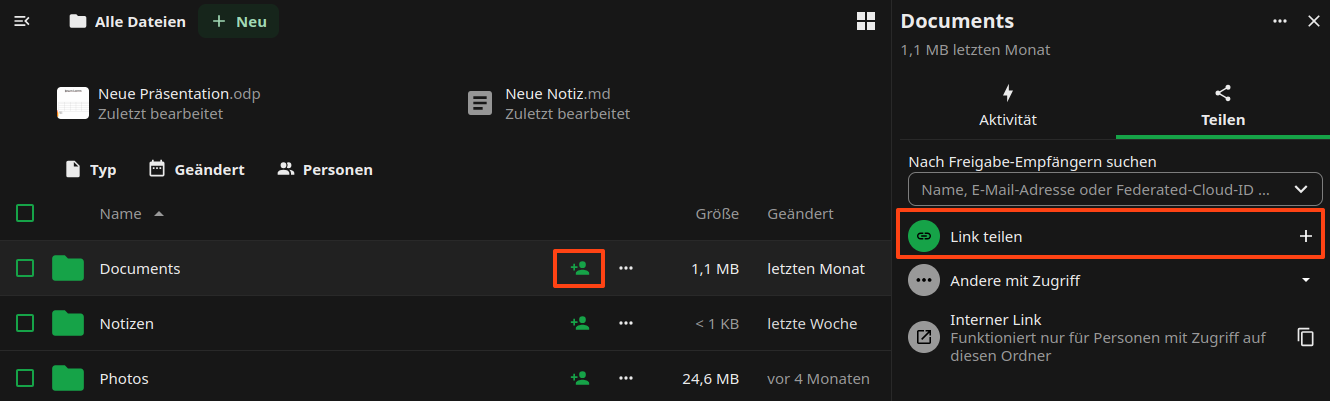
Sharing via Link
Click the head icon next to the item you want to share. You can share both individual files and folders.
The share menu opens on the right.
Click on the “+” symbol near “Public Links” this would create a public link.
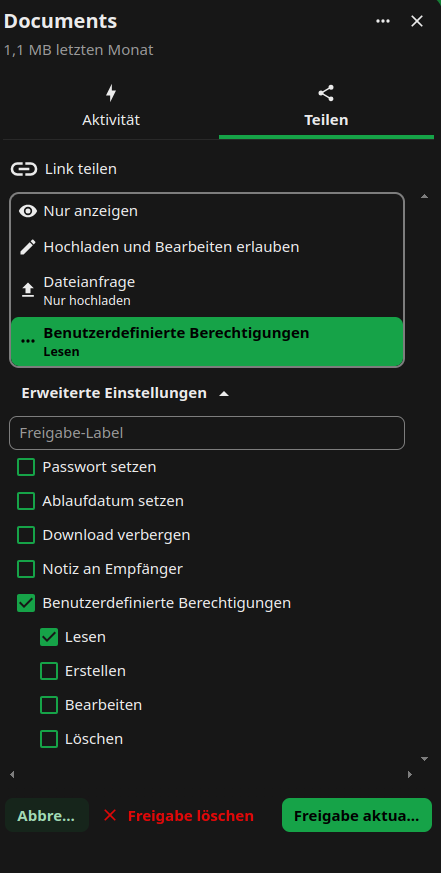
Decide which permissions people who access the file or folder via the link will have. Click on […] on symbol, choose
the “Customize link” option, update the relevant permissions and approve by clicking “update share link”.
Optional: Set a password to protect your data from unauthorised access.
Optional: Set an expiry date to protect your data from unauthorised access.
Adding Files & Folders Shared by Link
If other users share data with you via link, you can add the shared files/folders to your own sciebo account.
Open the link and, if necessary, enter the password with which the link is protected.
Click on […]-Symbol.
Enter your sciebo-ID with the server address (e.g. user1@instance.de@instance.sciebo.de) in the “Hinfpgen zu Ihrer Nextcloud” input field and click on the arrow to the right of the field.
You will be forwarded to the sciebo login page. Log in with your sciebo identification.
The link is now displayed as “Remote Sharing” in a pop-up window. You may need to re-enter the password that protects the link. Then confirm the receipt by clicking on “Accept”.
The files/folders will now be added to your account.
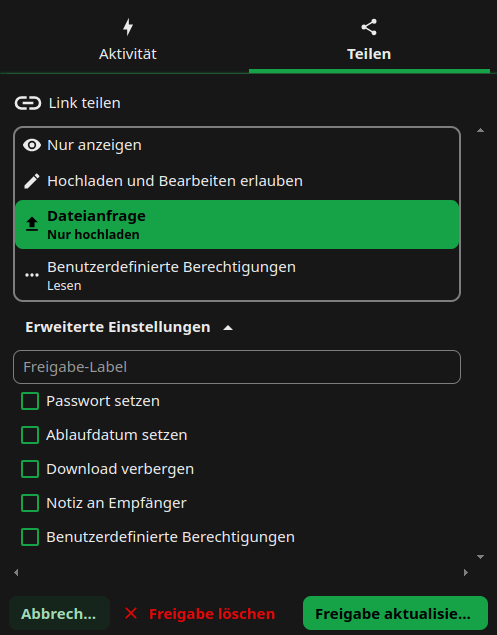
Receive Files & Folders via Link (file drop)
If you need to receive large files from external sources, you can create a “file drop” for this purpose.
Create a new folder.
Click on the header icon next to the directory where the files are to be uploaded.
The share menu opens on the right.
Click on the “+” symbol near “Public Links” this would create a public link.
Click on […] and choose the “Customize link” option, in the opened window choose the “File request/Upload only” option,
update the relevant permissions and approve by clicking “update share link”.
Optional: Set a password to protect the folder from unauthorised uploads.
Optional: Set an expiry date to protect the folder from unauthorised access.
please notice:
If you want to share large files or folders with people that are not in your institution, the synchronisation can be quite slow, because the files need to be transferred.
Within the same institution, this approach is not recommended, as it also creates an external share (remote share) which does not work as reliably as a direct user-to-user share within an institution.
1.3 - Client
Learn how to synchronize files on your computer with sciebo.
Download
More information on downloading the client application can be found here!
The desktop client is a program that allows you to store your data from the cloud locally on your computer or laptop.
The client runs in the background and automatically synchronises your data so that you always have the latest version
of a file available on all devices.
1.3.1 - Installation and configuration of the client
After a successful download, open the installation file.
Confirm that you want to run the file by clicking on “OK”. The setup wizard appears.
Click on “Next” to make the installation settings.
If you do not want to install sciebo at the suggested location, select the folder for the installation now. Otherwise, click directly on “Next”.
Click on “Install.” You may have to confirm that the software may be installed on your PC. Sciebo will then be installed.
Click on “Finish” to close the setup wizard.
Finally, you will be asked whether you want to restart your PC immediately or later so that sciebo works properly. Select the desired option. After restarting, you can set up your folder synchronisation (see below).
After successful download give AppImage permission to run by opening the terminal and entering
chmod u+x Sciebo-Linux64-VERSION.
Start the client by typing ./Sciebo-Linux64-VERSION in the terminal. Configure the client. During the configuration,
the Client will be added into autoload and by next restart would start automatically.
Configuration
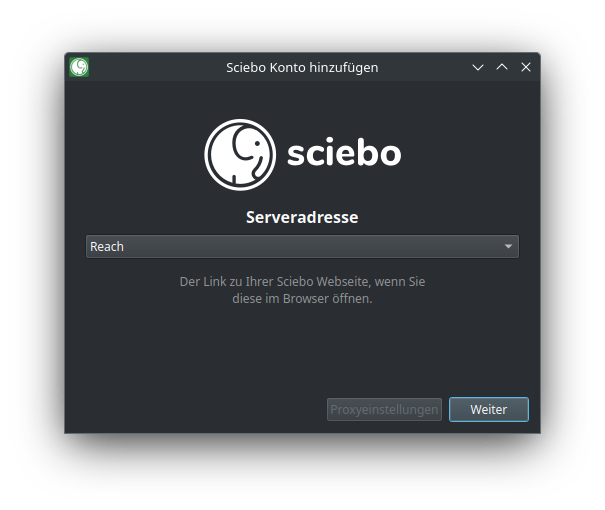
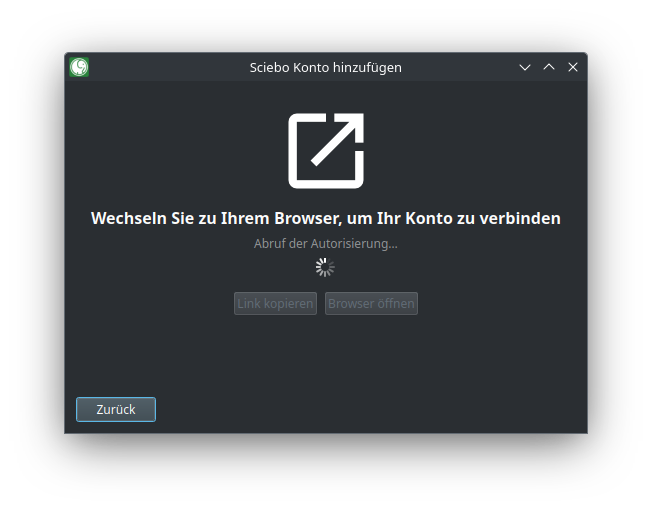
Open the client. The connection wizard appears.
Select your sciebo institution from the list.
A browser will open and you will be asked to log in and allow the client to access your data.
By default, your entire sciebo directory is synchronised. For folders larger than 500 MB, you must manually confirm
synchronisation for the first time. However, you can also change the limit or deactivate this function. (If you do not want
to synchronise your entire sciebo directory, you can decide which subfolders are synchronised under “Select elements to be synchronised”).
Select a destination folder on your PC. (This folder will be synchronised with your sciebo directory, i.e. the data
you selected from sciebo will be saved here, and files and folders newly created in this folder will be uploaded to sciebo).
Click on “Connect…”
Hinweis
If you want to synchronize different subfolders with different destination
folders, start with the first subfolder. You can add additional folder synchronizations later via the client.
1.3.2 - Client Settings
Learn about the basic client settings.
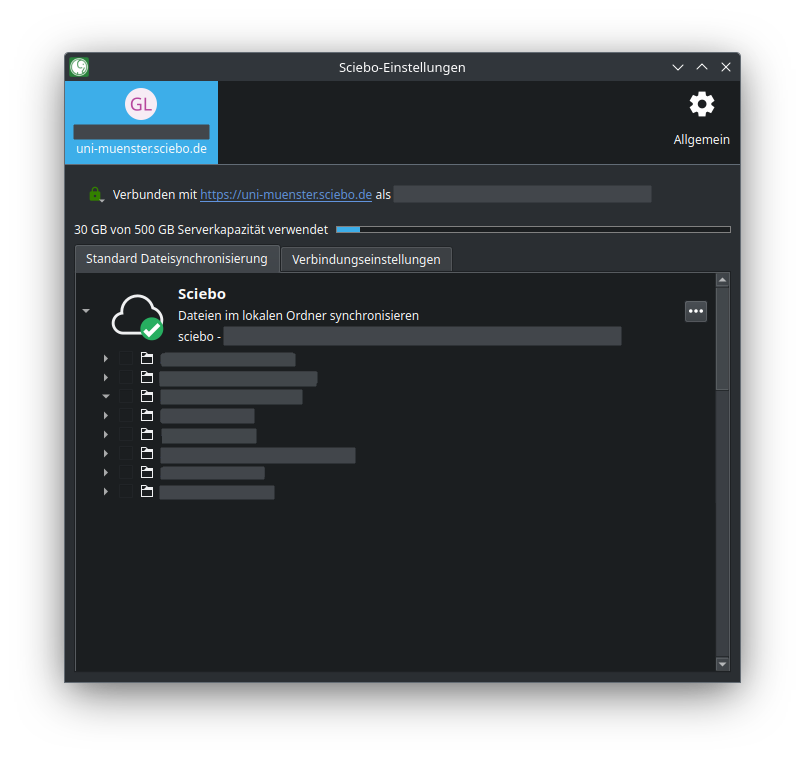
User Account
Under the tab with your sciebo ID, you will get an overview of
the storage space is available to you in sciebo and the share you already use,
all folder synchronisations (if you synchronise your entire sciebo folder with a single destination folder, you will only see a single folder synchronisation),
for each folder synchronisation, all folders and subfolders that are synchronised on your PC.
You can make synchronisation settings here.
Settings
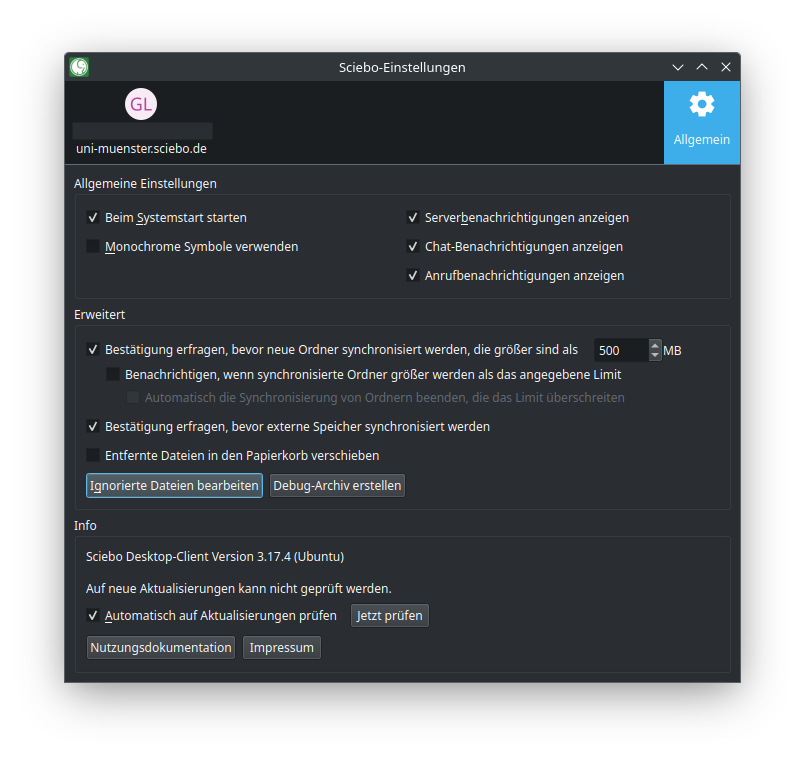
Under the “General” tab, the version of the sciebo client you are using is displayed. You can also specify.
whether the sciebo client should be started when you switch on your PC,
whether you want to receive desktop notifications,
whether the synchronisation of large folders has to be confirmed and if so, from which size limit,
whether synchronisation of external storage needs to be confirmed,
whether sciebo client should check if there are updates available.
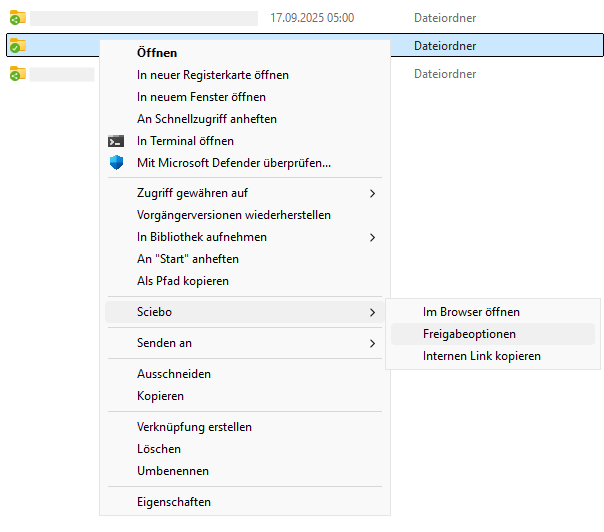
1.3.3 - Share files and folders
Learn how to share files using sciebo client.
Sharing with Other Users
Open your local sciebo folder.
Open the context menu for the file or folder you want to share. Select “sciebo” and then “Share options”.
A new window opens. In the field “Search for users or groups”, enter the name of the desired user according to the scheme “last name, first name”.
Select the person from the list.
Determine which rights the person receives by clicking on […] near person/group name and setting or removing the corresponding ticks.
Close the menu.
You can check at any time with which persons and groups a file or folder has been shared by calling up the share menu
again. There you will find a corresponding list where you can manage editing rights and delete shares.
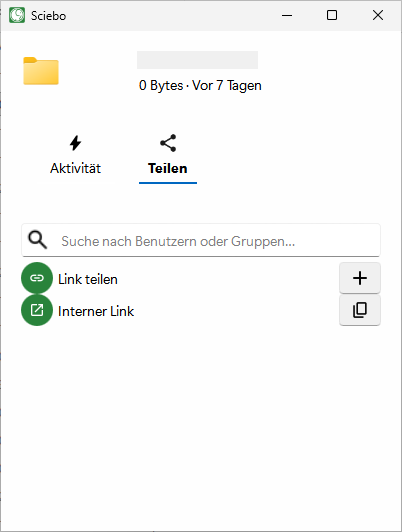
Sharing by Link
Open your local sciebo folder.
Open the context menu for the file or folder you want to share. Select “sciebo” and then “Share options”.
The share menu opens in a new window. Click the plus sign near “Share Link”.
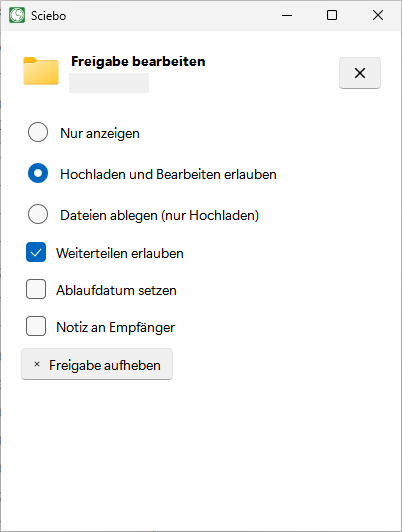
Decide which rights people who access the file or folder via the link will have by clicking on […] near “Share Link”
and setting or removing the corresponding ticks. The following options are available:
View only
Allow upload and editing
File drop (Upload only)
Hide download
Optional: Set a password to protect your data from unauthorised access.
Optional: Set an expiration date to protect your data from unauthorised access.
Optional: Give the link a different name. By default, the new link is called “Public Link”.
The options are saved automatically. As you are done, close the menu.
Click on the copy sign next to the new link to copy it to the clipboard and send it by e-mail, for example.
Close the menu.
You can check at any time whether a file or folder has been shared by link by calling up the share menu again.
There you will find a corresponding list where you can manage and delete associated links.
1.3.4 - Synchronisation Settings
Learn how to configure and edit client synchronization.
The sciebo desktop client allows you to synchronise your sciebo directory (to various local folders) on your computer.
You determine which data is synchronised and which is not. This is especially useful if you use your sciebo account on
different computers or for different purposes. For example, employees can synchronise only data for teaching on their
laptop and all data on their desktop PC.
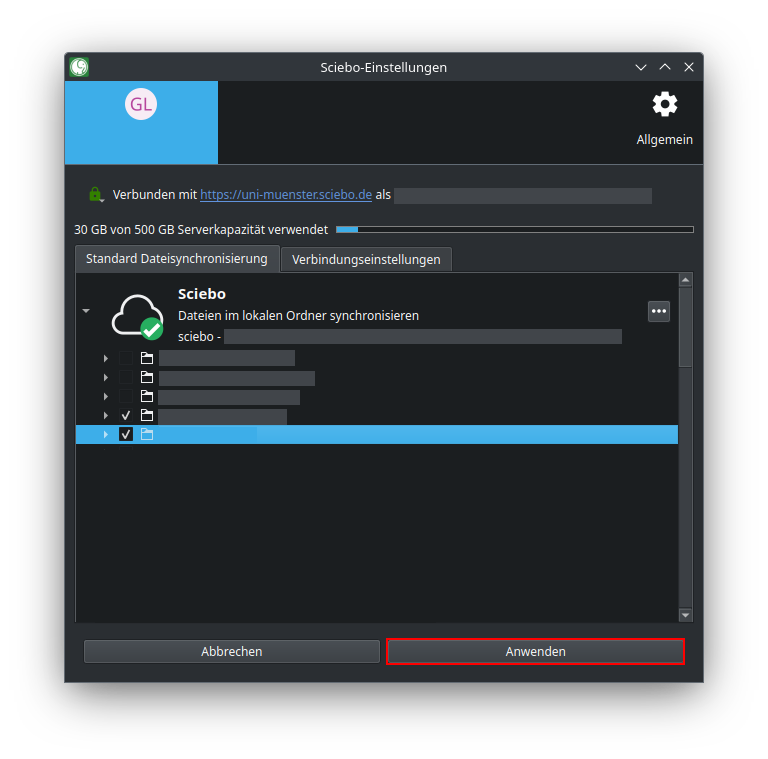
Setting Up Further Folder Synchronisations
If you want to synchronise different subfolders with different destination folders, you can set this up in the client.
Open the client. The tab with your user ID is displayed. (If you have already created an initial folder synchronisation when setting up the client, it will be displayed here).
Click on “Add folder synchronisation”.
Select the destination folder and click “Next”.
Select the sciebo folder you want to synchronise and click on “Next”.
Click on “Add synchronisation”.
The new folder synchronisation is now displayed in the overview and the synchronisation process starts.
Stop Synchronisation of Individual Subfolders
In the client you have the option to exclude individual subfolders that you have synchronised so far from synchronisation and thus remove them from your PC. As these folders remain in sciebo, you can select and synchronise these folders again at any time.
Open the client. The tab with your user ID is displayed.
Click on the small arrow next to the folder synchronisation to show the subfolders.
Untick the subfolders that you no longer want to synchronise.
Click on “Apply”.
Synchronising Large Folders
Subfolders that exceed a size of 500 MB are not automatically synchronised. In the client, these folders are highlighted with a red font colour. If you want to synchronise them, you must manually confirm the synchronisation once. (You can adjust the size limit or deactivate this setting in the client settings.)
Open the client. The tab with your user ID is displayed.
Click on the small arrow next to the folder synchronisation to show the subfolders.
Tick the box of the folder concerned.
Click on “Apply manual changes”.
Pausing Synchronisation
You can pause folder synchronisation in the client, e.g. if you do not want your Internet connection to be burdened by the synchronisation of data temporarily.
Open the client. The tab with your user ID is displayed.
Click on the three dots next to the folder synchronisation you want to pause. (If you synchronise your entire sciebo directory with a single destination folder, only one folder synchronisation will be visible).
Click on “Pause synchronisation”.
To continue synchronisation at a later time, you must repeat the same steps, but click on “Continue synchronisation” in the last step.
Removing Synchronisation
In the client, you can remove existing folder synchronisations, e.g. if you no longer need a folder synchronisation or want to restructure the synchronisation.
Open the client. The tab with your user ID is displayed.
Click on the three dots next to the folder synchronisation you want to remove. (If you synchronise your entire sciebo directory with a single destination folder, only one folder synchronisation will be visible).
Click on “Remove folder synchronisation”.
A new window opens in which you must click again on “Remove folder synchronisation”. The folder synchronisation is then deleted.
1.3.5 - Client-Status-Icons
Learn the meaning of the desktop client’s icons.
The desktop client uses icons in various locations to indicate the current status. This can be very
helpful when troubleshooting. Therefore, if an icon appears that suggests a problem, you should select
the “Open Sciebo Desktop” option from the context menu in the taskbar to see if any corresponding error
messages are displayed.
The Meaning of the Most Important Icons
Location
Icon
Meaning
settings
everyting is fine
settings
sync in progress
settings
sync paused
settings
error occured
system tray
everything is fine
system tray
sync in progress
system tray
sync paused
system tray
initialisation or error
system tray
error occured
Tip: In Windows, the icon is often hidden from the taskbar. You can adjust this setting
under Personalization => Taskbar => Other taskbar icons.
1.4 - Android App
Learn how to synchronize files on your phone with sciebo.
The mobile app is ideal for viewing and sharing files on the go. You can upload, delete, and move files
(e.g., photos). However, since mobile devices usually have limited storage space,
your data is not automatically downloaded. A file is only saved on your device
when you manually access it.
1.4.1 - Android App install anc configure
Setup
Download the sciebo app from the Play Store or from our download page and open it.
Select the server name of your institution. You will be redirected to the login page. Click on “Login”.
Click on “Authorize” to grant the sciebo app access to your sciebo account.
1.4.2 - Delete and recover files & folders
Deleting Files & Folders Locally
Tap the three dots next to the file or folder to open the context menu.
Select the “Delete” option.
Click the “Locally only” button to delete the file or folder from your phone. The file or folder will now only be deleted locally and will not be removed from the sciebo server.
Deleting Files & Folders
Tap the three dots next to the file or folder to open the context menu.
Select the “Delete” option.
Click the “Delete” button to delete the file or folder from your sciebo account. The file or folder will now be moved to the trash.
Restoring Files & Folders
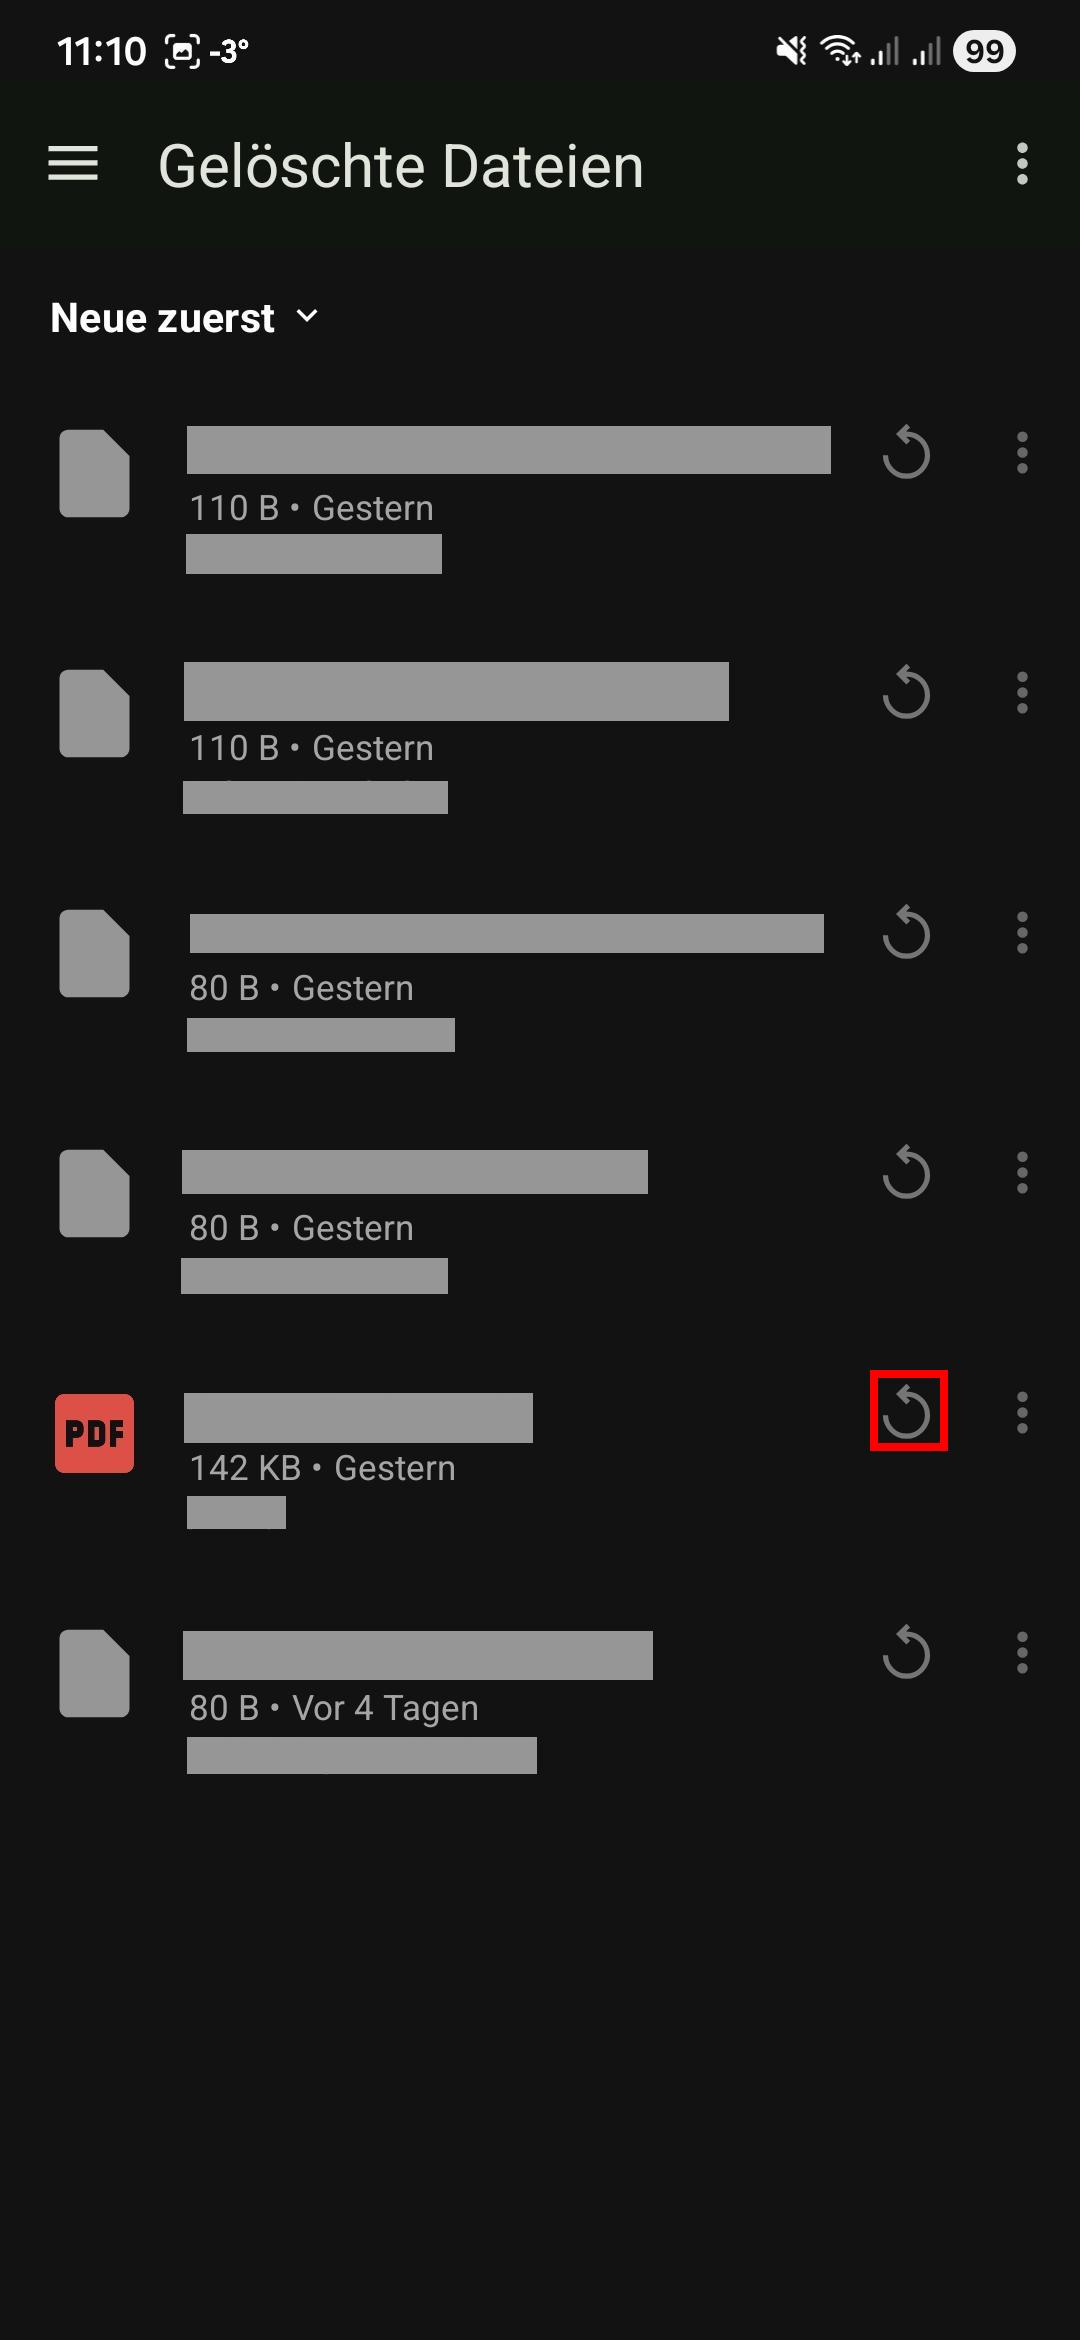
Restoring individual files/folders
Click on the three lines at the top left.
Select the “Deleted files” option from the menu.
Click the “Restore” icon next to the file or folder you want to restore.
The file or folder will be restored to the location where it was last saved.
1.4.3 - Create, rename, and move
In the sciebo app, you can create new folders as well as rename and move files and folders.
Creating Files & Folders
Select the folder in which you want to create the new folder.
Tap the “+” button at the bottom right. It opens the context menu.
Tap the menu “New folder” entry.
Name the folder.
Tap on “Create”. A new folder is created.
Renaming Files & Folders
Tap on tree dots next to the file or folder you want to rename. It opens the context menu.
Select “Rename”.
Enter a new name.
Tap “Rename”.
Moving Files & Folders
Tap on tree dots next to the file or folder you want to move. It opens the context menu.
Select “Move or copy”. This takes you to the top folder level.
Select the folder to which you want to move the file or folder.
Tap “Move” in the bottom menu bar to move the file or folder.
1.4.4 - Share files & folders
Sharing with Other Users
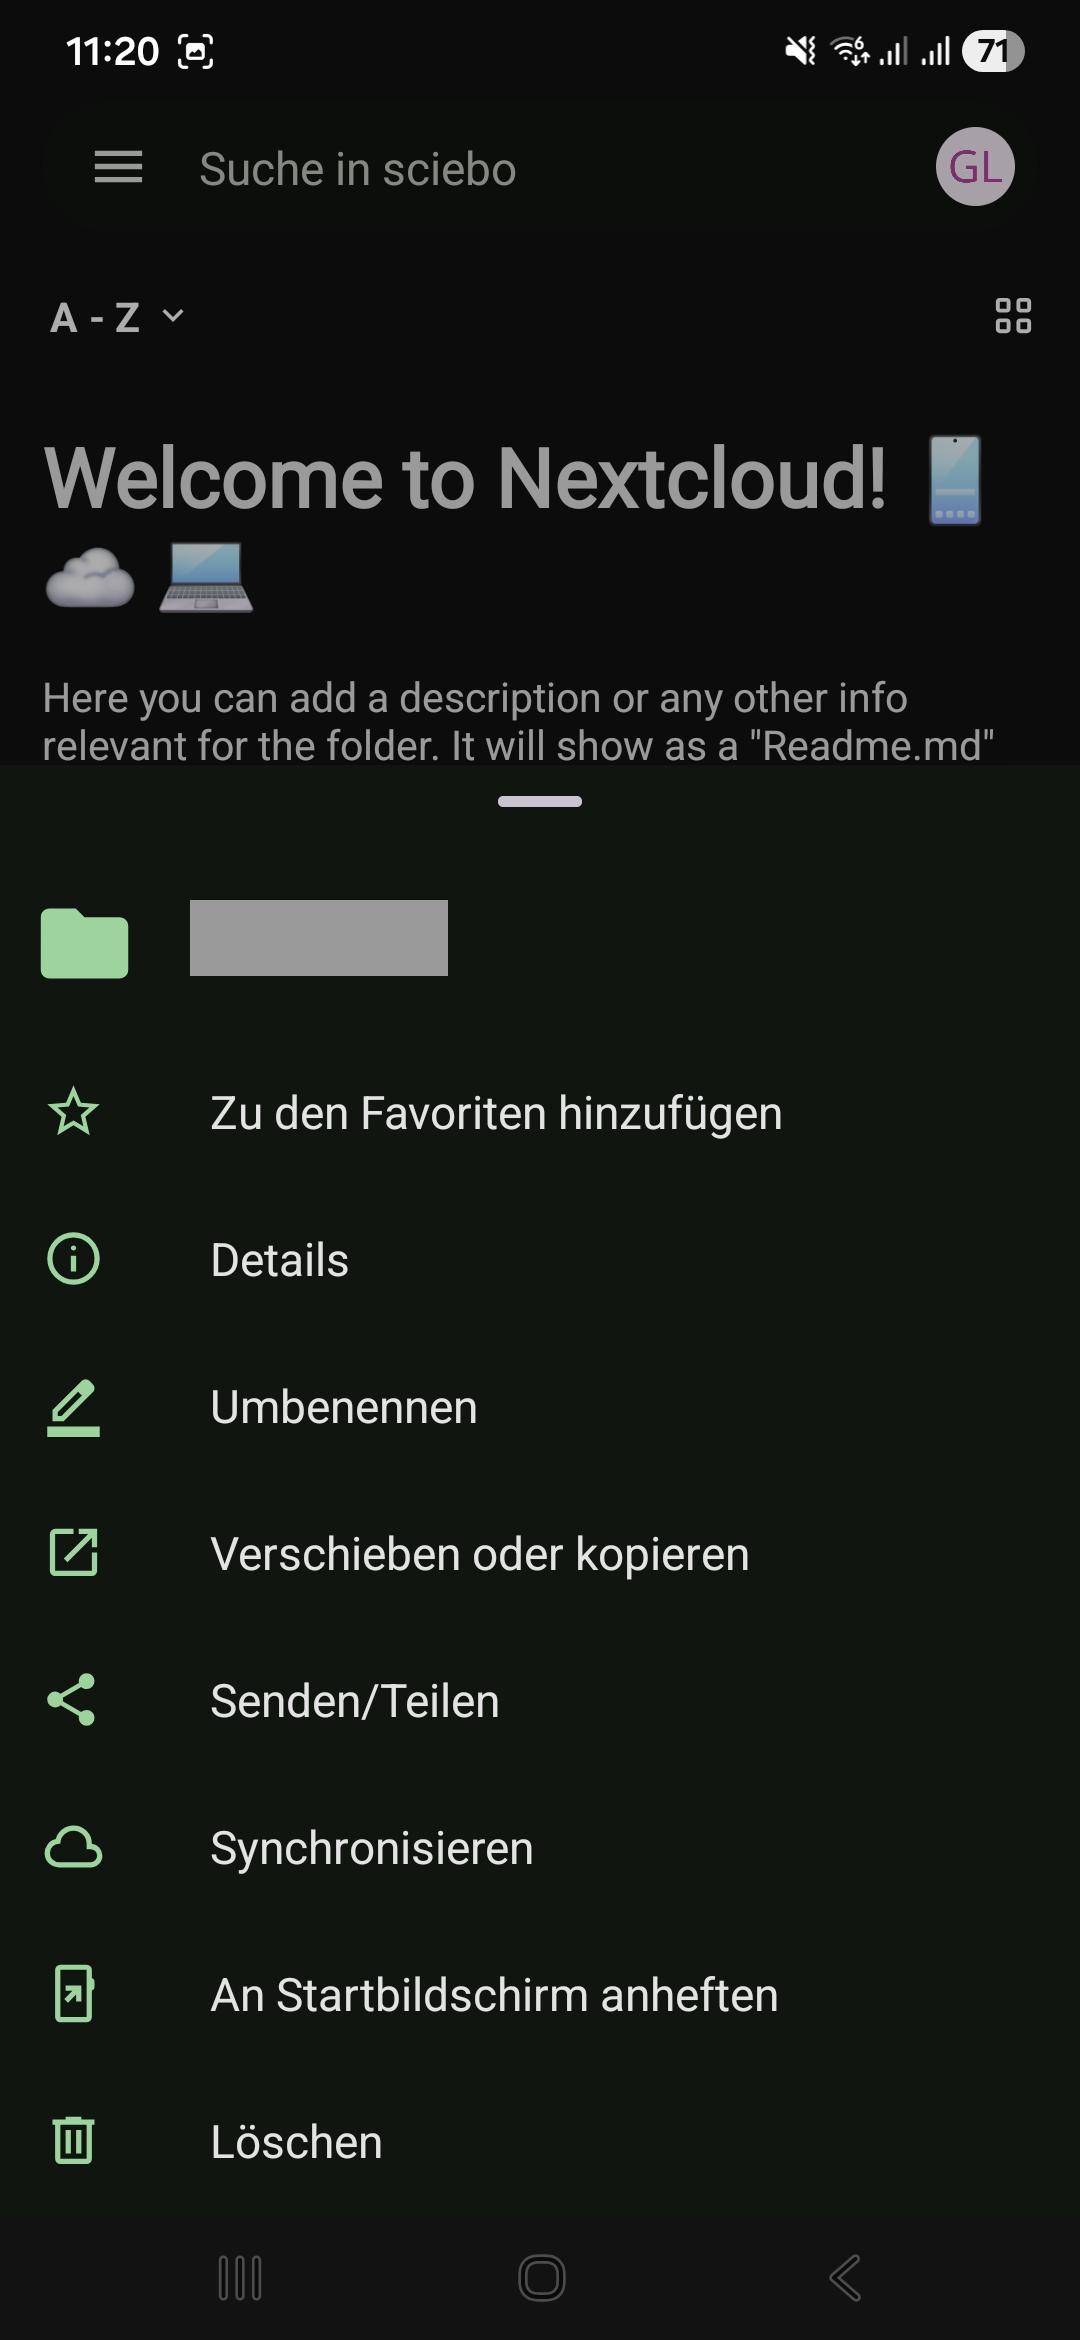
Tap the three dots next to the file or folder to open the context menu.
Tap the “Send/Share” menu entry.
Tap the “Share” button.
Enter the name of the desired user in the format “Last Name, First Name” into the “Add user or teams” field.
Set the person’s editing rights. Adjust the rights as needed. Click “Next”.
Close the sharing menu by tapping the arrow in the upper menu bar.
You can see which people and groups a file or folder has been shared with at any time by calling up the sharing menu again. There you will find a corresponding list in which you can also manage editing rights and delete shares.
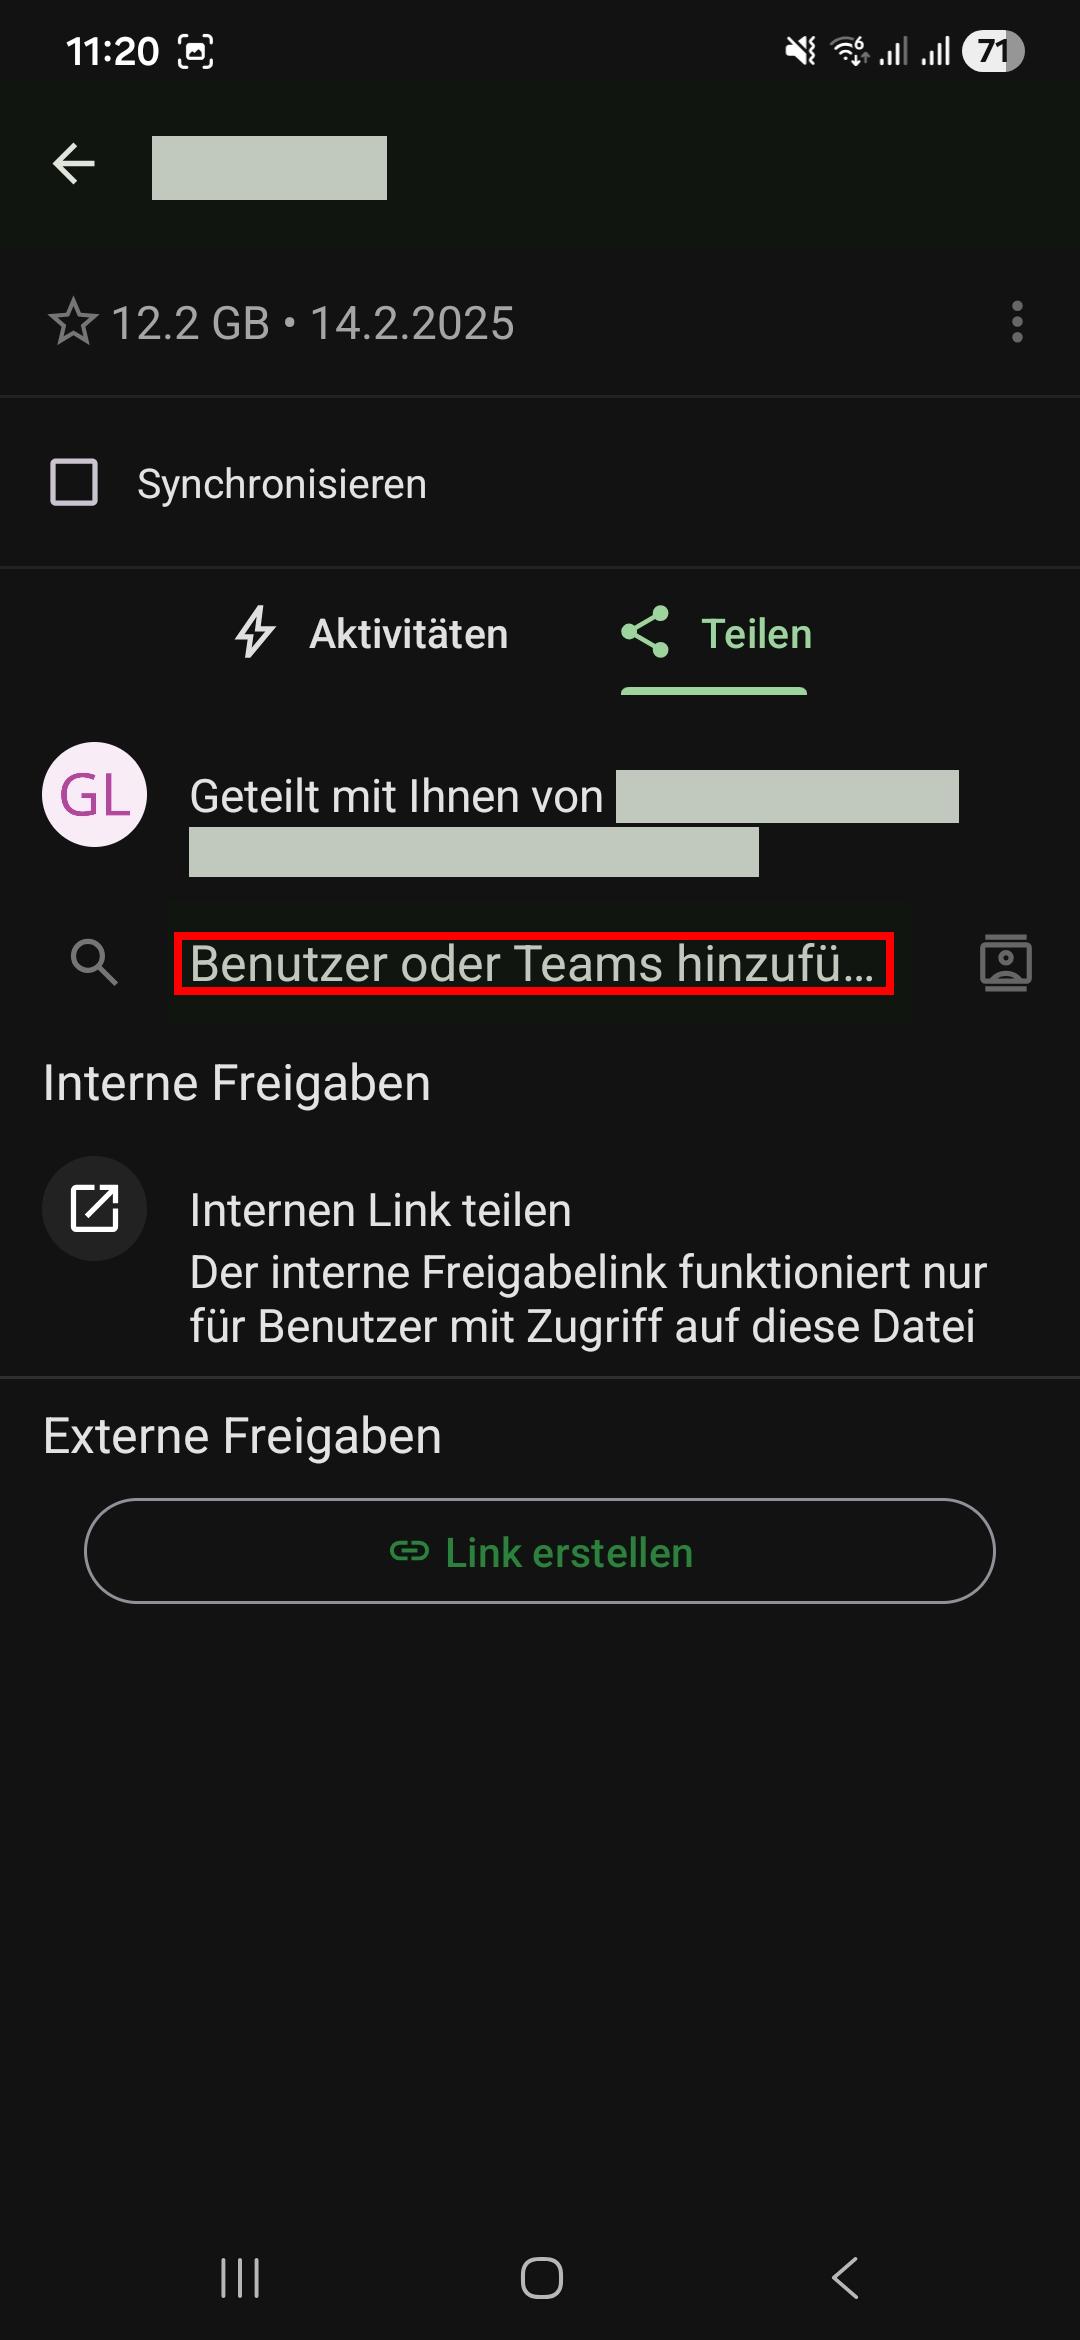
Sharing via Link
Tap the three dots next to the file or folder to open the context menu.
Tap the “Send/Share” menu entry.
Tap the “Share” button.
Tap the “Create link” button. A link will be created.
Adjust the editing rights by tapping the three-dot icon next to the link and selecting “Settings”.
Optional: Change the name of the link.
Optional: Set a password to protect your data from unauthorized access.
Optional: Set an expiration date to protect your data from unauthorized access.
Tap “Share and copy link”.
Close the sharing menu by tapping the arrow in the upper menu bar.
1.4.5 - Upload and download
Upload and download photo and video files easily via the sciebo app.
Uploading Files
Select the folder where you want to upload the file(s).
Tap the “+” button at the bottom right. Two new buttons appear.
Tap the button with the “Upload” symbol.
Select “Files”. (You may now have to confirm that sciebo is allowed to access your photos/videos. The option “Allow access to all photos” is particularly uncomplicated. However, you can also restrict access to certain photos/videos via “Select photos…”).
Select the desired file(s) and tap on “Select”. The files will now be uploaded to the sciebo server.
Downloading Files & Folders
Tap the file or folder you want to download with your finger for a moment to select it.
Tap the “download” symbol in the upper menu bar. The file or folder is now saved locally on your device. Downloaded items are marked in the app with a small green circle with a white “download” symbol.
Note: If you want to delete downloaded data locally, select the file or folder again and tap on the three dots in the upper menu bar. Select “Delete” and then “Local only”. The file remains in sciebo, but no longer takes up space on your device.
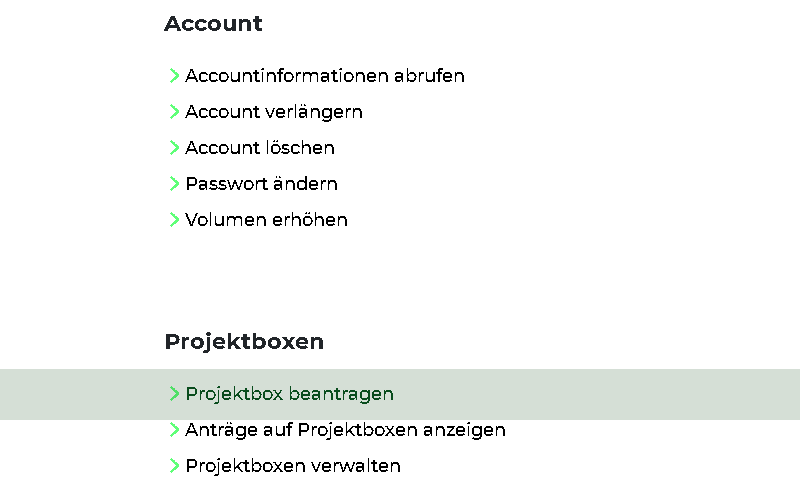
1.5 - Create and manage project boxes
Here you can learn how to create and manage project boxes.
In this brief HOW-TO, we will take you through the steps of applying for a Project Box and setting it up so that you can
actually work with the files stored in the Project Box using your private Sciebo account.
Apply for the project box
To request a project box, you must first submit the project box application in
mysciebo. You will find the relevant field
unter the heading Project boxes.
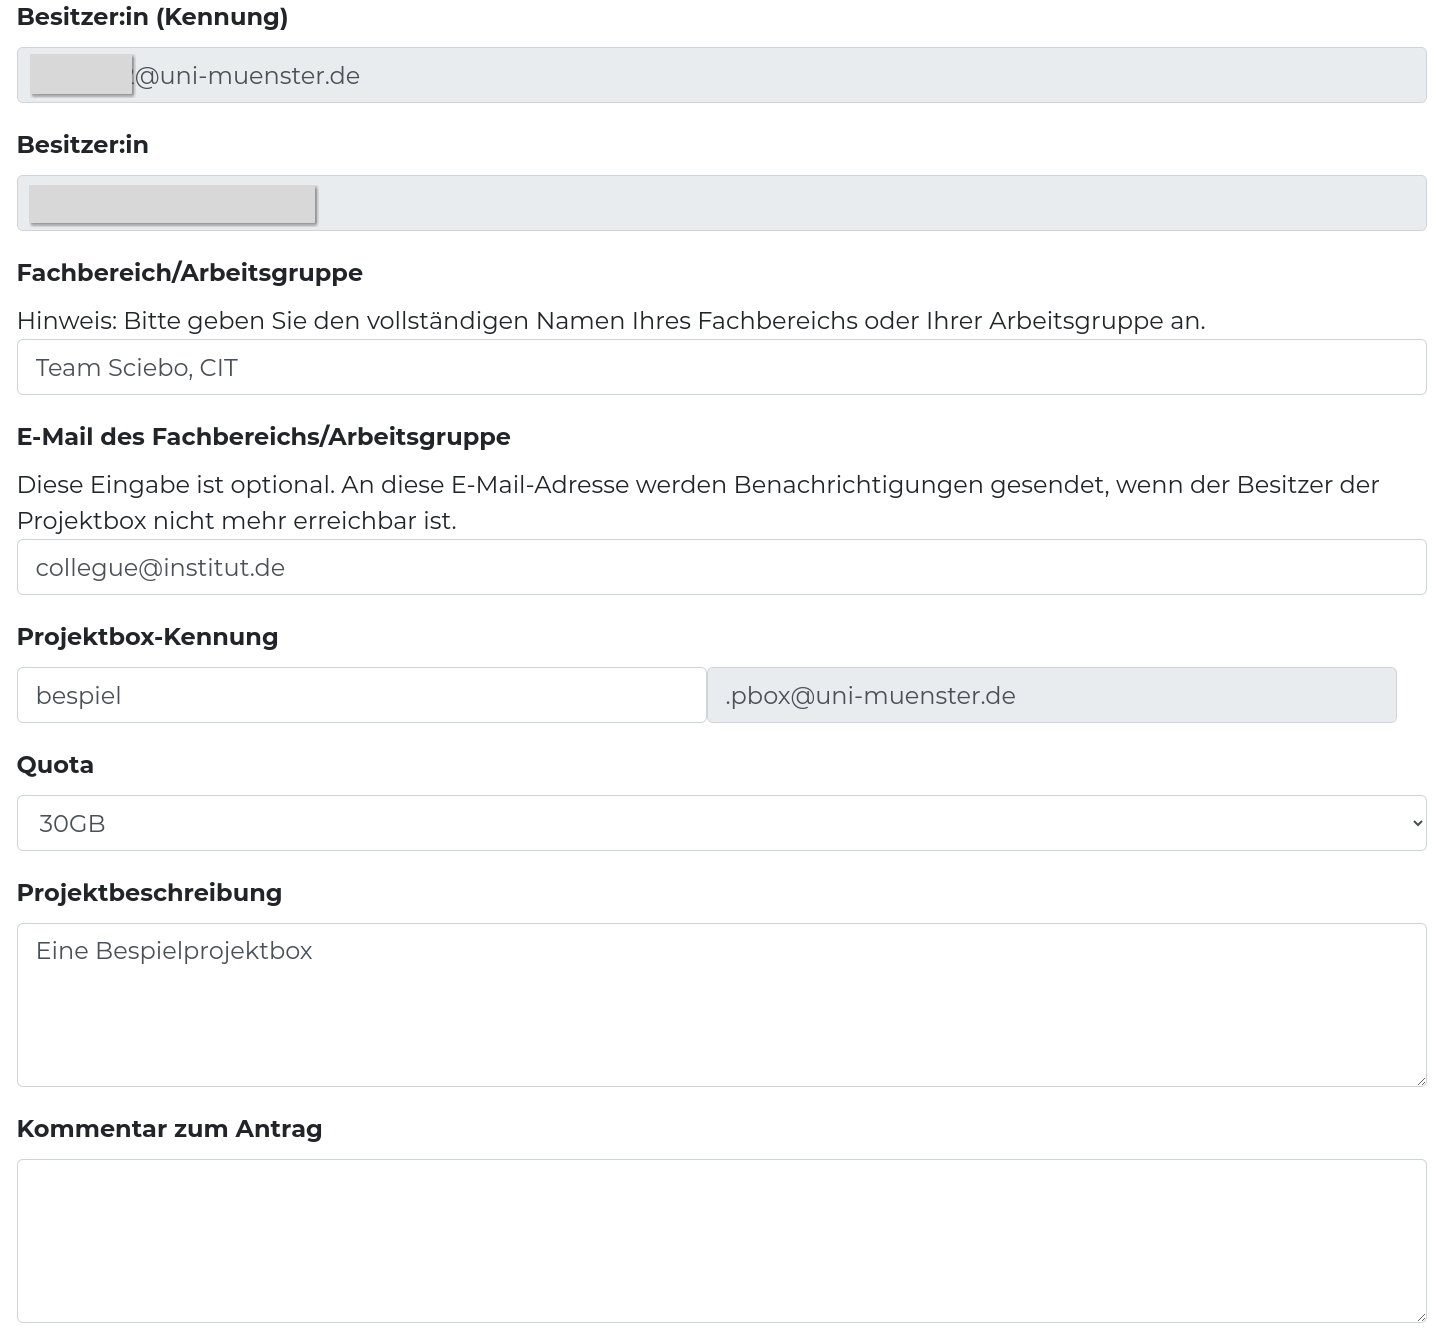
The form for the project box must be completed there; in the ‘Department/Workgroup’ field, please provide as precise
a description as possible of the actual working group. Also enter the e-mail address of a person who can be contacted if
you are unavailable in the “E-mail of Department/Workgroup” field. As the project box is not personalised, this makes it
easier to reassign the data when you leave the university and the project box becomes orphaned.
Set up a password
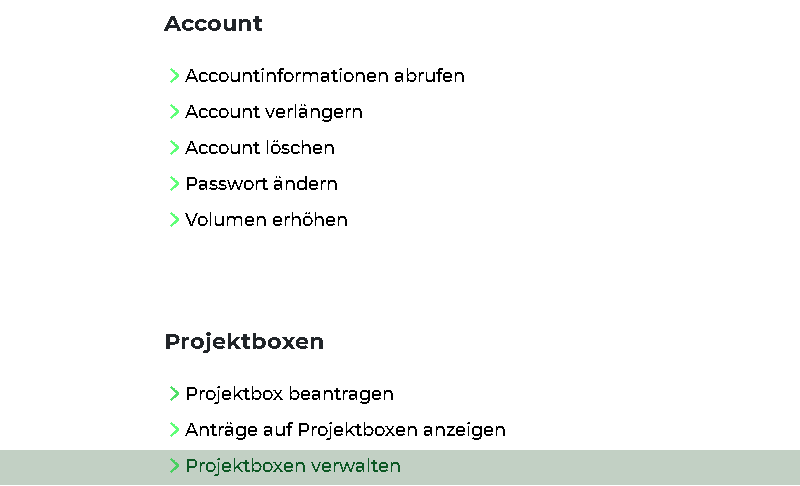
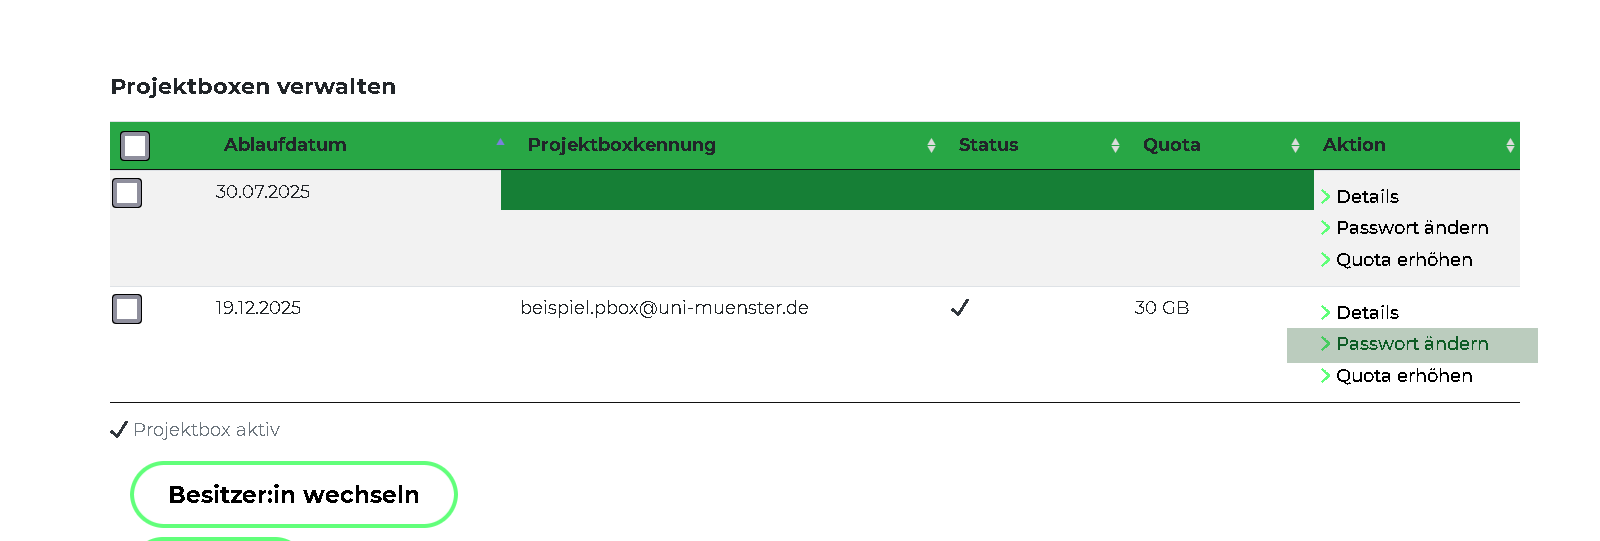
Once this request has been accepted, you can access the project box management menu in mysciebo by clicking on
‘Manage project boxes’:
Here you need to set a password for the project box.
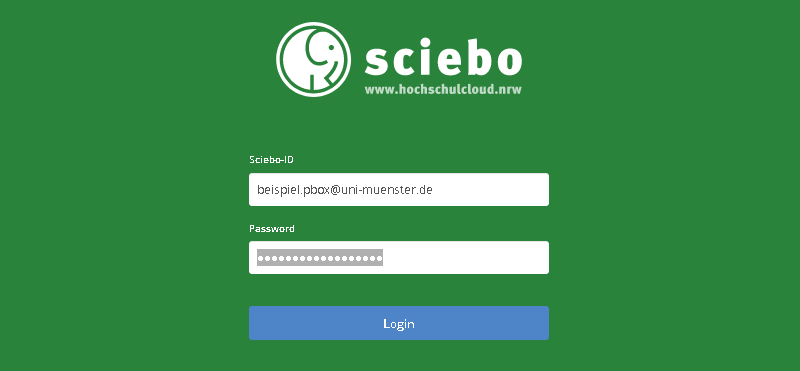
Log in to the project box and set up shares
Now you can log in to your own Sciebo instance with this project box. For me, this is
https://uni-muenster.sciebo.de. Please note
the .pbox@institute at the end of the project box name, for example .pbox@uni-muenster.de for the University of Münster.
You can now set up a folder structure in the project box; it usually suffices to just have a folder, which you share with
your personal Sciebo account:
You can set the permissions by clicking on the cogwheel next to the share. By default, everything is allowed; this makes
sense for your personal account, as it enables you to share this project box folder with other project partners without
having to log into the project box again.
1.6 - Groups
With sciebo you can create groups of users that you can share and edit files with.
If you often share data with the same group of people, you can create a group for this in the web interface. You no longer have to share data with each person individually,
but can simply select the group you have created. All members of the group automatically get access to the data. You can set the editing rights as usual when sharing. Note,
however, that groups can only consist of members of your own participant institution.
Creating Groups
Log in to the sciebo web interface.
Click on your name in the upper menu bar and then on “Settings”.
Select “Custom Groups”.
Enter a new group name in the text field and click on “Create group”.
The member menu opens on the right.
In the text field, enter the name of a person you want to add to the group, following the principle “last name, first name”. Select the person from the list that appears. He
or she is now added to the group. Repeat the process for all other persons.
Managing Groups
To manage your groups, you must log in to the web interface. Click on your name in the top menu bar, then on “Settings” and select “Custom groups”.
Notice
Please note that if you enable the Visible to everyone option under the Privacy section, this team will be visible to all users of this organization. Please only use this
feature if absolutely necessary.
Renaming a Group
Move the mouse over the desired group. Click on the pencil symbol that appears next to its name.
Change the name and confirm the change by pressing “Enter”.
Removing a Group
Move the mouse over the desired group. Click on the bin symbol that appears.
Click on “Yes” in the pop-up window to confirm the deletion.
Managing Group Members
To manage the members of one of your groups, you must log in to the web interface. Click on your name in the top menu bar, then on “Settings” and select “Custom groups”.
Adding Group Members
Click on the group to which you want to add members. The members menu opens on the right.
In the text field, enter the name of a person you want to add to the group, following the principle “last name, first name”. Select the person from the list that appears. He or
she is now added to the group. Please be aware that currently only users from the same instance can be added to a group.
Changing Group Roles
Group members can be either “group owner” or “member”. Group owners have all editing options for the group (including deleting, renaming, adding/removing members). There can be more
than one owner. Members, on the other hand, cannot make any changes to the group. By default, only the person who created the group is the group owner. If you want to change the roles,
proceed as follows:
Click on the group whose member roles you want to change. The members menu opens on the right.
In the list of group members you can see which member has which role.
Move the mouse over the desired person. Click on the pencil symbol to change the role. (If you want to give up your role as group owner, you must confirm this, as you can no
longer make any changes once you have given up the role).
Removing Group Members
Click on the group from which you want to remove members. The members menu opens on the right.
Move the mouse over the desired person. Click on the bin icon that now appears.
Click on “Yes” in the pop-up window to confirm the deletion.
Sharing with a Group
In principle, you can share with a group in the same way as with individual users. Follow the appropriate instructions depending on the platform (web interface, client or app)
via which you want to share. You only need to note the following differences:
Instead of the person’s name, enter the group name when sharing.
You can only set editing rights for the group as a whole and not for individual group members.
1.7 - Guests
Sign up guests in sciebo - Collaborate also with external users
Projects often involve people who normally cannot use sciebo because they are not members of a participating institution. However, it is precisely here that a simple exchange of data is important. For this reason, there are guest IDs for these cases, which you as an employee can create yourself for your project partners.
Important!
Guests must log in at gast.sciebo.de, because they are not a member of an organisation that is part of sciebo!
General Information
The guest’s e-mail address used for the invitation serves as the guest identifier. The sciebo web interface can be accessed by guests via gast.sciebo.de. Desktop client and apps can be used by guests for synchronisation. Guest IDs are valid for 12 months, renewal is possible. To do this, the guest must contact their sponsor, who can carry out the renewal via my.sciebo. After expiry, the guest ID is blocked and deleted after a further 3 months.
Guests can only use sciebo in a limited way, i.e. they do not have their own storage volume and cannot actively share data. To collaborate with guests, sciebo users must first share files and/or folders with them and give them the desired editing rights. Guests cannot create files or folders in their home directory, but only in folders shared with them. In this way, guests use the storage volume of the sciebo users who share with them.
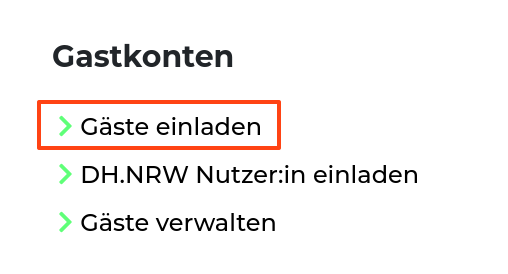
Inviting Guests
Please note that it is not allowed to create guest IDs for members of the participant institutions.
Log in to my.sciebo with your central user ID (not sciebo ID).
Select the menu item “Invite guests”.
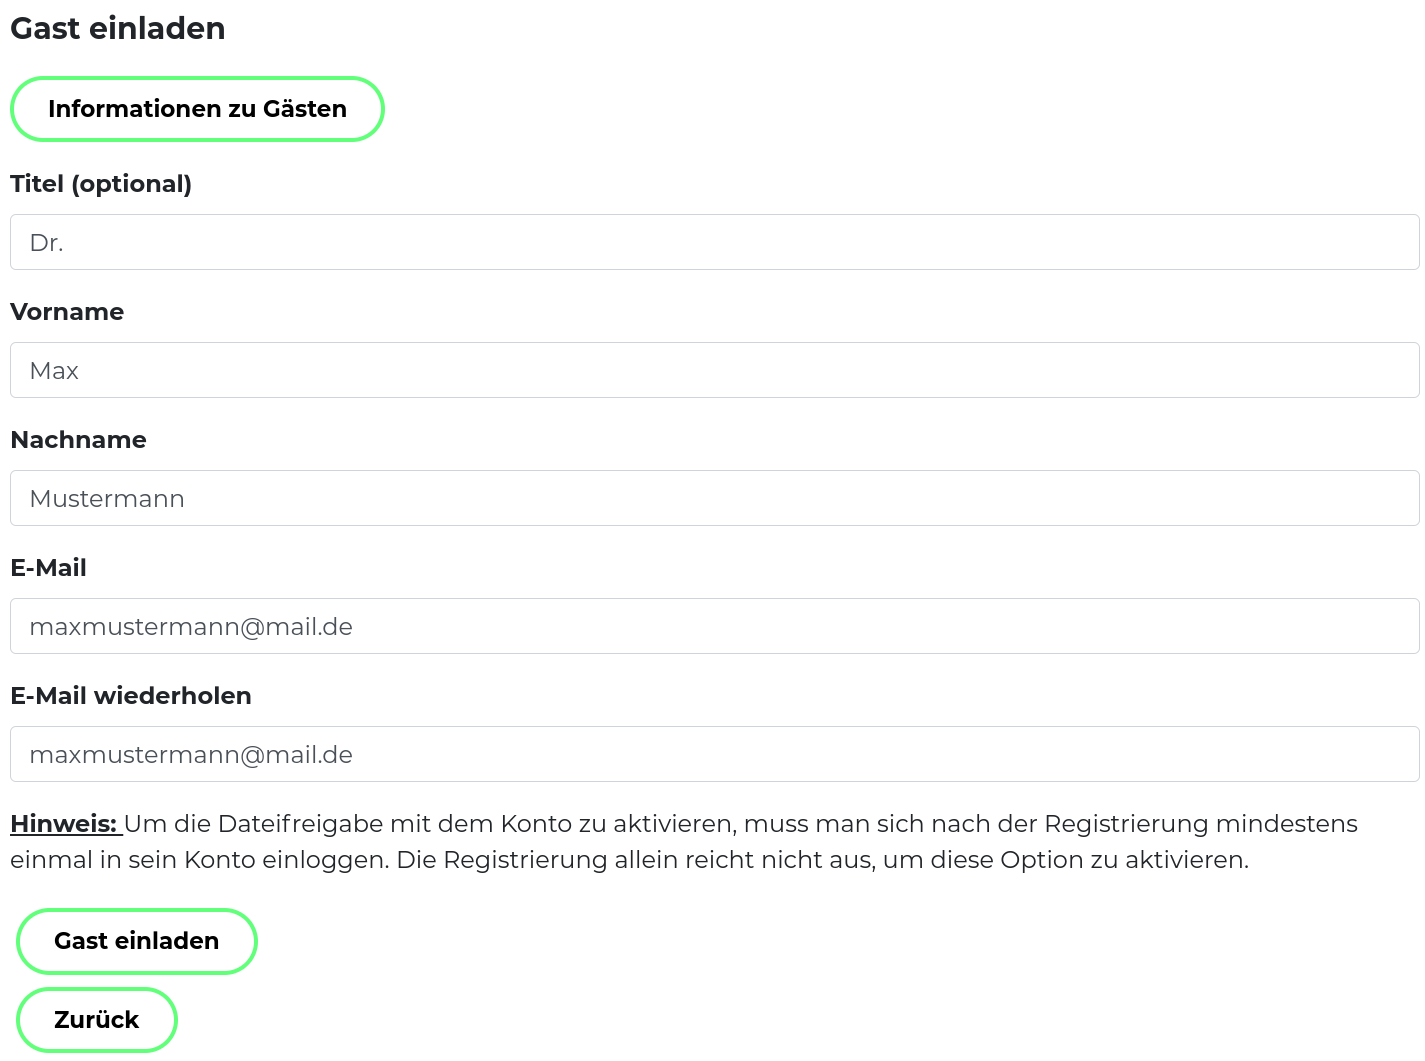
Enter the name and e-mail address of the guest in the form. The e-mail address serves as the guest ID.
Click on “Send invitation”. An invitation will now be sent by e-mail to the guest and a copy to yourself - as the guest’s so-called sponsor.
Note: If the guest has already been invited by someone else, you will automatically become the new sponsor. In this case, the previous sponsor will also be notified.
Account Activation as a Guest
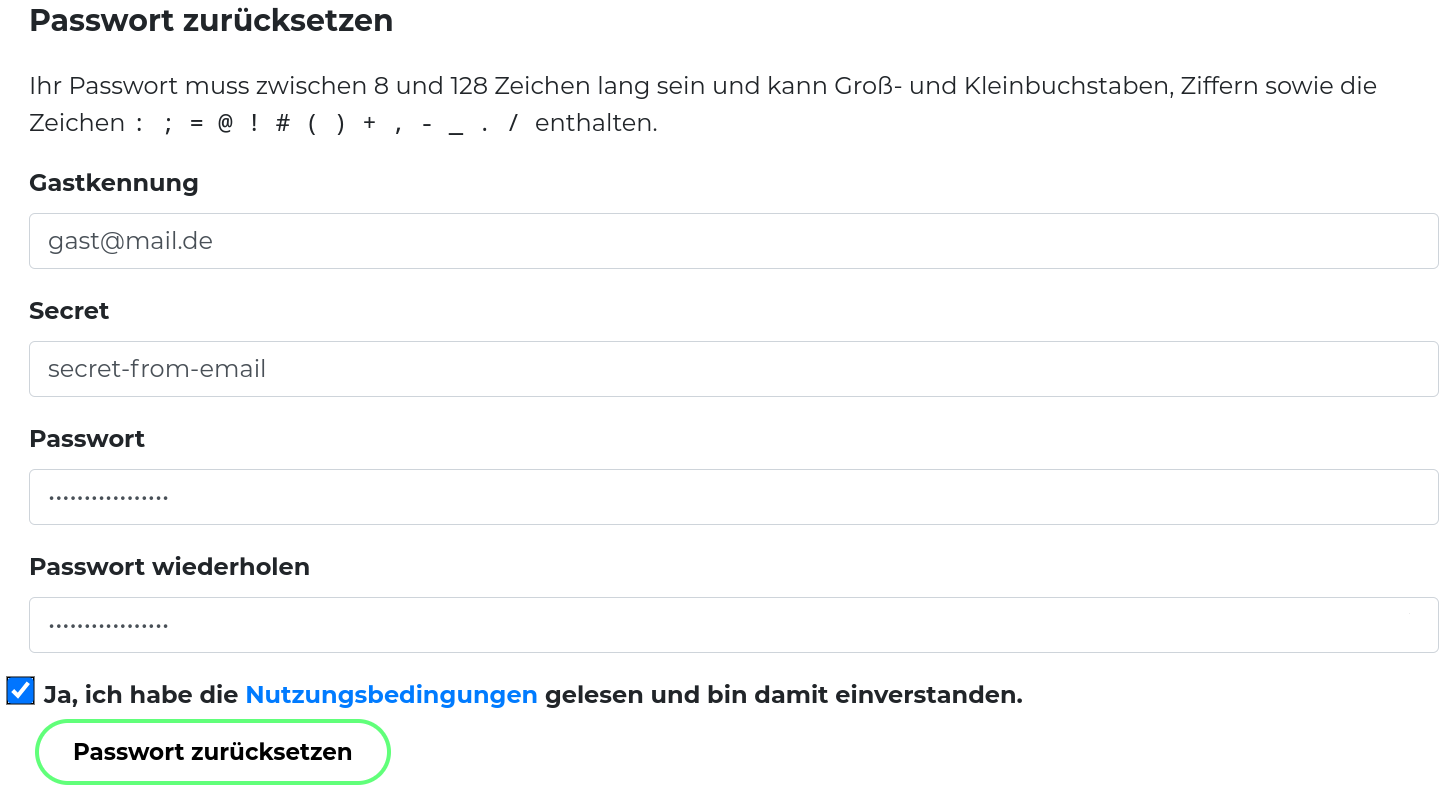
In order to use your guest account, you must first set your password:
Click on the link in the invitation email.
Enter your sciebo ID. Your ID corresponds to your e-mail address via which you received the invitation.
Enter the one-time password.
Set a new password (at least 8 characters).
Confirm the terms of use.
Click on “Set password”.
Log in to the sciebo web interface at
gast.sciebo.de to activate your account.
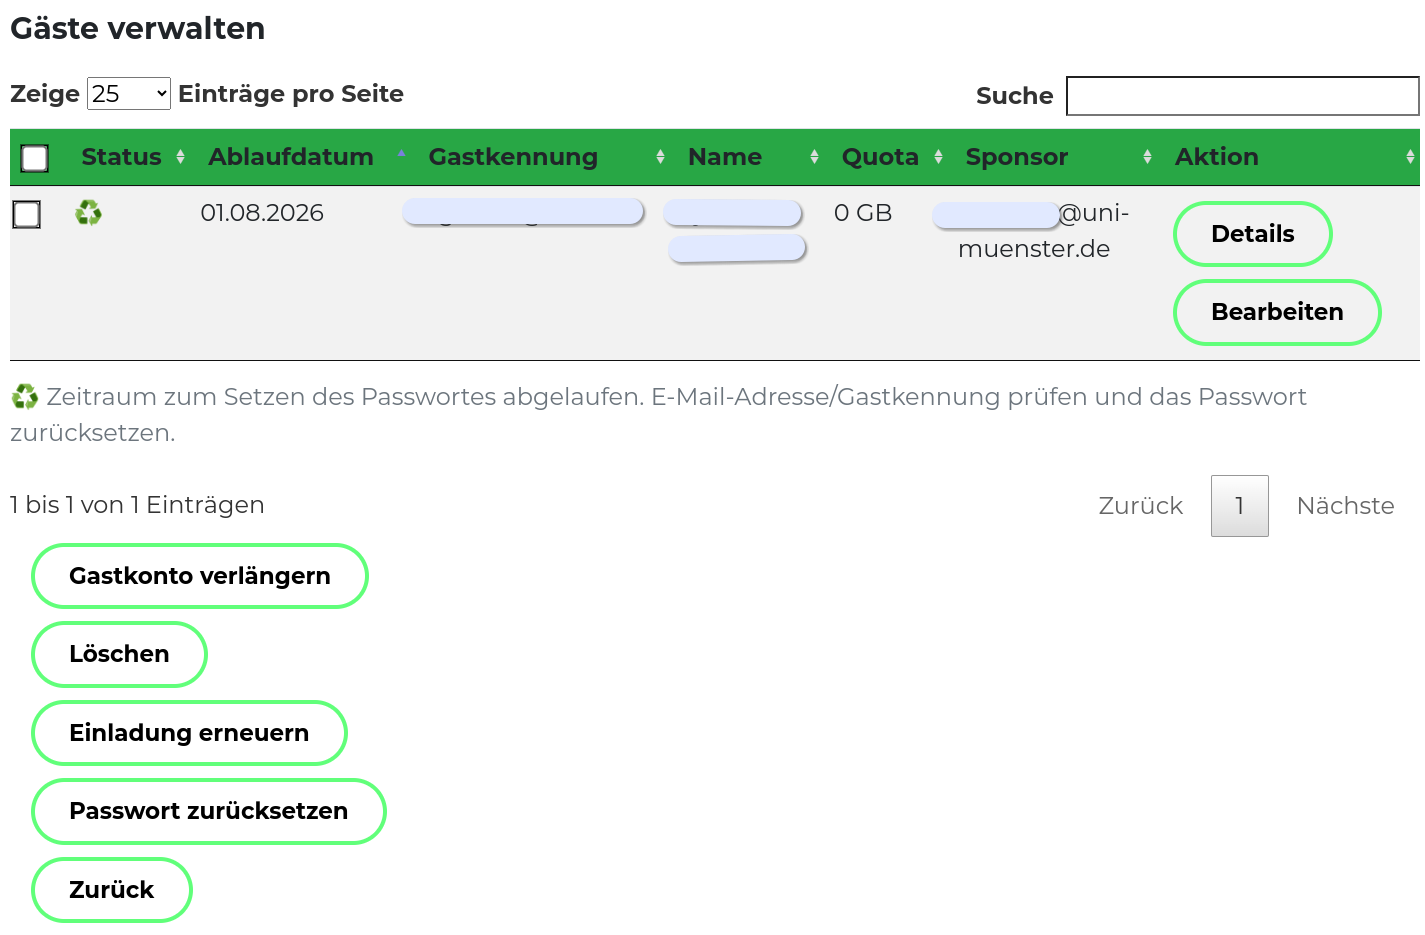
Managing Guests
Log in to my.sciebo with your central user ID (not with your sciebo ID).
Select the menu item “Manage guests”. You will now see an overview of all guests you have invited.
You can perform the following actions here:
Renew invitation (In case the guest did not accept the invitation in time).
Renew guest ID (Renewal for another 12 months.)
Reset password (In case the guest has forgotten his password. The guest can set a new password afterwards. He will automatically receive the necessary information by e-mail).
Delete guest ID
Sharing with Guests
The prerequisite for sharing is that the guest has accepted your invitation and activated his or
her account. The guest will only appear in the address book of the sharing dialogue the day after
activation.
(In the web interface, in the client or in the app) open the sharing dialogue for the file or folder you want to share.
In the text box, enter the name of the guest following the principle “Last name, First name” or the guest ID. Select the guest from the list that appears. Pay attention to
the addition “auf gast.sciebo.de”, because only with this note is the selection correct. (If the guest has deactivated the address book feature, enter
Guest-E-Mail-Address@gast.sciebo.de directly). 1
Decide what rights the guest will have regarding the file or folder you shared. The write permissions include “create”, “edit” and “delete”. We recommend that you disable the
sharing permission (“can share”). You can change the rights at any time.
You can find more information on the topic of sharing files and folders with sciebo here.
Since Nextcloud version 31, searching the address book for shared folders to other institutions is unfortunately not possible. We hope the manufacturer will improve
this in the foreseeable future. ↩︎
2 - FAQs
Frequently asked questions
Questions about accounts
What is my Sciebo ID?
The Sciebo ID consists of a local identifier, the @ symbol, and your institution’s scope. Therefore, the Sciebo ID looks like an
email address. In many cases, the Sciebo ID and email address are even identical. However, these Sciebo IDs and email addresses are processed differently. At some
institutions, the Sciebo ID does not allow any conclusions to be drawn about your actual university user ID. These institutions anonymize your central university ID.
You can view your Sciebo ID here in the Login field.
Why did you make the Sciebo ID so complicated?
We cannot guarantee that the local ID assigned to us by your university is unique across all instances. However, for some functions, it is essential that each Sciebo ID
is assigned only once. This also allows us to see, based on the Sciebo ID (except for guests), which university users are registered at. This uniqueness is also helpful
when sharing data.
Why doesn't account management work simply via my Sciebo web interface?
There are several, mostly technical, reasons for this. The Sciebo web server only has read access to the central user database. And the developers, both ownCloud (back
then) and Nextcloud (now), don’t offer a suitable account management system. So, colleagues developed the account management system mySciebo
their own. Unfortunately, it can’t be directly integrated into the system. However, we’re trying to make account management more visible and have already integrated it
into the regular user menu under the mysciebo item.
How can I extend my account?
Account management is not implemented in the standard Sciebo web interface. Everything related to account and project box management, etc., can be handled in the
mySciebo portal. Switch to www.sciebo.de or hochschulcloud.nrw
in your browser and then click on My.Sciebo in the top bar. On the page that appears, select your higher education institution and confirm your choice with Select.
In the subsequent mask, enter your central university ID along with the associated password. Your entitlements will be checked in the background. If everything is
in order, you can extend your account using the account functions.
My account has been deactivated. What should I do?
If you are still entitled to use Sciebo, you can extend your account as described above. In the process, it will be reactivated.
My account name has changed. What do I need to do?
If your account name has changed (for example, because you have switched to another university and received a new ID), you must re-register. Unfortunately, you can no
longer use your old account. You can manually transfer your data from the old to the new account if needed.
Since migrating to Nextcloud, this can be easily achieved by transferring folders and files to the new account via the web interface.
Information on this can be found here: Transfer of ownership
My name has changed. What do I need to do?
As long as your ID has not changed, you only need to extend your sciebo-account in mySciebo to update your data.
My email address has changed. What do I need to do?
As long as your ID has not changed, you only need to extend your sciebo-account in mySciebo to update your data.
Can you change my email address?
We take your email address from the data transmitted to us by the DFN (German Research Network). To change the address, it must therefore be changed centrally at your
institution. Then you simply need to renew your sciebo account in mySciebo to update your data.
I plan to go on parental leave or be absent for a longer period and want to prevent my account from being deleted. What should I do?
Please contact your local support. The colleagues there can set up a moratorium for you as admins in the mySciebo
portal. Any project boxes you manage should be transferred to a substitute person. You can do this yourself in the mySciebo portal for the project boxes you manage.
I have left the university and can no longer access or extend my account. What can I do?
If you leave your institution, you can no longer extend your sciebo account and it will be blocked after a grace period (max. 1 year from the last extension) and then
deleted. If you forgot to secure your data before it was blocked, open a support ticket.
Your identity will then need to be verified (e.g., via video identification), as we take data confidentiality very seriously. For the video identification process, you
will need a high-resolution webcam and a valid identification document. Additionally, a valid email address must be provided, through which you will receive the
temporary access information. Please back up your data immediately, as we are not permitted to repeat this activation process indefinitely.
I am a student and need more than 30 GB of storage. What can I do?
Unfortunately, students cannot currently increase their storage volume.
I am an employee and need more than 500 GB of storage. What can I do?
How can I, as a guest, reset my password or have my account extended?
Please contact your sponsor; they can reset your password or extend the validity of your account in the guest management of mySciebo.
Why do I have to extend my account every year?
Once a year, you must confirm with the extension of your account that you are still authorized to use Sciebo. The funding conditions of the state of NRW require us to
that only students and employees of the participating universities use Sciebo. Since we do not have a mechanism that actively notifies us of the expiration of
authorization, this is unfortunately the only way. This restriction, however, also has an advantage. If we had such an automated data transfer from the institutions,
we would have to completely delete the accounts immediately after the authorization expires. However, we can currently grant a grace period of one year.
I get an error message when trying to log in to the mySciebo portal. What's the cause?
There are several errors that can occur. We can only address the most common ones here.
Login fails after selecting my institution:
The common mistake here is using the Sciebo login credentials. You need to use your central university ID with the corresponding password.
Login worked, but I’m told I’m not authorized:
This could be because your user authorization has actually expired. Either open a support ticket or contact your university’s local support team to clarify the situation.
Login worked, but some data seems to be missing:
Occasionally, for whatever reason, we don’t receive the complete data set from your home institution. In this case, please contact your local support team for clarification.
Important:
Guests do not have access to the mySciebo portal, as authentication via the DFN is not possible.
When trying to renew my account, I receive an error message stating that the submitted data is incomplete. What should I do?
Sometimes this is a temporary error. At this point, we receive the data from your home institution. If it is not clear from this data that you are authorized to use Sciebo,
we have to reject the account renewal. You should receive an overview showing what was transmitted to us. This error can occur temporarily because several services (DFN,
your institution’s IDM, and our system) communicate with each other. Therefore, please try again after about an hour. If the error still occurs, please contact your local
support hotline directly, as we in the Sciebo team do not have access to this data. We only evaluate what we receive.
Another possible cause of the error could be that you have logged in with a different identifier than your personal university ID. When using functional IDs, no information
useful to us is transmitted. You can either delete the browser data (especially the cookies) and try again. Alternatively, you can use a different browser to extend the account’s
runtime.
Access to data
Can I access my sciebo account via SMB/FTP/SSH?
No, the mentioned protocols are not supported. You can use sciebo via the web interface, the desktop client, or the apps.
Can I access my sciebo account via WebDAV?
Basically, it is possible to use sciebo via WebDAV.
We explicitly advise against using it as a network drive or embedding it using webdavfs, as this often results in data loss. Other WebDAV clients may work, but we
do not offer support for this. Use sciebo best via the web interface, the desktop client or the apps.
I rely on WebDAV. The account is set up with a 2nd factor. What can I do?
Unfortunately, some third-party apps only allow access via the WebDAV interface. We cannot test access for these apps and guarantee flawless functionality. This then
falls under the responsibility of the app manufacturer (e.g., Zotero). If the app itself does not support a 2nd factor, an app password must be set up, with which the
app hopefully works.
I have a server where I cannot install a client, but it should exchange data with Sciebo. What can I do?
rclone works well on various platforms. Please note that rclone is not as clever as the sciebo client, and the data synchronization creates relatively
high load on our systems. For larger data volumes, we ask you to choose the synchronization intervals as large as possible or to synchronize only partial quantities very explicitly.
Data has disappeared from my account. What can I do?
There can be various reasons why data is no longer found.
First, check the following solutions:
If you have accidentally deleted data, you can restore it within 7 days (depending on available storage space, also significantly longer) if you are the owner of the data.
Log in to the web interface for this and select the trash can from the left menu. The data listed there can be restored directly.
If data is missing that has been shared with you, contact the person who shared the data. They may be able to restore the share or the data (if they were accidentally
deleted). Also note that data shared by a user is no longer available if their sciebo account is deleted.
If your data could not be restored in this way, open a support ticket. Also, remember to make regular backups of your data.
Do you make backups of my data?
No, because the amount of data is very large (it’s several thousand terabytes, more than a billion files), we cannot perform a complete backup. However, the storage
system is designed to be redundant and fault-tolerant, so the data is as secure as reasonably possible. We do, however, create a snapshot once a day, which we keep for
several weeks. We can access it for extremely important data. This represents a considerable effort for us, though. Therefore, we cannot promise every user that we will
be able to restore data from it. Please create your own external backups regularly!
If we are to search for and restore lost data, we need exact information about the storage location and the date/time of the data loss. If recovery is possible, we will
then take the data from a snapshot taken immediately before the data deletion. Because this process is very complex, we cannot accommodate very specific requests or
individual file lists.
Questions about sharing data
How can I share with external users, e.g., at other universities?
If the person with whom you want to share data is a member of a university participating in the Sciebo project, they can create a Sciebo account. About a day after
registration and account activation, you should be able to find them via the address book search. Alternatively, you can also add them using their Federated Cloud ID.
If this option is not available, you can share the data via a public link. Please remember that anyone with this link will be able to access the data. Therefore,
please be sure to protect this link with a password. Staff members of participating universities can also invite external guests.
I can't find the external users. How can I still share data with them?
Currently, sharing with participants from other universities is not possible via the address book search. We assume this is a bug and have opened a ticket with the
vendor. Until this is resolved, please use the Federated Cloud ID.
What is the Federated Cloud ID and where can I find it?
If data needs to be shared with users outside your organization and you don’t want to share it via a public share link, the system uses the Federated Cloud ID. This
consists of the user ID, an @ symbol, and the target server. For external Sciebo users, this means a relatively long ID with a total of two @ symbols. If you are
asked for your Federated Cloud ID, please check the web interface under Settings/Sharing. The information is displayed in the upper section. The Federated Cloud
ID can also be easily copied to the clipboard with a single click.
Questions about the clients
After updating the client, I get Internal server error...
Notice: The current Sciebo version (V31) that we have distributed should resolve this issue. Please notify us if the problem persists.
We are now aware of this error on Windows clients and have reported it to the manufacturer. Hopefully, a permanent solution for this error will be found soon. Many, but
not all, users are affected; thankfully.
Until a permanent fix is available, you can try the following workarounds:
a) Install the old client version, which you can find at https://install.sciebo.de/Sciebo-Windows-3.17.3-34773-x64.msi. Afterwards, please disable automatic updates in
the General settings, as otherwise the system might try to install the faulty version again.
b) Remove the local account from the client and recreate it. Please do this with utmost care and caution, and only if you have created a backup of your local data.
If you set up your client account with the VFS option, no local data should be present. This action isn’t quite so critical.
c) If you log in to your Sciebo instance via the standard browser before updating the client, the problem does not occur, according to the manufacturer Nextcloud.
We apologize for the inconvenience. We are testing the new clients to the best of our ability before activating the automatic updates that the vendor, Nextcloud, will
then distribute for us. Since it doesn’t affect all users, we don’t want to disable the update function centrally.
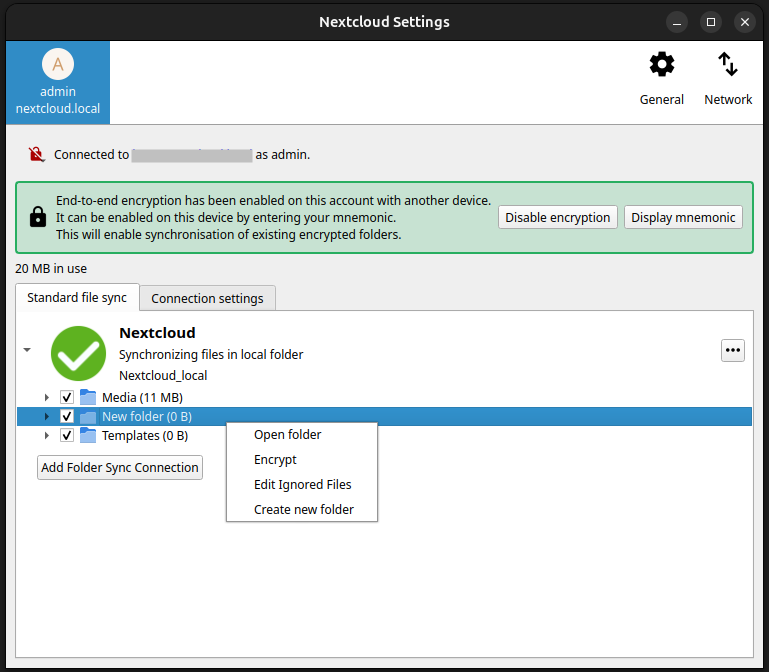
I cannot select folders for synchronization in the desktop client. Why?
If no selection is offered despite an existing server connection, it is usually due to the fact that you are working with VFS (Virtual File System). Initially, only
the metadata is synchronized with your system, not the file contents. Since hardly any space is consumed on the hard drive, a selection of the data to be synchronized
is not necessary.
My Windows desktop client does not synchronize all data/directories. What now?
First, check if the folder to be synchronized is larger than the set limit (default 500 MB). You can find this in the client settings. If the folder is larger, you can
either deactivate this limit (if there is enough disk space) or specifically release it in the folder selection. Sometimes the folder does not appear in the list at all,
but other folders do. This is often due to some restrictions of the Windows file system. The folder usually contains data that Windows cannot handle. This includes files
and folders that contain an invalid character. Colons mark device names and should not be used in the Windows context. Problematic are also spaces at the end of directory
names.
What is VFS and what should I consider?
VFS stands for Virtual File System and is a feature that is used in particular under Windows. It can be useful to switch to VFS, especially on systems with little free
hard disk space. Initially, only the metadata (i.e. the file names, timestamps, etc.) are downloaded from the server. The file itself only lies on the server and the
content is only downloaded when you need it. This makes the synchronization faster and consumes less disk space and also less bandwidth. You do not (and cannot) have
to decide what is synchronized. That’s it with the advantages. The desktop client is also recommended by us so that you have a kind of “backup” of your data, should you
ever have no access to the server. If you work with VFS, this does not work, since only the metadata, not the contents, are stored locally. We also strongly recommend
having at least one external backup of your important data. This is quite difficult to do. According to our knowledge, external backup tools are necessary for this if
you do not want to download the entire content of the cloud with every backup. With a few GB, this is usually not a problem, but with larger employee accounts, this is
no longer practical. We have also observed that synchronization is extremely slow with accounts that have a large number of objects (files & folders). A precise cause
could not be determined so far. Perhaps the implementation in the operating system is not yet optimal.
I receive the error message 'Access denied - state token missing.' (iOS Nextcloud App)
Log in via the browser.
Go to Personal Settings → Security.
Remove the iOS device from the list.
Write an app name (e.g. iPhone) in the field at the bottom of the page and click on Create new app password.
Then use the QR code to connect the app to the server.
My client does not start. What can I do?
This unfortunately happens in rare cases. We have not yet found a way to reproduce the problem. Therefore, we do not know the cause of this behaviour and can only
help to a limited extent.
Check in the task manager if there is definitely no client process present. The software may be running in the background.
Please check the system logs of the computer to see if there are any indications on problems.
Check on our download page if you have installed the current version of the client.
Deactivate software such as virus scanners or VPN for testing purposes.
Please reinstall the client completely.
I'm using the original Nextcloud client. Which server URL do I need to enter?
The URL to enter is the same as for the web interface. You can find the list here.
I use the original ownCloud desktop client for another cloud service. Can I use it for Sciebo as well?
We understand users’ desire to avoid installing too many different programs on their computers. Currently, it is still possible to access Sciebo with the ownCloud client
software. However, we cannot guarantee this in the long term, as the two products, ownCloud and Nextcloud, are being developed independently. It is possible that the
ownCloud client may stop working altogether or that data loss may occur. Therefore, please be very careful when proceeding in this way.
We cannot and will not provide any support whatsoever for client software that is not from Nextcloud or officially supported!
If the ownCloud client should ever stop working reliably, a switch to the Nextcloud version of the software will be necessary. Unfortunately, you cannot simply transfer
your configuration and data. This means you will have to install and configure the new client. After the first complete and successful synchronization, you will likely
need to copy more recent data from the old ownCloud Sciebo directory to the data directory of the new client. Command-line tools like ROBOCOPY (Windows) and rsync
(Linux, possibly macOS) are available for this purpose. These tools are not straightforward to use. A detailed guide would be beyond the scope of this document. We may
provide a short guide later.
The required server list for original clients from the manufacturer can be found here.
I'm getting a checksum error from the client. What can I do?
Please contact support so that the problem can be resolved. Usually, a file scan needs to be performed for the affected account. This means that if the data is located
in a shared folder, this action must be performed for the account of the person sharing it. To explain: Checksums (so-called eTags) are stored in a database. If this
checksum doesn’t match the calculated checksum of a file, this message appears, and the client refuses synchronization. This error can occur if files are written very
frequently in an extremely short period of time. Presumably, several processes are running in the background to calculate the checksum, and a process based on outdated
data finishes last and then writes this value to the database.
Questions about Overleaf
How can I share with people in Overleaf?
The web interface lies a bit: no email is sent. It can only be shared with IDs that have logged into sciebo-Overleaf once and created a project. Then you can share with
these people via the Sciebo ID. It is not necessary to use the federated Cloud-ID (with the double @), but you must use the normal ID that the people have at their respective instance.
Can additional features such as integration with Zotero or Github be enabled in Overleaf?
We use the open source version of Overleaf, as found on GitHub. This means that we have no influence on the features that can be used. The integrations of
Zotero or Github cannot be installed for this reason.
Can I import data into Overleaf from sciebo or export it from overleaf?
Unfortunately not.
The Overleaf installation in sciebo is (currently) not fully integrated into sciebo and therefore data cannot be imported or exported directly into sciebo.
Overleaf projects can only be imported and exported indirectly as a .zip file.
Questions about the web interface
How do I log in to the web interface to access my data?
When logging in, I am asked for a 2nd factor that I have not activated.
Probably something went wrong during the transition of the instance from ownCloud to Nextcloud. The error is known to us. Unfortunately, we do not have a central repair
tool and we do not want to deactivate the 2nd factor for all users for security reasons. Please write a support ticket with your university email address so that we can
reset the 2nd factor.
As a member of a participating university, I'm getting an error message saying my username or password is incorrect. What could be the reason?
There are several possible causes. Here are the most common:
The password is incorrect.
The Sciebo ID is not case-sensitive. Unlike ownCloud, Nextcloud is very particular about this.
The central university ID was used instead of the Sciebo ID.
The account does not exist.
'Username or password incorrect' is too general for me. Why doesn't it tell me whether it's the ID or the password that's the problem?
This is for data protection reasons. Someone trying to hack an account should not be able to tell whether a Sciebo ID exists. We ask for your understanding for this
measure. If you are unsure whether your account has been deleted in the meantime, please check the mySciebo portal.
I want to log in as a guest to the web interface, but I get an error message saying my username or password is incorrect.
The most common mistake is trying to log in to your sponsor’s server. Guests can only log in to the guest instance.
Questions about Guests
Why don't you use Nextcloud's guest function?
We developed our own guest concept before ownCloud or Nextcloud integrated this feature. The advantage is that these guests truly function system-wide and are not
limited to the respective instance. This allows for much more flexible collaborations, even across multiple universities. Therefore, we have a separate
guest instance.
What restrictions apply to guest accounts?
Due to the funding requirements of the state of North Rhine-Westphalia, guests are not allowed to have their own storage quota.
Since guests do not have their own quota, they can only store or modify data in shares where they have the necessary permissions.
Guests are not allowed to share further.
Guests cannot use the mySciebo portal to renew their account or reset their password. Should this be necessary, please contact your sponsor. You will then receive an
email with the appropriate instructions.
Who is my sponsor?
We currently do not have a function to provide this information. Therefore, please be sure to keep the emails you received when registering your guest account. If the
emails have been lost, please send us a support request. We can investigate this for you.
My sponsor is no longer reachable and I haven't been assigned a new sponsor?
Unfortunately, we can’t do much about this, as we have to delete a considerable amount of data for data protection reasons. Therefore, it’s generally advisable to
maintain contact during collaborations and also obtain the names of any representatives. In this case, our hands are usually tied in support.
My guest account has been deleted/blocked. I still need it. What now?
Please contact your sponsor first to have the account reactivated or a new one created. If that does not work, please try another academic staff member of the project
so that the sponsorship can be taken over by a substitute. We are not allowed to extend guest accounts or transfer the sponsorship.
Questions about Apps (Calendar & others)
Which app also works with participants from other Sciebo/Nextcloud institutions?
The new apps (Decks, Surveys, Tasks, Forms) and the calendar are currently not capable of this. For the Decks app, the manufacturer has announced the Federated function,
which is expected to come with server version V33. As of now (Q1/2026), we are currently transitioning to V31. The other apps are also expected to be enabled for this,
but we have neither confirmation nor a scheduled date.
Can you activate the app <insert name here>?
There are a few things to consider when it comes to apps. Therefore, we take a very conservative approach to activating additional apps. We appreciate your understanding.
An additional app should not affect the stability of the overall system.
The app must not rely on other/external services, as your data must not be shared.
The app must be supported by the developer.
The app must be updated regularly.
The app must not incur any additional licensing costs.
The problem is, once an app has been activated and is in use, it’s difficult to deactivate it again for any reason. The example of Overleaf showed us this some time ago.
That’s why we’re being cautious now.
How can I save a form from the app as a PDF?
This is not currently possible. Saving as a PDF via the operating system’s print function does not work reliably because only the first page is displayed. Therefore, this
is not a bug in the app. We also do not have official support for this app, so we cannot make any demands. Nextcloud recommends using Collabora for these purposes.
Miscellaneous questions
How can I receive very large files?
If you only occasionally want to receive very large files, using a public link share is a good option. To do this, create a folder where you want to receive the file and
click on the share icon and select “Public Links”. There you can create a link, and for single use you should set an expiration date and password, as well as, of course,
the option to upload files. See also instructions to
file drop.
How can I unsubscribe from the address book, as was possible with ownCloud-Sciebo?
Unfortunately, this function is not currently available. However, you can configure individual information in your profile settings. A complete opt-out option is not
currently offered by the vendor.
Why should I create external backups? Isn't the cloud secure?
There are some good reasons to create external backups. Basically, the data in the cloud is well protected. But technical circumstances can lead to data loss occurs,
for example when using WebDAV or VFS. Our system uses various protection mechanisms
to prevent data loss. The data storage is distributed redundantly across two locations. The failure of individual hard drives can also be compensated for by the system.
However, user errors can cause data to disappear. Problematic here is in particular the use of shares. If you store your data in the account of the owner of the
share, then if this account is deleted by the system, for example after the expiry of the authorization, then this also applies to the data. We are forced to do this
for data protection reasons, on the other hand, due to the limited storage capacity. Our system also sends corresponding warning emails to the recipients of shares
before the accounts are deleted. But unfortunately, these messages are often ignored. If a third person has access to the same share, they are probably authorized to
delete the data or move it to another location outside the share. This is the current standard setting when creating shares. We do not create backups due to the huge
amount of data. The storage system only creates so-called snapshots once a night. But we have to delete these or thin them out after a few weeks due to space reasons.
In addition, searching in the snapshots and restoring from them is not quite easy and very time-consuming.
Why are Collabora and OnlyOffice used instead of Microsoft Office 365?
Collabora and OnlyOffice are open source and hosted by us. This operating mode is not possible with Microsoft Office. Therefore, for data protection and security reasons,
Microsoft Office 365 is not a viable option. In addition, Microsoft Office works less reliably on the scale of sciebo.
Since the upgrade to Nextcloud Version 30, the default document editor has been set to Collabora (aka Nextcloud-Office). This has technical reasons that the manufacturer
Nextcloud prescribes for us. Currently, there may still be problems, especially with the formatting and character sets of MS documents in Collabora. In this case, you can
open your MS documents via the 3-dot menu with OnlyOffice until further notice. We hope that the support for these documents in Collabora will improve in the medium term.
I have a suggestion for improvement. What now?
We are nerds and therefore, by definition, blind to our own operations. We have partially become accustomed to the processes and quirks of the system. However, we know
that neither the manufacturer nor we always offer the optimal solution or the perfect workflow, as it is now so beautifully called. Therefore, we are grateful for
suggestions for improvement. And now comes the big but: We use software from the manufacturer Nextcloud (previously ownCloud). It is a standard product that we have
visually adapted to the Sciebo brand. Changes in the server service would therefore generally affect all other external users as well. Therefore, the chance of achieving
something must be realistically assessed. A single voice unfortunately often goes unnoticed. But if you can already win many supporters for your idea in advance, this
increases the prospect of success. If we like a request for change and it seems plausible, we will gladly pass it on to the manufacturer Nextcloud.
Anyone who is themselves a web developer might consider joining the Community and taking direct influence on the development of the
product there. In that area, we are unfortunately tied by personal reasons (human resources).
How long does it take to receive a response to a contact email?
We typically respond to tickets within one business day.
What are your office hours?
We are not a commercial service and therefore are not available 24/7. We work on regular weekdays, i.e., Monday to Friday, excluding holidays, etc. We don’t have fixed office
hours, but we are generally available from 9:00 a.m. at the latest, and someone should be available until 4:00 or 5:00 p.m. On Fridays, we sometimes take an early weekend.
My problem is urgent. Can you call me?
For urgent problems, the respective universities have telephone hotlines for first-level support. The second-level support team, on the other hand, is only available by
phone in exceptional circumstances. This is because we are only four colleagues in this team, responsible for virtually the entire operation of Sciebo, including hardware,
further development, etc., for approximately 200,000 users. We ask for your understanding that we therefore need to isolate ourselves somewhat.
I received an answer to my question that was too technical for me. What now?
We are engineers. Therefore, it can sometimes happen that we also respond at that level. We do our best to prevent this from happening. Please explain exactly where the
problem lies. We will then try to explain the matter in a less nerdy way.
I've read everything carefully, but haven't found an answer to my question. What should I do?
You are welcome to submit this question to us via the contact form. However, we don’t know everything either. You might
find the answer you’re looking for in the documentation from the manufacturer, Nextcloud.
I found an error on these pages. What now?
We are human and we make mistakes. Whether it’s in spelling, wording, or even the fact that some texts have been copied from the old help pages for ownCloud-Sciebo.
We are happy to be corrected and can amend these pages promptly so that the corrections benefit all users. Simply send us a support ticket.
In case of outages we usually lack the time to update two languages.
4 - Download
client downloads and information
The desktop client is a program that allows you to store your data from the cloud locally on your
computer or laptop. The client runs in the background and automatically synchronises your data so that
you always have the latest version of a file available on all devices.
The app for mobile devices is ideal for viewing and sharing files on the go. You can upload, delete
and move files (such as photos). However, because mobile devices usually have limited storage space, your
files are not automatically downloaded. A file is not saved on your device until you manually access it.
Please note: We have completed the transition from ownCloud to Nextcloud in Q4/2025. Some users are
still using the Sciebo-ownCloud-Client on their desktop. This will no longer be developed. Therefore, it
is now time to switch to the Nextcloud version. Please remember to back up your data, as there have been
data losses during the client transition in recent times that we cannot reproduce and explain.
Further information on the migration to Nextcloud can be found here.
Sciebo Nextcloud Clients
We only support the Nextcloud version of the client, as all universities have already switched to Nextcloud.
If you should unexpectedly still need an ownCloud variant (e.g., for uninstalling the old client under Windows),
please see here. However, we offer no guarantee of completeness and
cannot provide any further support in this area.
Desktop
Before installing the new client, the old client needs to be uninstalled.
Information about VFS can be found in the FAQ section.
Notes for Windows Users:
Some users are seeing numerous, partially dysfunctional Sciebo entries in the left navigation pane of Windows
Explorer. We suspect a bug in the old client software. This means entries in the left Explorer sidebar aren’t
removed when the client is uninstalled. If users remove their local Sciebo account from the client before
uninstalling the old client, this problem shouldn’t occur.
For users who are now experiencing the problem, a colleague has provided us with a patch program for the Windows
Registry: ScieboDriveManager.
The tool should be considered a developer tool, and we advise caution when using it.
Notes for Linux Users:
Unfortunately, Nextcloud itself only provides the Linux client as an AppImage. We suspect that the large number of
different distributions makes packaging the respective packages too cumbersome. However, many distributions now also
have a Nextcloud client available that is provided by the distribution creator.
Examples for Ubuntu 22.04:
caja-nextcloud/jammy,jammy 3.4.2-1ubuntu1 all
dolphin-nextcloud/jammy 3.4.2-1ubuntu1 amd64
nautilus-nextcloud/jammy,jammy 3.4.2-1ubuntu1 all
nemo-nextcloud/jammy,jammy 3.4.2-1ubuntu1 all
nextcloud-desktop-cmd/jammy 3.4.2-1ubuntu1 amd64
nextcloud-desktop/jammy,now 3.4.2-1ubuntu1 amd64
These clients are usually not quite as up-to-date as the versions from the manufacturer. But handling is easier for
most users. Desktop users should then install the nextcloud-desktop package. If you want to use overlay icons, you
must also install the package compatible with your file manager (e.g., MATE => caja-nextcloud), as this does not happen
automatically.
Mobile Clients
iOS
Under iOS, the unbranded Nextcloud Client must be used.
The QR code for the Nextcloud app can be displayed here.
With the SHA256 checksums, you can ensure that the download was successful.
5 - Good to know
Additional Information that could be interesting for you.
5.1 - How Sciebo Works
How does Sciebo work? Where is the data located?
DRAFT!
This document is still under development… subject to change without notice…
How does Sciebo actually work? Where is the data located?
On this page, we’ll explain how Sciebo works to give you some background knowledge. Understanding how the
system works will help you avoid potential errors, as user errors can lead to data loss.
Where is the data located?
Physically speaking, the data is mirrored at two locations at the University of Münster. This storage system
is a dedicated server infrastructure with hundreds of individual hard drives on which the data is stored. A
special algorithm distributes the data blocks across different hard drives, so that the failure of individual
drives can be compensated for by the system, preventing data loss. In case of failure, defective drives are
replaced promptly. Another advantage of this data distribution is the very high data throughput, even though
these are still conventional magnetic hard drives. When a file is written, the write operation is distributed
and parallelized across multiple hard drives. Instead of the usual approximately 120 MB/s, we can store data
at a total of several gigabytes per second. With very low latency, this data is then also saved to the storage
system at the second location.
Because this storage system, like the Sciebo servers themselves, is located on university premises, we can
prevent foreign governments and their organizations from unauthorized access to our users’ data. This data
sovereignty is of paramount importance to us!
From a logical perspective, the data initially resides in the individual user accounts. This means that,
according to the current concept, each user has their own data directory. The structure is hierarchical. The
owner of the data is the user in whose respective folder that data is stored. Specifically, this means that
if this user shares a folder with you and you save data there, that data will also end up in the folder that
was shared with you. Sciebo (and therefore also ownCloud/Nextcloud) does not store who stored this data there.
Consequently, this also means that any data recovery requires the (written) consent of the person who shared
that folder with you. Provided this sharing is still active, data recovery to the exact same location is quite
straightforward. However, if the sharing has expired because the person sharing it no longer uses Sciebo, we
cannot avoid certain formalities.
Otherwise, we open the door to potential misuse. On the one hand, we are not allowed to do this, but on the
other hand, the trust of our users in these principles is very important to us.
If you now wish to access the data, there are several ways. You can access the data easily and directly via
the web interface. The various client apps are designed to simplify access to this data. Unlike the mobile
clients, the desktop clients are also able to save a local copy of your data.
This is particularly useful if internet access fails for any reason. However, the VFS option
must be deactivated for this to work. If VFS is active, the client behaves similarly to the mobile version.
Data is only temporarily downloaded when the respective file is accessed. Local, permanent storage of the file
must be explicitly selected by the user.
Comparison with Network Drives
Therefore, Sciebo is not comparable to network drives. With a network drive, there is only one central data
set on the server, which all users access. Therefore, only one person can write to a file at a time. A file
lock is passed through to all other users, so they can only read it.
In contrast, when accessing a network drive with client software, the data is copied to the client temporarily
or permanently (depending on the settings). Thus, each user has their own copy of the file, and everyone can
open this file locally (including write access), since file locks cannot currently be passed through. This can
be particularly problematic when editing Office documents. The last person to write the file wins. If multiple
write operations occur virtually simultaneously, file conflicts arise that must be resolved manually.
And now what?
The file locks created by Office products are essentially nothing more than lock files, which could
theoretically be synchronized down to the local system. We experimented with this a few years ago, but
unfortunately, it proved to be very unreliable. The problem is latency. That is, when the first user opens the
file, the lock file is created. This would then have to be synchronized up to the server and then distributed
to all other clients. This process is unreliable. Some users may have a slow client system or a slow internet
connection. Therefore, the distribution of a lock file can take a few seconds, but it can also take considerably
longer. A feature that is so unreliable isn’t a feature at all; it gives users a false sense of security.
Therefore, the only viable alternative at present is to move collaborative document editing to the web.
We host a suitable office suite for this purpose. The data is accessed centrally there, thus avoiding conflicts
as much as possible.
Why not Samba?
In theory, the data could also be made available as a Samba share. Unfortunately, this doesn’t work smoothly with
Sciebo and the other related cloud systems. The main reason for this is the metadata database that manages the
data in Sciebo. When data is edited via a client or the web interface, these changes (file path, owner, timestamp,
checksum, etc.) are stored in a database. A Samba server cannot communicate with this database. This means that
Sciebo wouldn’t be notified of changes, and the checksums and other entries for the respective file would be
corrupted. Background jobs that could track such changes and update the database in a timely manner require an
extremely high number of resources. The system would be severely slowed down and would also become very unreliable.
But there’s WebDAV, right?!
Yes, that’s true. It’s a protocol that Sciebo supports in principle. However, it’s not trivial to use. The
probability of data loss is relatively high if you don’t know exactly what you’re doing. We therefore advise our
users against using this interface, and we don’t offer official support for it.
Those who know exactly what they’re doing can access Sciebo via WebDAV using tools like rclone. But we don’t
like this, as it can tie up a lot of system resources. That’s simply unfair to all other users. If, for example,
we see that such access is putting too much strain on the servers, we are forced to deactivate the account of
the user in question.
5.2 - Accessibility
Turning on the screen reader in Nextcloud Office.
Migrating to Nextcloud has made it possible to make sciebo a little more accessible, as Nextcloud Office allows documents to be read aloud. We have activated this option on the server side. However, for it to work properly, it must also be enabled on the client side. To do this, follow these instructions:
Open sciebo in a web browser.
Open a document that you want to have read aloud.
Navigate to the Help tab by pressing the key combination “ALT+Y” in the open document. Alternatively, press the ‘ALT’ key and navigate by pressing the tab key until you hear “Tab Control Help Tab selected”.
Then press the down arrow key. You should hear “Tool Bar four toggle buttons not pressed.”
Press the TAB key until you hear “Screen Reading Button not pressed” and activate it by pressing the space bar. After this action, the content of the document should become accessible to your pre-installed screen reader.
Hinweis
These settings have been tested for web interfaces on Windows and Linux.
5.3 - Client Logs
You can try to find errors yourself!
Client Logs
When the client throws errors, it is often helpful to send logs to support, which may
provide more insight into what exactly went wrong.
Debug logging is enabled by default, with an expiration time of 24 hours. To create a debug archive, go to the client
settings and click ‘Create debug archive…’.
You will be asked to select the location where the desktop client will export the logs and database as a zip file.
Enter an archive name to activate the Save button.
5.4 - Expiration and Deletion Dates
expiration ands deletion dates for your sciebo accounts
Action
Acoount-Type
Date
account block
regular
last login date + 12 months
account deletion
regular
date of account block + 6 months
account block
guest
last login date + 12 months
account deletion
guest
date of account block + 30 days
account block
project box
last login date + 24 months
account deletion
project box
date of account block + 6 months
5.5 - Permissions
Who id allowed to save what kind of data in sciebo?
We have not yet translated this page. For the german page, click here
5.6 - Who owns the data?
Generally we differentiate between two types of accounts:
The situation for personal accounts is obvious: The data is owned by the person that owns the account.
When a person shares a file with you from their personal account, you will have access to this file temporarily, but you do not own it.
If the person stops sharing their file with you or their account is deleted, access to the data is lost.
In this case we cannot recover your access to the file.
Project Boxes
In project boxes the institution or the registered project owns the data. If the person who created the project box stops working for the project or institution, their collegues can talk to the support and take over the project box.
Handling of business documents
Regulation of the handling of business documents is governend by the
participating institutes.
There can be made no distinction between the personal space in sciebo and
private storage devices.
For files which are not allowed to be saved on private devices, but should be
accessible in sciebo, project boxes can be used.
A good description and attribution to the working group in the project box
appliction can here help ease the support of certain issues in the future,
e.g. when people leave the institute.
6 - Sharing
Sharing is an integral part of sciebo. Learn how to share files with your peers.
Sharing in the Webinterface
Please note that Nextcloud supports sharing with users from other institutions only for Files apps. Sharing with external users in other apps is only possible via public links (if supported).
If you want to learn how to share a file in the Webinterface, click here!
6.1 - Link Generator
Learn to share files and how to create shareable links.
When you share a folder or a folder is shared with you, that contains a lot
of subfolders, it is often annoying to navigate through the entire structure
or to explain to others how to get to a specific file. You can create a link that
leads to a specific folder that has been shared. This only works if the folder that
you shared is located in your root directory!
The link has the following form:
https://<institution of the person that you are sharing with>.sciebo.de/?dir=/<Path>/<to>/<the>/<directory>/
You can use the following tool to generate a link to a shared directory.
Share Link:
In your browser, navigate to the directory that you want to share a link to.
Copy the link from the address line of your browser into the field “File-URL”.
Click “Apply”.
Share the link to this page. The inputs you have provided will be persistent.
Follow Link:
You have received a link to this page.
In the dropdown menu “Your Institution” select your institution.
You can now follow the link in the field “Link to the File”.
Link Generator
File-URL
:
Apply
Your Institution
:
Link to the File:
Follow Link
Copy to Clipboard
Link to this Page
:
Follow Link
Copy to Clipboard
6.2 - Project Boxes
Project boxes are specialized sciebo accounts for work-groups that work with large amounds of data (30 GB to 2 TB).
Project boxes are special sciebo accounts for work groups that work with very large amounts of data (30 GB to 2 TB). They are particularly suitable for long-term projects with changing project management. Project boxes are not bound to individual persons, i.e. the role of the owner is transferable. Project boxes are managed in the owner’s my.sciebo section.
Project description: In addition to a project title and a short abstract, information on the responsible organisational unit, project duration, project participants or funding may be useful. The text must not exceed 150 words.
Storage volume: 30, 500, 1,000 or 2,000 GB
For all applications, the support of the institution decides on an approval. Once the application has been approved, you will be notified by e-mail.
Activation
In order to use the project box, you must first set the password:
Log in to my.sciebo with your central user ID (not sciebo ID).
Select the menu item “change project box password”.
Select the desired project box from the drop-down list.
Enter the new password.
Log in to the sciebo web interface of your institution with the project box ID to activate the project box.
Usage
Direct access to the project box is only necessary for assigning access rights to the central project folder (using shares) and managing the associated editing rights:
Log in to the sciebo web interface of your institution with the login data of the project box.
Create a central project folder to be used for the project data.
Share this folder with your own personal sciebo ID and the other project participants.
You and the project participants can now access the shared project box folder via your/their own sciebo account(s) and create and edit folders and documents there.
Extension and Transfer
Extension: The duration of a project box is 2 years. An extension is possible via my.sciebo.
Transfer: The transfer of a project box is initiated via my.sciebo. (*Note: In order to enable the transfer to another person, no personal or copyright-protected data may be stored by the participants).
6.3 - Transfer of ownership
Transfer ownership of files and folders to other users
In Nextcloud, there is a new feature that allows you to transfer files and folders to other Sciebo users of the same institution. This can be useful,
for example, if you want to transfer data from your personal account to a project box.
This function can be found under the menu entry Settings/Share/Files. There, the data to be transferred can be selected. In the next step, the ID
of the account to which these data are to be transferred is selected. If this is confirmed, the person who has access to this account will receive a
notification (Web interface: bell symbol) asking them to approve or reject the transfer. After accepting the transfer of ownership, a background process
is started for the transfer. According to Nextcloud, this can take up to an hour. The data are physically transferred from one account to that of the
recipient, and the new owner thus has full control. After the transfer, the data will end up in a separate folder Transfer... and can be moved to the
appropriate location if necessary.
Eventual shares will be transferred as well.
7 - Apps
Information about application that are compatible with sciebo.
7.1 - Connecting the *Cloud - FileLink with Thunderbird
Send really big files with the email client thunderbird through sciebo
If you use the Thunderbird email programme with the *cloud - FileLink extension, you can upload large email attachments to
Sciebo and then just send the download link.
Installation of the Thunderbird
Follow the
download link to download the suitable file
for your operating system, then run the file and follow the instructions for installation.
Installation of the *cloud- FileLink
Go to Thunderbird -> Settings -> Composition -> Attachments -> Find more providers...
A new tab would open, enter "*cloud “ in the search field.
Click on “+ Add to Thunderbird. In the popup window click again on “add” and close the tab.
Click on the newly appeared field *Add *cloud in the Attachments section
Fill the form:
Server URL: the URL of your institution’s Sciebo instance (e.g. https://sciebo.uni-muenster.de)
Username: your Sciebo account
App token or password: Your Sciebo password
Click on Save
Usage
When composing an e-mail, click on the drop-down menu next to " 📎Anhängen” and select Filelink -> *cloud.
Select the file you want to attach and click ‘Open’.
The selected file will now be uploaded to your Sciebo account and the recipient of your e-mail can download the file using the link.
7.2 - Fill file drop with scripts
Sometimes data is generated automatically somewhere and you want to move it to a specific Sciebo folder.
Preferably in an automated way.
In this case, you can share the folder via a link and create a share with
write permission (and password).
The link will look something like this:
https://uni-muenster.sciebo.de/s/XphYPtnTxc2MDm0 and the password could be secter. The part after the /s/ is the
username that you would use to interact with the webdav interface https://uni-muenster.sciebo.de/public.php/webdav/ and
the password is the corresponding password.
You can now send a request to the Sciebo webdav interface for example with Curl and upload a file data.csv via:
Note that the webdav interface does not have an update verb (as far as we know), i.e. if you want to overwrite a file,
you must first delete the file using the following command:
curl -u "XphYPtnTxc2MDm0:geheim" -X DELETE https://uni-muenster.sciebo.de/public.php/webdav/daten.csv
7.3 - Forms
Create and manage forms.
Hinweis
Currently, forms can only be shared with users from other universities or guests via a public link.
Create a form
Click on “New form”.
Enter a title and description for the form.
Click on ‘Add a question’. The following options are available:
Checkboxes
Radio buttons
Dropdown
File
Short answer
Long text
Date
Time
Linear scale
Color
Export/download the results
In order to export the gathered data:
Go to the form results section.
Click on ‘Create spreadsheet’ in the opened window and choose the sciebo folder to which the spreadsheet must be saved.
Click on the XLSX, CSV or ODS buttons to select the file format. This will create a spreadsheet linked to the form.
Note: data from forms is not automatically synced with the linked file and needs to be re-exported after new answers are added.
Transfer ownership
Click on the share symbol and go to the settings tab.
Click on ‘Transfer ownership’ at the bottom.
In the “Select account” field, type in the account of the person to whom you want to transfer the form.
Enter the requested text in the second field, then click “I understand, transfer this form” to confirm the transfer.
Share form
There are several options for sharing forms:
Share the form via a public link.
Share the form with specific people or teams within your institution.
Permit access to all logged-in accounts. This option makes the form visible to everyone in your institution.
You can choose to list such a form in the left menu for all users by enabling the ‘Show to all accounts on sidebar’ option.
7.4 - Joplin
Synch notes on your smartphone or your laptop through sciebo
The Joplin app allows you to create notes on your smartphone or desktop/notebook and synchronise them via sciebo.
You can download the apps at
https://joplinapp.org/.
To synchronize the Joplin using Sciebo go to Tools -> Options -> Synchronisation
By default, the Vault name will later also be the folder name in Sciebo. This can lead to conflicts. For example, if the
Vault name is set to “Notes”, the Obsidian notes will be saved in the directory that is also used by the Nextcloud notes
app. Therefore, these notes are also available to the editor in the web interface under the notes app.
This behavior can be changed in the settings, but this function is still marked as experimental.
Install Community Plugin “Remotely Save”
First, community plugins need to be activated, and then the plugin “Remotely Save.”
Find sciebo WebDAV Link
By clicking on “File Settings” at the bottom left of the sciebo web interface, a popup opens. There, you can copy the WebDAV address.
Generally, it has the format
https://instanzname.sciebo.de/remote.php/dav/files/kennung, where kennung is your sciebo identifier, with the @ replaced by %40.
Configure Obsidian
Finally, you need to configure Obsidian. Here, the WebDAV link from above must be entered under “Server Address.” The username and password are your regular sciebo identifier (here again with @) and your regular sciebo password.
To use a screenreader with Collabora, you have to enable it in the web
interface. In the collabora interface, under the tab “help”, you have to
activate the button “Voice Over”. In non-English locales this might be
translated too literally, e.g. in German “Stimme Über”.
Shutdown of OnlyOffice at the end of February 2026
Since end of February 2026, sciebo is no longer offering OnlyOffice.
7.7 - Overleaf
Our Overleaf app - hosted in germany and free for sciebo users
Sciebo offers an integration of the collaborative LaTeX tool overleaf.
This integration is based on the open source variant and its feature set is
roughly between the free and basic tier of the commercial overleaf service.
We run our own overleaf instance, which can be used by all sciebo users.
The integration currently requires considerable development effort on our side
and is provided as is.
In particular, we recommend to make regular backups of overleaf projects via
the download function of overleaf projects, as we have only limited ability to
restore singular projects.
Errorhandling
Alongside the logs there is a button on the lower right
Other logs and files, which often allows you to download a output.stdout.
This file can be opened in any text editor and often contains additional
information.
At the moment we have no working error message if folder names do not match
our restrictions (A-Za-z0-9 _-). In case of doubt use only very simple
folder names.
Sharing
In order to be able to share with a person, it first has to log into our
overleaf instance via sciebo and create a new project.1
Creating new shares
Open the project you want to share.
Then there appears a Share-Button on the upper edge of the editor window.
A sharing dialog is then openend.
Here you need to enter the sciebo-id of the other person.
This is the id you get shown after logging into sciebo in the upper right
corner.
If you do not know the sciebo ID of the other person, please ask them.
Often it is not their e-mail.
After entering the address, push the green share button.
Afterwards tell the other person that you shared something with the, because
our overleaf does not send out E-mails (even though it tells you it does).
Sharing with users in other sciebo instances
Note that for sharing with persons from other universities, you do not need to
use the federated id, but just their local username, which is everything
federated ID
before the second “@”. This feature can be used for guests at
https://gast.sciebo.de also.
Receiving a share
If you receive a share, there is a notification in the project overview about
this.
This invitation can be accepted via “Join project” or be dismissed by a click
onto the cross.
Import and export of projects
Currently, it is sadly impossible to directly interact with the sciebo storage,
but it is possible to use .zip archives both for importing and exporting
projects.
To import a project, you click on “New Project” and use the upload option:
To export/download a project, you click on the small cloud symbol in the
project overview:
Known problems and non-features
Overleaf does not send out e-mails; you have to inform share receivers by
yourself
we run Overleaf in Version 3 and are evaluation forks for our update path to
Version 5. Until then we can not tell how the future feature set will look
like
sharing only works after a person logged into overleaf via sciebo at least
once
you cannot directly import from sciebo or export to sciebo
WIP we allow for compiles beyond one minute, but the webinterface has a bug
telling you after 60 seconds that it does not work. Subsequent clicks on the
compile button then should return a message that a compilation is already
running. If that is the case and only your initial compile takes longer than
60 seconds, you usually can still get a full compile sequent on subsequent
compiles.
WIP folder and filenames are heavily restricted; sadly if the folder name does
not match the rules, no error message is being thrown. If a name is not
allowed as a filename, it is also forbidden as a foldername
We are still working on the issues marked with WIP. If you experience a
beahvior which differs from what we described here, please let us know.
To be honest we are not completely sure if it is necessary to really
create a project beforehand. Logging in definitely is necessary though and
when there is a project, we can be sure that a login happened. ↩︎
7.8 - Polls
Create and manage polls.
Hinweis
Currently, surveys can only be shared with users from other universities or guests via a public link.
Create a poll
Click on “New poll.”
Enter a title for the poll and select a poll type (text poll/date poll).
Click on “Add.”
Click on “Options” in the menu on the right to add options for the poll.
a. In the case of a date poll, there is an “Add date” button; clicking on it opens a window.
– Select the times you want to add.
The number of repetitions determines the number of options to choose from.
The increment defines the time between the start of each individual date.
b. In the case of a text poll, you can type the desired option in the text field from the available options.
Optional: Allow suggestions from participants by activating “Allow suggestions.” When this option is activated, an option to limit the suggestion period appears.
Activate/share survey
Surveys remain inactive unless you share them. There are several options for doing so:
Share the survey via a link
Share the survey with individual people/teams within your institution
Activate internal access. This option makes the survey visible to everyone in your institution.
Such polls are listed in the left menu under “Publicly accessible polls.”
To share a poll, click Share in the right menu and select the appropriate option.
7.9 - Project management with deck
A visual project management tool.
Notice
Currently, sharing boards with users from other universities or with guests is not possible.
Deck is a project management tool that follows the Kanban principle. Thanks to the user-friendly interface, projects can be organized easily and efficiently.
The following instructions will show you the first steps in using Deck.
Create boards
Click on “Add board” in the Deck app.
then enter the name of the board in the input field
optionally, you can select a color scheme to visually distinguish the boards from each other
confirm the creation by pressing “enter” or by clicking on “Save board.”
Add columns and cards.
A column is a list of cards or tasks. You create these as follows:
enter the name of the list - e.g. “In Progress” or “To-do”—in the “List name” line.
click on “Add list” to create the list
to create cards for a specific column, click on the “Add card” button for the respective list.
assign a name to the card and press the enter key.
Share boards
click on […] next to the board name and open the “Board details.”
click on “Share” in the top bar
enter the account names or groups you want to share the board with.
click on the “enter” button to add the relevant users or teams to Nextcloud.
8 - Security Settings
These safety settings should be made
In the web interface, you can make additional settings to protect access to your sciebo account.
2-Factor Authentication
Two-factor authentication is a feature that increases security when accessing the sciebo web interface. When logging in, you must enter a 6-digit number in addition to the sciebo password, which you receive anew for each login via a 2-factor app.
Before you can activate 2-factor authentication in sciebo, you need to download a 2-factor app for your mobile device (e.g. FreeOTP, Google Authenticator).
Then log in to the sciebo web interface.
Click on your name in the top menu bar, then on “Settings” and then on “Security”.
Check the box to activate 2-factor authentication.
A QR code will be displayed. Scan the code with your 2-factor app. (Alternatively, you can enter the displayed numerical code manually).
Now enter the latest sequence of digits from the 2-factor app in the field provided and click on “Check”.
If “Verified” is displayed, the function is activated. (If you enter the code too slowly or confirm too late, you must repeat this step with the next sequence of digits).
Notes:
If you want to use different mobile devices for 2-factor authentication, scan the QR code directly with all devices as it will not be displayed later for security reasons.
If you want to delete the 2-factor app from your mobile device, you must first deactivate 2-factor authentication in sciebo. Otherwise, you will no longer have access to the sciebo web interface.
When 2FA is switched on, external apps that were connected to the cloud via WebDAV lose their access to the cloud. You will need to reconnect them by using App Password.
App Passwords
App passwords are 16-digit security codes that allow a device to access your sciebo account. They are valid only once and are entered instead of the sciebo password when logging in. The use of app passwords is only useful in exceptional cases, for example, if the sciebo password would be stored in plain text on your end device.*
Log in to the sciebo web interface.
Click on your name in the top menu bar, then on “Settings” and then on “Security” and then the “Devices & sessions” section.
Enter a name in the “App name” field and click on “Create new app passcode”.
The app password is now displayed once. Use it to log in to sciebo in the desired app or on the desired device.
Click on “Done” to complete the process.
9 - Dangerous Mistakes
Avoid these mistakes at any cost!
Warning!
Some things that one can do with sciebo will lead to the loss of data.
This may not always be obvious.
Combining the sciebo-Client with Sync-Services
You cannot use the sciebo-client and another cloud-client, such as Google Drive, dropbox or Microsoft OneDrive for the same folder.
Especially folders synchronized to Microsoft OneDrive may be a little hard to recognize.
Combining a Sciebo-Client with another Sciebo-Client
You should not use the same folder with two different sciebo-clients. This may happen if for example a partition of your hard
drive is used by two different operating systems.
Using the Sciebo-Client with a Network-Drive
The Sciebo client cannot be used with a Network-Drive. Errors in network traffic can quickly lead to the loss of data, and
Errors in Network traffic occur more often than many people think.
Using WebDav to use sciebo as a Network-Drive
It would be nice if this worked well. But data is transferred only at specific times, that are hard to control (or even see) by
the user, and so it may happen that sciebo does not receive the data at all or only empty files.
Actions in the Web Interface that affect Many Files/Folders Simultaneously
If you delete or move a folder containing many objects (a combination of files and folders) via the web interface, this can
lead to problems. The result may be an undefined state. In this case, data can no longer be accessed. The reason for this is
that each object also has a database entry. Therefore, when a folder is deleted or moved, the action is first performed in
the storage system. Then, the database entries for each object must be updated. A background process is started for these
actions, but for resource reasons, it must complete within a finite time. If this job runs out of time, the database will
unfortunately not be up to date. The data is then usually not visible in the web interface, but access to it no longer works.
A client will also notice that something is wrong.
Should this happen, please contact support. A file scan can then be used to synchronize the database entries with the actual
data in the storage system.
Editing Files on Multiple Clients Simultaneously
Please avoid editing files on different PCs simultaneously. This is a common mistake, especially with Office documents. A Word
or Excel file is opened and edited locally on different systems. Each system opens its local copy of the file. File locks, like
those found on network drives, cannot be reliably propagated to other systems. This means the document can be opened on any
system with write access. As a result, while the last person to edit the file wins, the data of those who made changes before
them is lost. This is inherent to how the cloud works, and we cannot change it.
10 - Account
Information about your account
In
my.sciebo you can access information about your user account, change your password, extend the term of your account and delete your account. As a university employee, you can also increase your storage volume from 30 to 500 GB.
Access Account Information
Open
my.sciebo. (You must authenticate with your institution to do this.)
Click on “Account Information”. There you can view the following information:
ID
User name
E-mail address
Storage volume
Expiration date
Changing Your Password
Open
my.sciebo. (You must authenticate with your institution to do this.)
Click on “Change Password”.
Enter your new password. It can contain upper and lower case letters, numbers and the following special characters: . : ; = ! # ( ) + , - _ /
Confirm the password change.
Renewing Your Account
Your account is valid for 12 months from the date of renewal. As long as you are a member of your institution, you can renew your account at any time.
Open
my.sciebo. (You must authenticate with your institution to do this.)
Click on “Renew account”.
Confirm the renewal.
Deleting Your Account
If you delete your account, your data stored in sciebo will be irrevocably removed from the sciebo servers. Locally stored data (i.e. data synchronised via the desktop client) will remain on your PC.
Please note that shares will also be deleted. This means that data you have shared with other users will no longer be available to them. If necessary, inform these users in good time so that they can make their own copies. You can view a list of all folders and files you have shared in the web interface.
Open
my.sciebo. (You must authenticate with your institution to do this.)
Click on “Delete account”.
Tick the box “Confirm deletion”.
Click on “Delete”.
Your account will be deleted within the next 24 hours.
Increasing Your Storage Volume (Employees Only)
As an employee, you have the option of increasing your storage volume to 500 GB on your own.
Open
my.sciebo. (You must authenticate with your institution to do this.)
Click on “Increase volume”.
Confirm the volume increase.
11 - Nextcloud Migration
Instead of ownCloud, we now use Nextcloud. What has changed?
Sciebo was gradually transitioned from ownCloud to Nextcloud.
The basic functions remain unchanged; only a few functions are added.
This document briefly outlines the resulting changes.
Generally, we will take care of your concerns as usual via
our contact form
in case of a request.
Changes
Apps are now at the top of the page and no longer at the top left in the menu
Groups are now called Teams and can be found in the Contact app
Microsoft Office formats are no longer opened in Onlyoffice, but in Collabora. Collabora is set as the standard for all Office formats.
This is unfortunately beyond our control and is a requirement by the manufacturer Nextcloud. If problems (e.g. formatting)
occur with MS documents, you can open and edit MS documents via the 3-dot menu with OnlyOffice for the time being. Please
ensure that when collaborating on documents, all editing persons use the same editor, otherwise conflicts or data losses
are to be expected. The reason for this is that the OnlyOffice server and Collabora are independent server services that cannot communicate directly
with each other.
by default, the eye-friendly Dark mode is activated; via the menu at the top
right, Light Mode, High Contrast and Dyslexia modes can also be set
Login only with Sciebo ID: Due to a bug, it was previously possible to log in with the email address. Please
use only your Sciebo ID for login. In case of doubt, you can find out what this is in mySciebo.
Incoming shares can be automatically sorted into a separate folder. This can be selected under Settings/Share.
Incoming external shares (Federated Shares) currently have to be accepted via the web interface (bell icon). A next
update to a newer Nextcloud version is expected to provide a remedy.
Update to the Nextcloud Client
We recommend that all users uninstall the old client and install the new Nextcloud-based client.
See: Nextcloud-Clients
or for English instructions: Nextcloud clients. The unbranded Nextcloud client works just as well with Sciebo and can also be used for other Nextclouds. A branded mobile client is currently not available, which is why we ask you to use the unbranded Nextcloud client from the stores.
Known characteristics:
The Nextcloud client does not synchronize files under Windows for compatibility reasons that contain characters reserved by Windows in their names ("?", “*”, “<”, “>”, “|”, “/”, “\” and “:”).
Migration Guide
Make sure that any synchronization running in the previously used
sciebo-ownCloud client is completed first.
Open the previously installed sciebo-ownCloud client and click on
“User Account”. Now select the option “Remove”. Confirm the removal.
No data is lost.
Now exit the sciebo-ownCloud client.
Uninstall the sciebo client previously used from your system.
IMPORTANT: Consider the sciebo folder previously used on your hard drive as
backup and rename it, for example to backup_sciebo.
Perform the client installation. If a system restart is required, perform it.
Set up the new client by first selecting your instance.
You will be asked for authorization with your sciebo ID via a browser window.
Set up the synchronization according to your wishes. DO NOT select the previously
used sciebo folder on your hard drive. Go back to step 5 of this guide if you have selected this and received an error message.
Complete the setup assistant and leave the PC on until the
synchronization is complete. Do not disconnect the device from the Internet during this time.
For advanced users
Tip 1:
(This measure only works if you do not use the VFS option.)
You can synchronize the data set from the old sync folder using ROBOCOPY or rsync -av (depending on the
operating system) into the new folder. These command-line tools prevent newer data on the server from being
overwritten by any older data from the client.
Tip 2:
(This is something for experts who know what they are doing. Always make a backup before doing this!)
Summary:
If you copy the config file aside before step 2 in the migration guide above, you can copy the old configuration
file into the new config directory after installing the new client and then rename it according to the naming
scheme of the new client. In the new config directory, there should already be a cfg file that tells you exactly
which file the client is looking for. The initial file can then be renamed and the adopted cfg file will then be
named exactly the same. Steps 5, 9, and 10 from the above instructions can then be omitted, as applying the old
configuration file ensures that access is provided to the previous sync directory.
Step by Step:
Make sure that any ongoing synchronization in the previously used sciebo-ownCloud-client has been completed.
Find the configuration directory and copy the configuration file aside.
On Linux, this is usually ~/.config/sciebo/sciebo.cfg
On Windows, this is usually %HOMEPATH%\AppData\Roaming\sciebo\sciebo.cfg
On macOS, this should be the path ~/Library/Preferences...
The folders are usually hidden.
Open the previously installed sciebo-ownCloud-client and click on
“User account”. Now select the option “Remove”. Confirm the removal.
No data is lost.
This step ensures that the icons in the Explorer sidebar under Windows,
if that is the platform you are using, are removed.
Now exit the sciebo-ownCloud-client.
Uninstall the sciebo-client previously used from your system.
Download the sciebo-Nextcloud-client for your operating system from the following page:
https://hochschulcloud.nrw/de/download/index.html We recommend using a client without VFS, unless you
used the ownCloud-client with the activated VFS option in the old installation.
Run the client installation. If a system restart is required, perform it.
Start the new client and abort the installation. This ensures that a new configuration directory is created.
Copy the backed-up configuration file into the new configuration directory.
Start the new sync client. The settings from the old client installation should have been adopted.
12 - Information for the Support Team
Information for the support team.
12.1 - AAI
We have not yet translated this page. Click here for the german documentation.
13 - Roadmap
Sciebo Roadmap
On this page, we publish information about the things we plan for Sciebo in the future.
Short-term
Implementation of security according to BSI Basic Protection: 2026
Migration to new hardware: 2026
Update to Nextcloud 32: April/May
Medium-term
Update to Nextcloud 33: Date not yet known
Long-term
Improvement of Overleaf integration in Sciebo
14 - Required information by support request
What information will help the support team?
No software is completely free of errors. Sometimes, things may break elsewhere as well. Please understand that disruptions—this includes scheduled maintenance—may occur. We strive to provide the service as reliably as possible.
If you want to contact us because something isn’t working as expected, we appreciate it if you can provide us with detailed information in your very first message. Summarizing this in a general way is not trivial.
Please always check our help pages first. They are not yet complete, but we are working on it. :-)
If the problem is not listed in our documentation, please use this template to submit the issue, fill relevant fields.
1. Sciebo/Nextcloud User ID (required)
2. Institution / Organization
3. Where have you encountered with the problem.
Nextcloud Webinterface
Nextcloud Desktop Client
Nextcloud Mobile App
Other: [please specify]
4. Detailed Problem Description
5. Steps to Reproduce
6. Frequency
Always reproducible
Sporadic
Occurred only once
7. Time of occurrence (date/time)
8. Affected multiple users?
Yes, multiple
No, only single user
Unknown
9. Technical Details (Client/Environment)
Client version:[e.g., Desktop 4.0.0]
Operating system:[e.g., Windows 11, MacOS]
** Browser that was used: **
10. Error Messages, Logs & Status Messages
Errors in the webinterface (with screenshots):
Client logs
If a ticket has been created and you reply to it, please make sure to keep the subject unchanged. In particular,
the ticket information, also known as the ticket hook, must be preserved so that the ticket system can correctly
assign the information. Otherwise, we often lack the necessary context, which means we may have to ask follow-up
questions or search the system. Such things result in additional time expenditure and we cannot support you as quickly
and competently as we would like.
15 - The hidden pages
Here you see all documentation pages which are not shown due to being
confusing/WIP/whatever
Add toc_hide: true to the preamble of all pages in this section.
15.1 - Cryptnc
End-to-end encryption enables sensitive data to be transferred via the cloud without an administrator or third party being able to view the contents of the files on the server. Encryption and decryption is carried out by a client on the end device (computer, cell phone, tablet). The advantage of Nextcloud end-to-end encryption (E2EE) is that one can also share the encrypted folders without having to share the own key.
Prerequisite: an E2EE app must be activated on the server, original Nextcloud client version 3+.
Credentials: standard university login and password.
Check that the option “This account supports end-to-end encryption” is displayed in your client. Click on “Set-up encryption” to generate the encryption mnemonic.
Please save this phrase as you will need it to decrypt the files on other endpoints or to recover the files if the device is lost.
If you have already enabled encryption on the client, you can look up the mnemonic phrase by clicking ‘Show mnemonic’.
Creating the ecrypted folder
Notice: Keep a second copy of the files on your computer outside the nextcloud folder, this should also be where you edit the files.
Use the encrypted folders to transfer files between different computers.
Try not to edit files inside the encrypted folder, as they may be irreversibly encrypted. There are methods to decrypt the files using the script provided by Nextcloud, but this method has not been tested yet, so we would rather advise you to do everything possible to avoid this risk.
Create the new folder. The folder must be empty to enable encryption. This is to prevent data loss. Any files placed in this folder will automatically be encrypted. The contents of this folder won’t be displayed in the web interface. On the server side, only the top level of files would be displayed in encrypted form. This way the admin won’t be able to see the data type. So, for example, if you put another folder in the encrypted folder, it would only be shown as a file, without any details about the files in it.
Sharing the ecrypted folder via Desktop Client
Activate the Nextcloud client and navigate to the Nextcloud folder on your computer.
Right-click on the folder you want to share. If the Nextcloud client is active, you should see Nextcloud in the menu.
Clicking on Nextcloud > Share options will open a window where you can add or remove shares for the chosen file or folder.