This is the multi-page printable view of this section. Click here to print.
Getting started
- 1: Create sciebo-Account
- 2: Webinterface
- 2.1: Deleting & Restoring Files & Folders
- 2.2: Editing Files (Simultaneously)
- 2.3: Further Functionality
- 2.4: Organising Files and Folders
- 2.5: Server List
- 2.6: Sharing and recieving files and folders
- 3: Client
- 3.1: Installation and configuration of the client
- 3.2: Client Settings
- 3.3: Share files and folders
- 3.4: Synchronisation Settings
- 3.5: Client-Status-Icons
- 4: Android App
- 4.1: Android App install anc configure
- 4.2: Delete and recover files & folders
- 4.3: Create, rename, and move
- 4.4: Share files & folders
- 4.5: Upload and download
- 5: Create and manage project boxes
- 6: Groups
- 7: Guests
1 - Create sciebo-Account
To register an account, please follow these instructions:
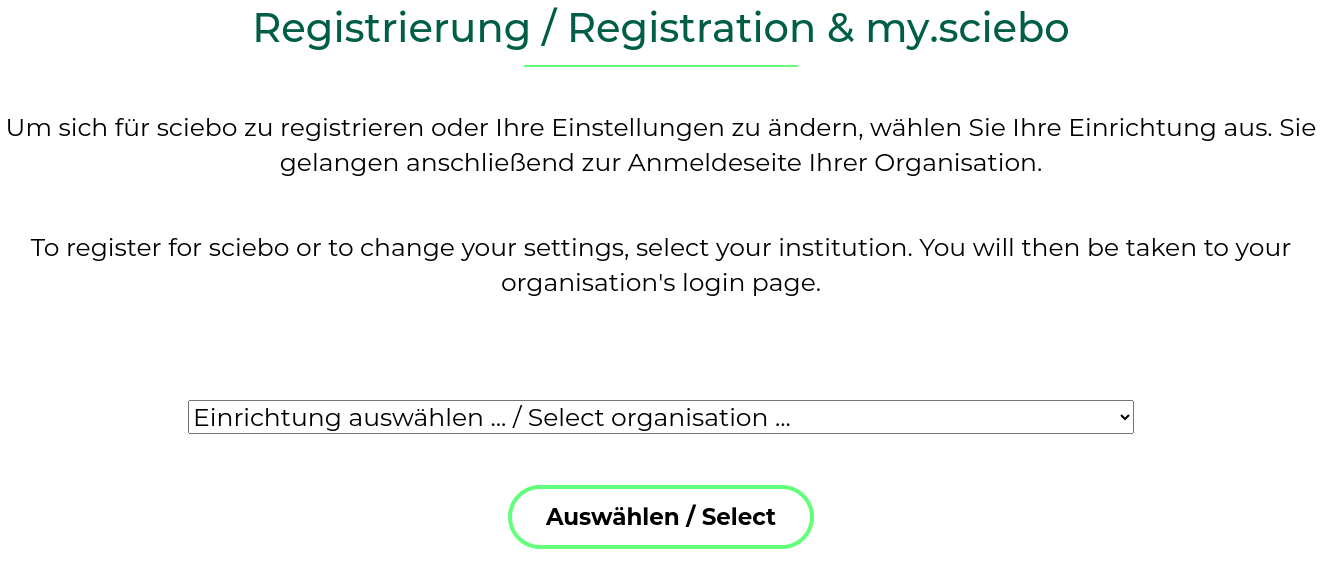
- Click on the homepage of sciebo on “Registration”.

- On the next page you will find a dropdown menu. Select your institution from there and click on “Select”.
-
You will be redirected to the Shibboleth login page of your institution. Please enter your username and password that you use for your academic services there. Check the option “Die zu übermittelnden Informationen anzeigen, damit ich die Weitergabe gegebenenfalls ablehnen kann” so that you can review the forwarded information again, and click on “Login”.
-
If all information is correct, confirm the registration by clicking on “Yes, I accept”. (If the information does not match, please contact your local IT support at your institution.)
-
Next, you will be taken to the registration page, where you are asked to set a password for your sciebo account. Within 15 minutes after setting the password, your sciebo account should be active and you should be able to log in to the Sciebo server of your institution.
Notice:
- Please note that service accounts are excluded from registering for a sciebo account.
- If you are a member of multiple universities, please use the login details of your main institution when registering.
- If data is to be shared with you, it is necessary that you activate your account through a first-time login at the web interface. It usually takes a day until you can be found via the search in the address book 1, as the address books are only synchronized between the instances once a day.
- Please be sure to check whether you can receive messages at the registered email address. The system will send you notifications this way if your registration needs to be renewed or if data shared with you might no longer be available in the foreseeable future. This can happen if the sharer’s account or a project box expires.
-
Since Nextcloud version 31, searching the address book for shared folders with other institutions is no longer possible. We hope the manufacturer will improve this in the foreseeable future. ↩︎
2 - Webinterface

With the web interface, you can access your data anywhere via web browser. No matter whether you want to upload, download, edit, delete or share data or whether you want to work on a file with several people at the same time - in the web interface, you can use all the advantages of sciebo.
2.1 - Deleting & Restoring Files & Folders
Deleting Files & Folders
Deleted files/folders remain in your trash bin for at least 30 days before they are permanently deleted. You can view the trash bin under “Deleted files” in the left menu.
Delete Individual Files/Folders
- Click on the three dots next to the file/folder and select “Delete file/folder”.
- The file or folder is moved to the trash.
Delete Several Files/Folders
- Select the files/folders you want to delete by checking the boxes on the file/folder icon.
- Click on the three dots that appear in the top menu bar and select “Delete”.
- The files/folders are moved to the trash.
Removing Files & Folders Shared with You
If you no longer need a file/folder that has been shared with you, you can delete the share. The file/folder is removed from your sciebo account, but remains with the owner.
- Click on the three dots next to the file/folder and select “Leave this share”.
- The file/folder is removed from your sciebo account. It is not moved to the deleted files to get it again; the person would need to reshare it with you.
Restoring Files & Folders
Restore Individual Files/Folders
- Open the trash bin by clicking “Deleted Files” in the left menu.
- Click on the “Restore” icon next to the file/folder you want to restore.
- The file/folder will be restored to the location where it was last saved.
Restore Several Files/Folders
- Open the trash bin by clicking “Deleted Files” in the left menu.
- Select the files/folders you want to restore by checking the boxes on the file/folder icon.
- Click on the “Restore” icon that appears in the top menu bar.
- The files/folders will be restored to the location where they were last saved.
2.2 - Editing Files (Simultaneously)

Editing Files
- Click on the file name to open the editor. Depending on the type of document (text, presentation or spreadsheet) you will be taken directly to the appropriate editor.
- Edit the file. General information on how to use the editor can be found under “File > Help”. Changes are automatically saved temporarily.
- To return to the file overview, click on the folder symbol in the upper menu bar of the editor. The file will be saved again.
Editing Files Simultaneously
In the web interface, you can edit files together with other sciebo users of your institution. The prerequisite is that the file is shared with all of them and that the appropriate editing rights have been assigned. Simultaneous editing offers simultaneous access to text, presentation and spreadsheet documents, a review function (visual marking of edited elements), a comment function, and a chat function.
The number of users currently editing the document is displayed at the top right of the control bar. Click on the user symbol to find out the names of the persons editing the document.
Notes on Simultaneous Editing
- Unfortunately, simultaneous editing is currently not possible with persons from other universities or guest accounts.
- A co-edited document is only synchronised via the client when you close the editor.
- Simultaneous editing may only be carried out via the web interface. Parallel editing via the desktop client leads to conflicts when saving.
- The undo/redo function cannot be used.
2.3 - Further Functionality
In the header of the webinterface of Sciebo you can find different. Here you can find informormation on each of these apps.
Files
Here you can manage your files. Further information you can find here:
Photos
Here you can upload anf manage your photos.
Activity
Here you can see the activity of your Sciebo-Account. The list of file changes is generated automatically.
Contacts
Here you can create and manage personal contancts.
Calendar
Add envents to this calandar. You can import calander data. If you are already using a digital calendar, it can usually export its calendar data. The file that is created in this way can be imported into the calendar app.
Notes
In the Notes app you can format and organise your thoughts with Markdown, a popular and simple rich text format.
Deck
Deck is a visual project management tool. For further information click here
Announcements
Here you can find important announcements from the sciebo-team.
Polls
Create and share polls. For further information click here
Forms
Create and share forms. Here you can create very intrecate forms and share them even with people that are not sciebo-users!
Help
Here you get to this page.
Tasks
Manage your todos in this application!
Overleaf
Sciebo hosts its own overleaf instance. For more information click here
2.4 - Organising Files and Folders

Creating, Renaming & Moving Files & Folders
Creating Files & Folders
- Click on the “+ New” symbol in the upper menu bar.
- Select “New folder” or the type of file you want to create.
- Name the file or folder.
- Press the Enter key. A new file or folder is created. (New files are opened directly in edit mode.)
Renaming Files & Folders
- Click on the three dots next to the file and select “Rename”.
- Enter a new name and press the Enter key.
Moving Files & Folders
Move Individual Files/Folders
- Click on the three dots next to the file or folder you want to move and select “Move of Copy”.
- In the opened window, select the folder to which the file should be moved and click on it.
- Click on the “Move to …” button that appears at the bottom of the window. The file/folder is now inserted.
Move Several Files/Folders
- Select the files/folders you want to move by checking the boxes on the corresponding icons.
- Click on the “Move of copy” icon that appears in the top menu bar.
- In the opened window, select the folder to which the file should be moved and click on it.
- Click on the “Move to …” button that appears at the bottom of the window. The files/folders are now inserted.
Up- & Downloading Files & Folders
Uploading Files
- Select “Upload files” under “+ New”.
- Select one or more files and click “Open”. Alternatively, you can drag and drop the file(s) from your PC into the browser window.
- The loading bar shows the upload progress.
Uploading Folders
- Select “Upload folders” under “+ New”.
- Select one or more folders and click “Open”. Alternatively, you can drag and drop the folder(s) from your PC into the browser window.
- The loading bar shows the upload progress.
Downloading Files & Folders
Download Individual Files/Folders
- Click on the three dots next to the file/folder and select “Download”.
- Decide where the file/folder will be saved on your computer.
- When saving folders, a zip file is created which you must unzip before opening.
Download Several Files/Folders
- Select the files/folders you want to download by checking the boxes on the folder/file icon.
- Click on the “Download” icon that appears in the top menu bar.
- The download will be a zip file.
2.5 - Server List
List of Universities
Using the URLs from this list, you will gain access to the Sciebo web interface of your respective university.
Please use only your Sciebo-ID for login.
Note: These URLs also apply if you are asked for the server URL in the original Nextcloud client.
2.6 - Sharing and recieving files and folders
Further Information
You can find further information in our articles about sharing!Sharing Files and Folders
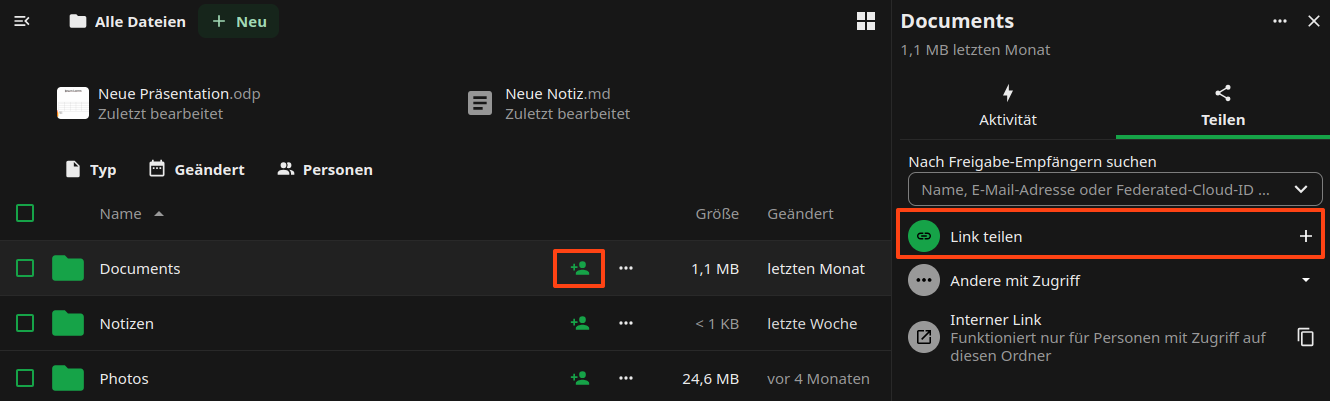
Notice: Since Nextcloud version V31, sharing content has been handled differently. The areas for sharing with users of the same institution are located in the upper section, while the lower section is used for users of other higher education institutions and guests. Unfortunately, Nextcloud has deactivated the address book search in the lower section. We currently cannot change this. Therefore, you need to search for the Federated Cloud ID here.
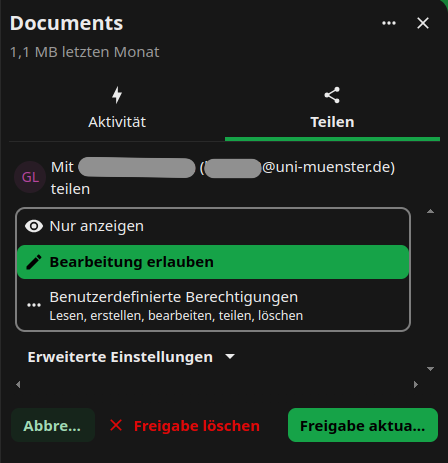
Sharing Files & Folders with Other Users
Sharing with Other Users
- Click the head icon next to the item you want to share. You can share both, individual files and folders.
- The share menu opens on the right.
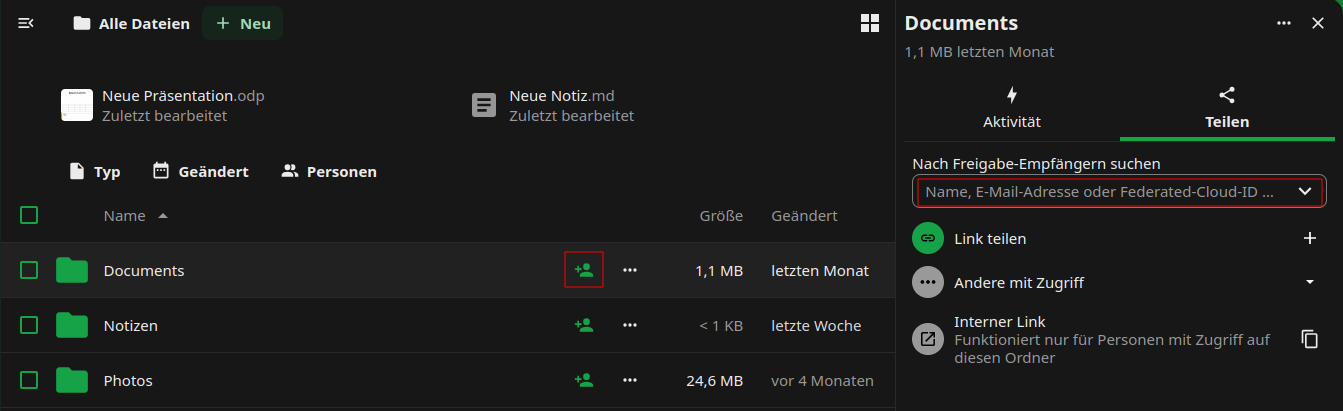
- In the text box, enter the name of the person with whom you wish to share your data, following the principle “last name, first name”. Select the person from the list that appears.
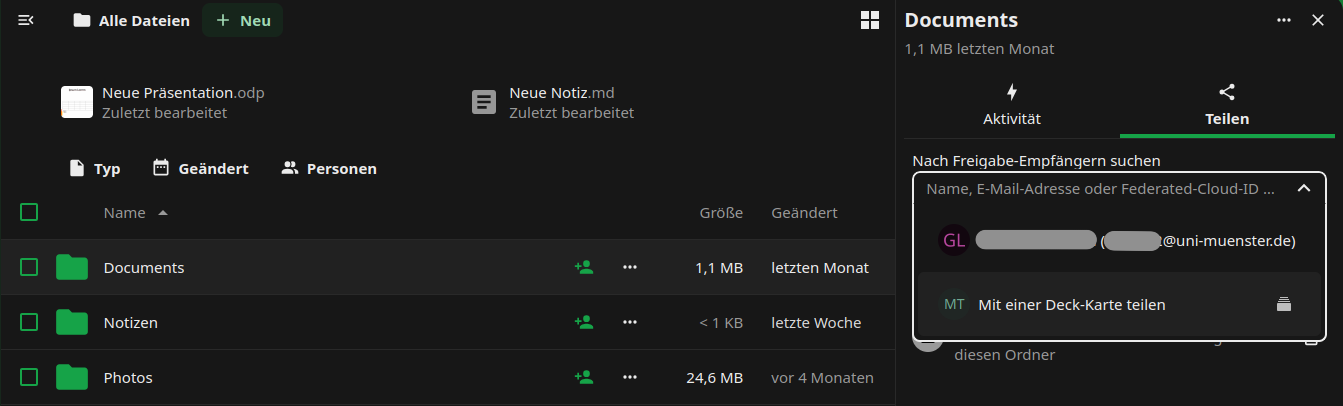
- Decide what rights the person will have regarding the file or folder you shared. The write permissions include “create”, “edit” and “delete”. We recommend that you disable the sharing permission (“can share”). You can change the rights at any time.
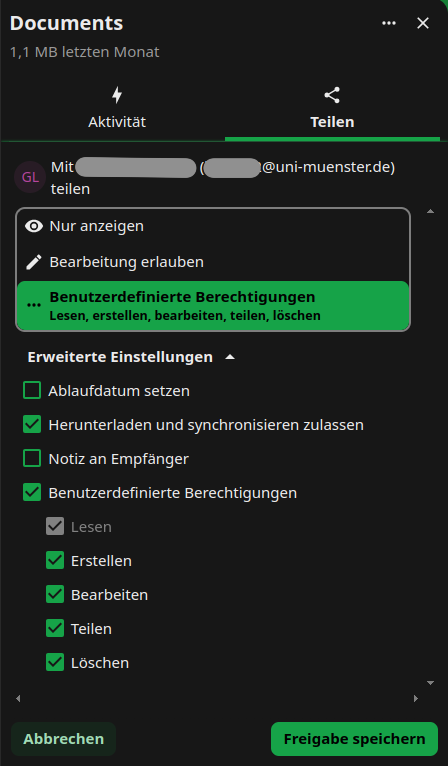
- You can delete the share by clicking on […] icon next to the person’s name and choose option “delete share”.
Sharing Files & Folders via Link
Sharing via Link
- Click the head icon next to the item you want to share. You can share both individual files and folders.
- The share menu opens on the right.
- Click on the “+” symbol near “Public Links” this would create a public link.
- Decide which permissions people who access the file or folder via the link will have. Click on […] on symbol, choose the “Customize link” option, update the relevant permissions and approve by clicking “update share link”.
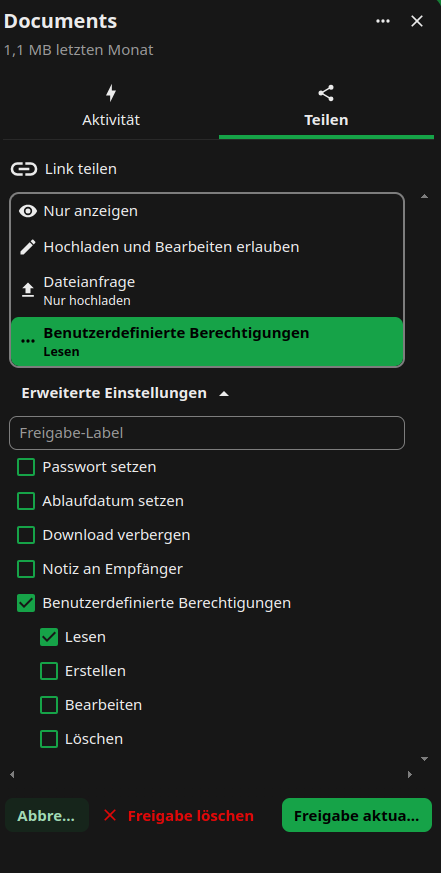
Optional: Set a password to protect your data from unauthorised access.
Optional: Set an expiry date to protect your data from unauthorised access.
Adding Files & Folders Shared by Link
If other users share data with you via link, you can add the shared files/folders to your own sciebo account.
- Open the link and, if necessary, enter the password with which the link is protected.
- Click on […]-Symbol.
- Enter your sciebo-ID with the server address (e.g. user1@instance.de@instance.sciebo.de) in the “Hinfpgen zu Ihrer Nextcloud” input field and click on the arrow to the right of the field.

- You will be forwarded to the sciebo login page. Log in with your sciebo identification.
- The link is now displayed as “Remote Sharing” in a pop-up window. You may need to re-enter the password that protects the link. Then confirm the receipt by clicking on “Accept”.
- The files/folders will now be added to your account.
Receive Files & Folders via Link (file drop)
If you need to receive large files from external sources, you can create a “file drop” for this purpose.
- Create a new folder.
- Click on the header icon next to the directory where the files are to be uploaded.
- The share menu opens on the right.
- Click on the “+” symbol near “Public Links” this would create a public link.
- Click on […] and choose the “Customize link” option, in the opened window choose the “File request/Upload only” option, update the relevant permissions and approve by clicking “update share link”.
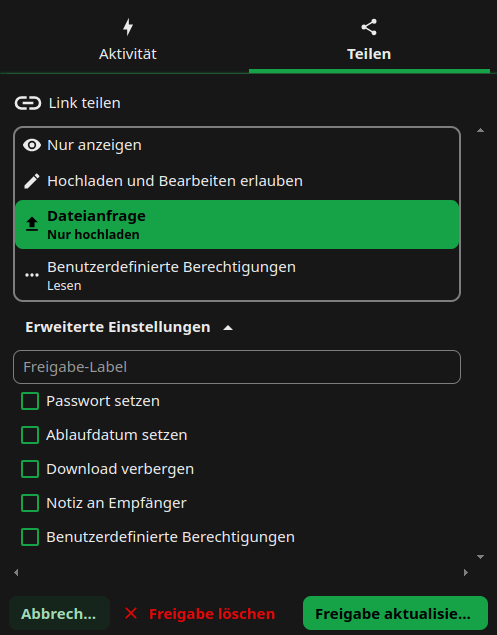
Optional: Set a password to protect the folder from unauthorised uploads.
Optional: Set an expiry date to protect the folder from unauthorised access.
please notice:
- If you want to share large files or folders with people that are not in your institution, the synchronisation can be quite slow, because the files need to be transferred.
- Within the same institution, this approach is not recommended, as it also creates an external share (remote share) which does not work as reliably as a direct user-to-user share within an institution.
3 - Client
Download
More information on downloading the client application can be found here!The desktop client is a program that allows you to store your data from the cloud locally on your computer or laptop. The client runs in the background and automatically synchronises your data so that you always have the latest version of a file available on all devices.
3.1 - Installation and configuration of the client

Installation
Windows
- Download sciebo for your PC.
- After a successful download, open the installation file.
- Confirm that you want to run the file by clicking on “OK”. The setup wizard appears.
- Click on “Next” to make the installation settings.
- If you do not want to install sciebo at the suggested location, select the folder for the installation now. Otherwise, click directly on “Next”.
- Click on “Install.” You may have to confirm that the software may be installed on your PC. Sciebo will then be installed.
- Click on “Finish” to close the setup wizard.
- Finally, you will be asked whether you want to restart your PC immediately or later so that sciebo works properly. Select the desired option. After restarting, you can set up your folder synchronisation (see below).
MacOS
- Download sciebo for your PC.
- After a successful download, open the installation file. The setup wizard appears.
- Click on “Continue” to make the installation settings.
- Now select where or for which users of the PC you want to install the software and click on “Continue”.
- Click on “Install”. You may have to confirm that the software may be installed on your PC. Sciebo will then be installed.
- Click on “Close” to close the setup wizard.
Linux
- Download sciebo for your PC.
- After successful download give AppImage permission to run by opening the terminal and entering
chmod u+x Sciebo-Linux64-VERSION. - Start the client by typing
./Sciebo-Linux64-VERSIONin the terminal. Configure the client. During the configuration, the Client will be added into autoload and by next restart would start automatically.
Configuration
- Open the client. The connection wizard appears.
- Select your sciebo institution from the list.
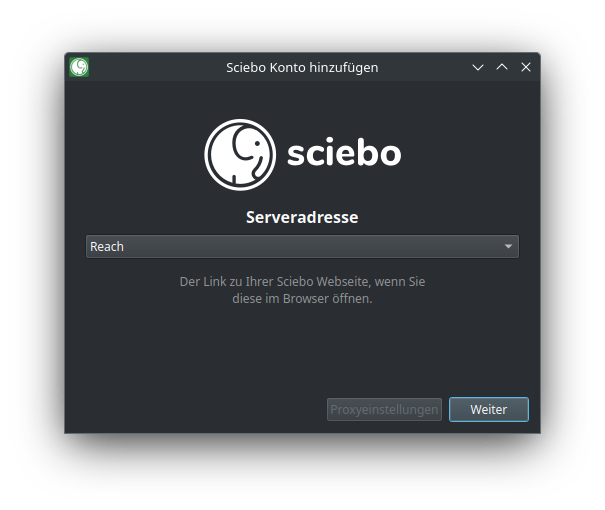
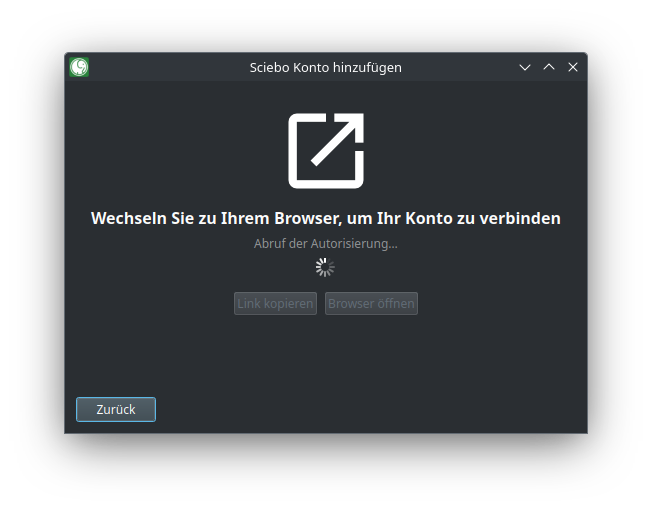
- A browser will open and you will be asked to log in and allow the client to access your data.
- By default, your entire sciebo directory is synchronised. For folders larger than 500 MB, you must manually confirm synchronisation for the first time. However, you can also change the limit or deactivate this function. (If you do not want to synchronise your entire sciebo directory, you can decide which subfolders are synchronised under “Select elements to be synchronised”).

- Select a destination folder on your PC. (This folder will be synchronised with your sciebo directory, i.e. the data you selected from sciebo will be saved here, and files and folders newly created in this folder will be uploaded to sciebo).
- Click on “Connect…”
Hinweis
If you want to synchronize different subfolders with different destination folders, start with the first subfolder. You can add additional folder synchronizations later via the client.3.2 - Client Settings
User Account
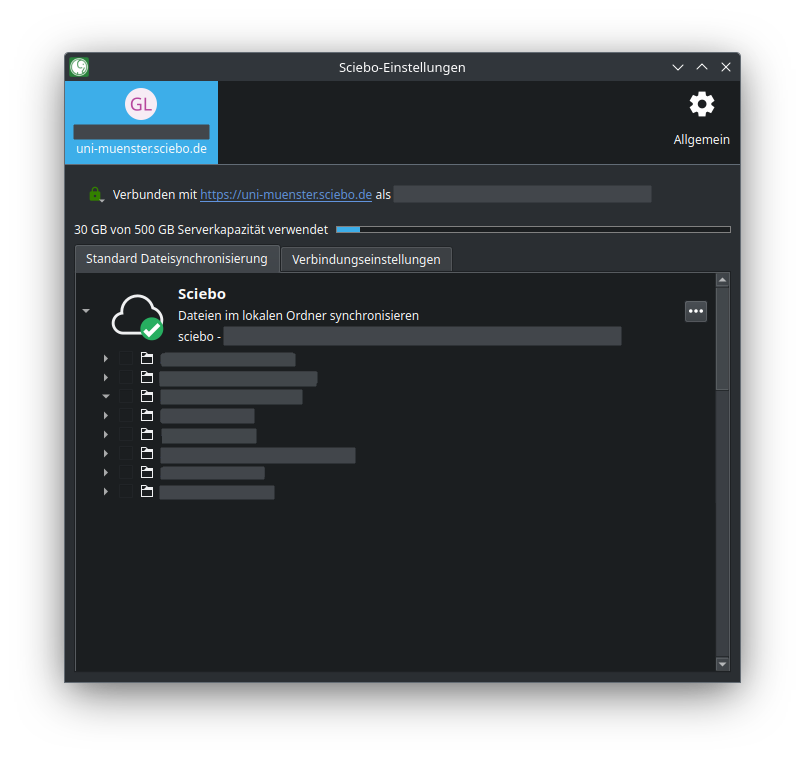
Under the tab with your sciebo ID, you will get an overview of
- the storage space is available to you in sciebo and the share you already use,
- all folder synchronisations (if you synchronise your entire sciebo folder with a single destination folder, you will only see a single folder synchronisation),
- for each folder synchronisation, all folders and subfolders that are synchronised on your PC. You can make synchronisation settings here.
Settings
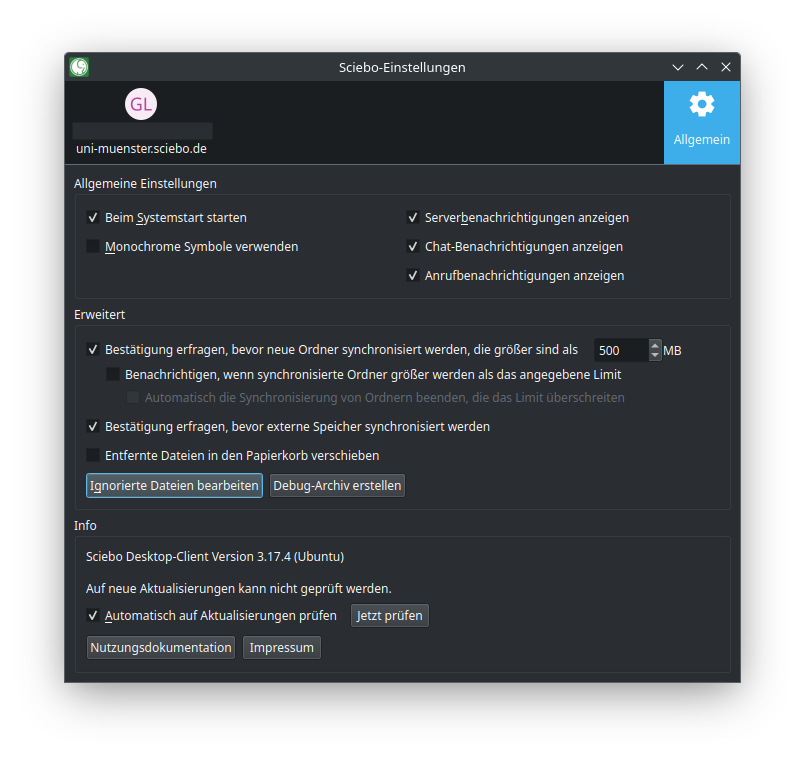
Under the “General” tab, the version of the sciebo client you are using is displayed. You can also specify.
- whether the sciebo client should be started when you switch on your PC,
- whether you want to receive desktop notifications,
- whether the synchronisation of large folders has to be confirmed and if so, from which size limit,
- whether synchronisation of external storage needs to be confirmed,
- whether sciebo client should check if there are updates available.
3.3 - Share files and folders
Sharing with Other Users
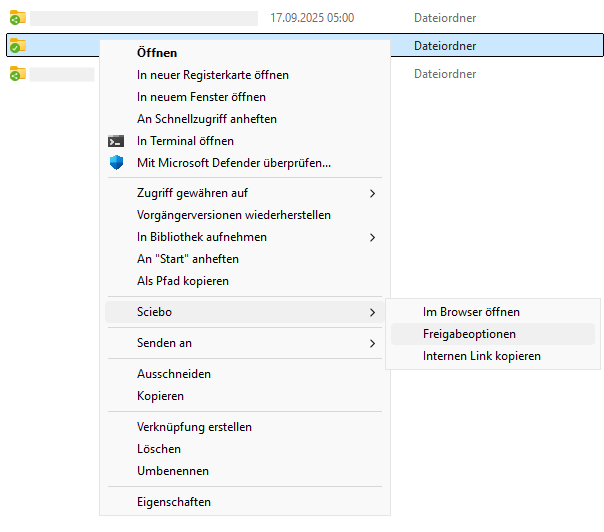
- Open your local sciebo folder.
- Open the context menu for the file or folder you want to share. Select “sciebo” and then “Share options”.
- A new window opens. In the field “Search for users or groups”, enter the name of the desired user according to the scheme “last name, first name”.
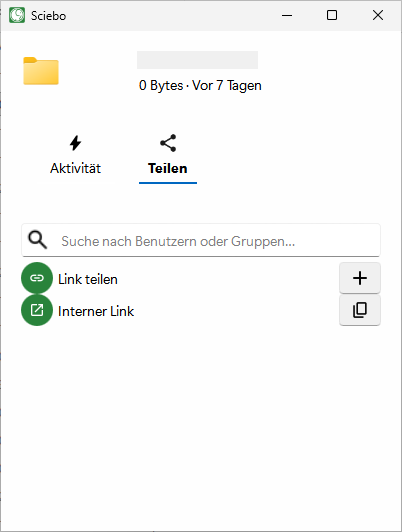
- Select the person from the list.
- Determine which rights the person receives by clicking on […] near person/group name and setting or removing the corresponding ticks.
- Close the menu.
You can check at any time with which persons and groups a file or folder has been shared by calling up the share menu again. There you will find a corresponding list where you can manage editing rights and delete shares.
Sharing by Link
- Open your local sciebo folder.
- Open the context menu for the file or folder you want to share. Select “sciebo” and then “Share options”.
- The share menu opens in a new window. Click the plus sign near “Share Link”.
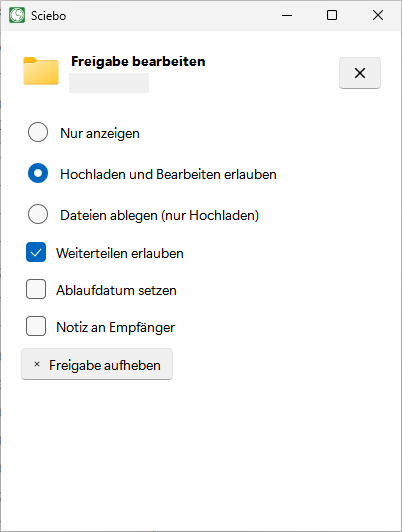
- Decide which rights people who access the file or folder via the link will have by clicking on […] near “Share Link” and setting or removing the corresponding ticks. The following options are available:
- View only
- Allow upload and editing
- File drop (Upload only)
- Hide download

- Optional: Set a password to protect your data from unauthorised access.
- Optional: Set an expiration date to protect your data from unauthorised access.
- Optional: Give the link a different name. By default, the new link is called “Public Link”.
- The options are saved automatically. As you are done, close the menu.
- Click on the copy sign next to the new link to copy it to the clipboard and send it by e-mail, for example.
- Close the menu.
You can check at any time whether a file or folder has been shared by link by calling up the share menu again. There you will find a corresponding list where you can manage and delete associated links.
3.4 - Synchronisation Settings
The sciebo desktop client allows you to synchronise your sciebo directory (to various local folders) on your computer. You determine which data is synchronised and which is not. This is especially useful if you use your sciebo account on different computers or for different purposes. For example, employees can synchronise only data for teaching on their laptop and all data on their desktop PC.
Setting Up Further Folder Synchronisations
If you want to synchronise different subfolders with different destination folders, you can set this up in the client.
- Open the client. The tab with your user ID is displayed. (If you have already created an initial folder synchronisation when setting up the client, it will be displayed here).
- Click on “Add folder synchronisation”.
- Select the destination folder and click “Next”.
- Select the sciebo folder you want to synchronise and click on “Next”.
- Click on “Add synchronisation”.
- The new folder synchronisation is now displayed in the overview and the synchronisation process starts.
Stop Synchronisation of Individual Subfolders
In the client you have the option to exclude individual subfolders that you have synchronised so far from synchronisation and thus remove them from your PC. As these folders remain in sciebo, you can select and synchronise these folders again at any time.
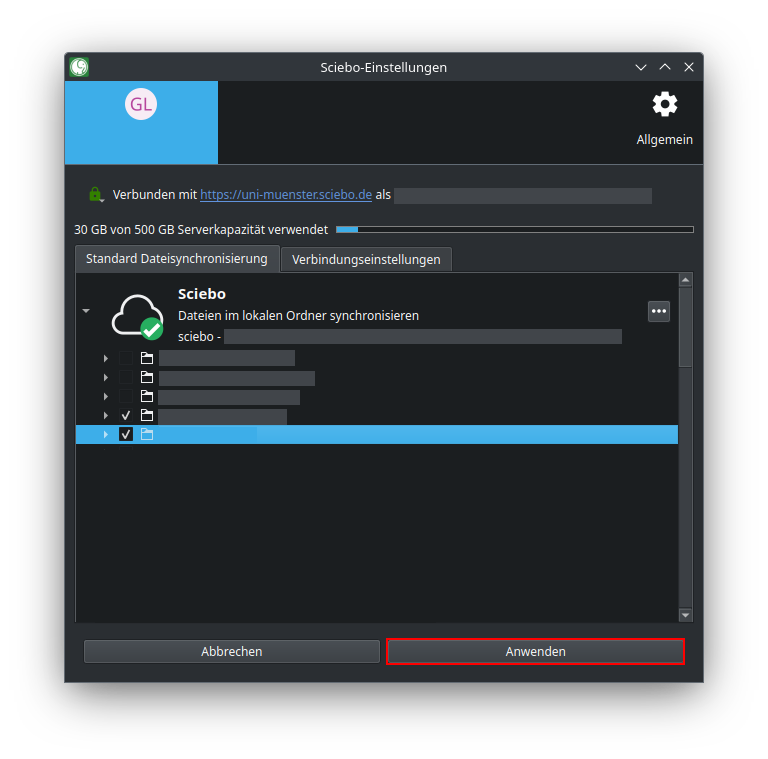
- Open the client. The tab with your user ID is displayed.
- Click on the small arrow next to the folder synchronisation to show the subfolders.
- Untick the subfolders that you no longer want to synchronise.
- Click on “Apply”.
Synchronising Large Folders
Subfolders that exceed a size of 500 MB are not automatically synchronised. In the client, these folders are highlighted with a red font colour. If you want to synchronise them, you must manually confirm the synchronisation once. (You can adjust the size limit or deactivate this setting in the client settings.)
- Open the client. The tab with your user ID is displayed.
- Click on the small arrow next to the folder synchronisation to show the subfolders.
- Tick the box of the folder concerned.
- Click on “Apply manual changes”.
Pausing Synchronisation
You can pause folder synchronisation in the client, e.g. if you do not want your Internet connection to be burdened by the synchronisation of data temporarily.
- Open the client. The tab with your user ID is displayed.
- Click on the three dots next to the folder synchronisation you want to pause. (If you synchronise your entire sciebo directory with a single destination folder, only one folder synchronisation will be visible).
- Click on “Pause synchronisation”.
- To continue synchronisation at a later time, you must repeat the same steps, but click on “Continue synchronisation” in the last step.
Removing Synchronisation
In the client, you can remove existing folder synchronisations, e.g. if you no longer need a folder synchronisation or want to restructure the synchronisation.
- Open the client. The tab with your user ID is displayed.
- Click on the three dots next to the folder synchronisation you want to remove. (If you synchronise your entire sciebo directory with a single destination folder, only one folder synchronisation will be visible).
- Click on “Remove folder synchronisation”.
- A new window opens in which you must click again on “Remove folder synchronisation”. The folder synchronisation is then deleted.
3.5 - Client-Status-Icons
The desktop client uses icons in various locations to indicate the current status. This can be very helpful when troubleshooting. Therefore, if an icon appears that suggests a problem, you should select the “Open Sciebo Desktop” option from the context menu in the taskbar to see if any corresponding error messages are displayed.
The Meaning of the Most Important Icons
| Location | Icon | Meaning |
|---|---|---|
| settings | everyting is fine | |
| settings | sync in progress | |
| settings | sync paused | |
| settings | error occured | |
| system tray | everything is fine | |
| system tray | sync in progress | |
| system tray | sync paused | |
| system tray | initialisation or error | |
| system tray | error occured |
Tip: In Windows, the icon is often hidden from the taskbar. You can adjust this setting under
Personalization => Taskbar => Other taskbar icons.
4 - Android App
The mobile app is ideal for viewing and sharing files on the go. You can upload, delete, and move files (e.g., photos). However, since mobile devices usually have limited storage space, your data is not automatically downloaded. A file is only saved on your device when you manually access it.
4.1 - Android App install anc configure
Setup
- Download the sciebo app from the Play Store or from our download page and open it.
- Select the server name of your institution. You will be redirected to the login page. Click on “Login”.
- Then enter your sciebo username (sciebo-ID@your-institution.de) and your password.
- Click on “Authorize” to grant the sciebo app access to your sciebo account.
4.2 - Delete and recover files & folders
Deleting Files & Folders Locally
- Tap the three dots next to the file or folder to open the context menu.
- Select the “Delete” option.
- Click the “Locally only” button to delete the file or folder from your phone. The file or folder will now only be deleted locally and will not be removed from the sciebo server.
Deleting Files & Folders
- Tap the three dots next to the file or folder to open the context menu.
- Select the “Delete” option.
- Click the “Delete” button to delete the file or folder from your sciebo account. The file or folder will now be moved to the trash.
Restoring Files & Folders
Restoring individual files/folders
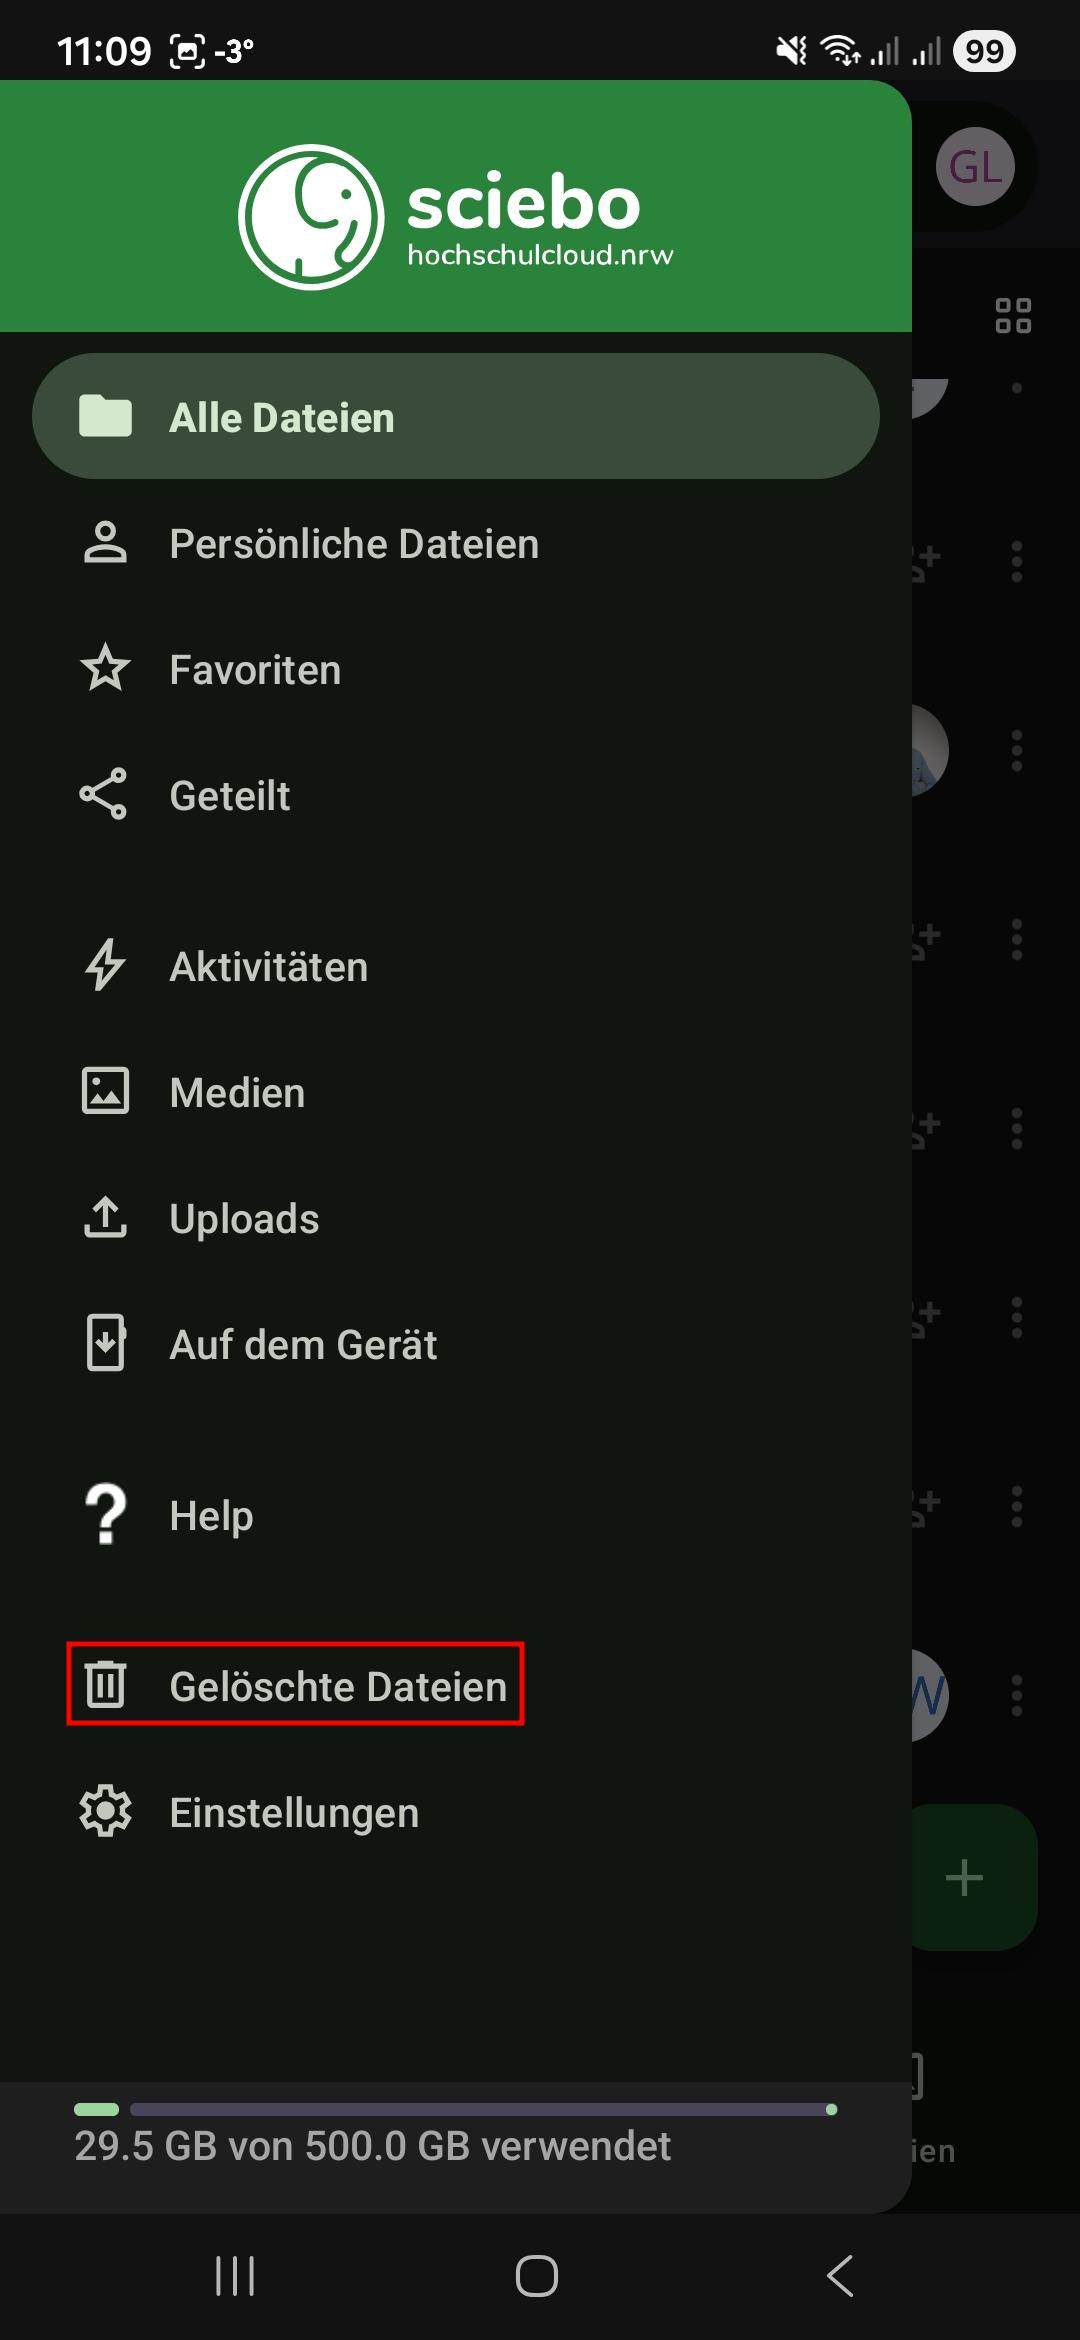
- Click on the three lines at the top left.
- Select the “Deleted files” option from the menu.
- Click the “Restore” icon next to the file or folder you want to restore.
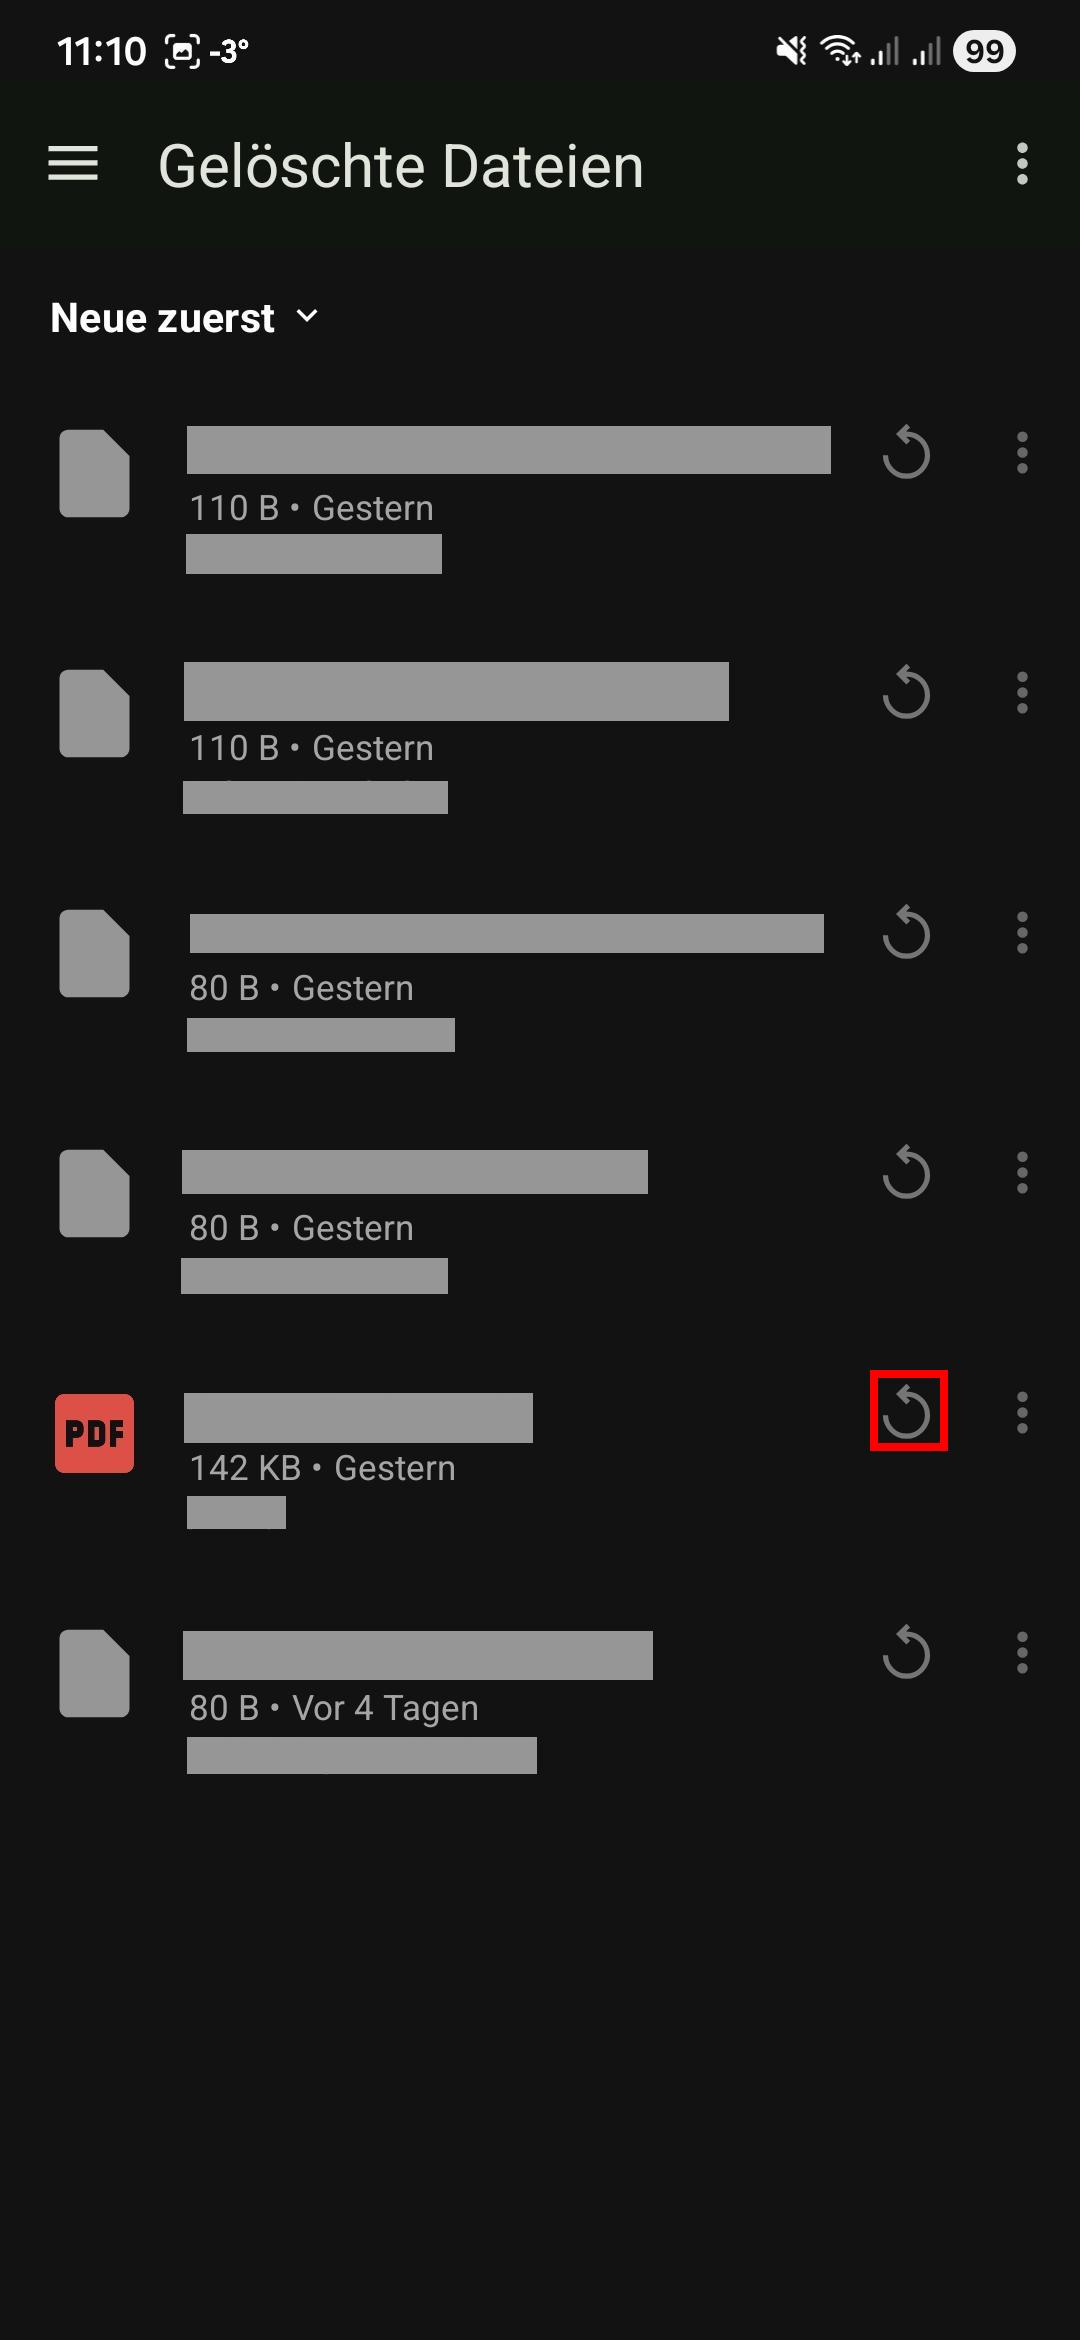
- The file or folder will be restored to the location where it was last saved.
4.3 - Create, rename, and move
Creating Files & Folders
- Select the folder in which you want to create the new folder.
- Tap the “+” button at the bottom right. It opens the context menu.
- Tap the menu “New folder” entry.
- Name the folder.
- Tap on “Create”. A new folder is created.
Renaming Files & Folders
- Tap on tree dots next to the file or folder you want to rename. It opens the context menu.
- Select “Rename”.
- Enter a new name.
- Tap “Rename”.
Moving Files & Folders
- Tap on tree dots next to the file or folder you want to move. It opens the context menu.
- Select “Move or copy”. This takes you to the top folder level.
- Select the folder to which you want to move the file or folder.

- Tap “Move” in the bottom menu bar to move the file or folder.
4.4 - Share files & folders
Sharing with Other Users
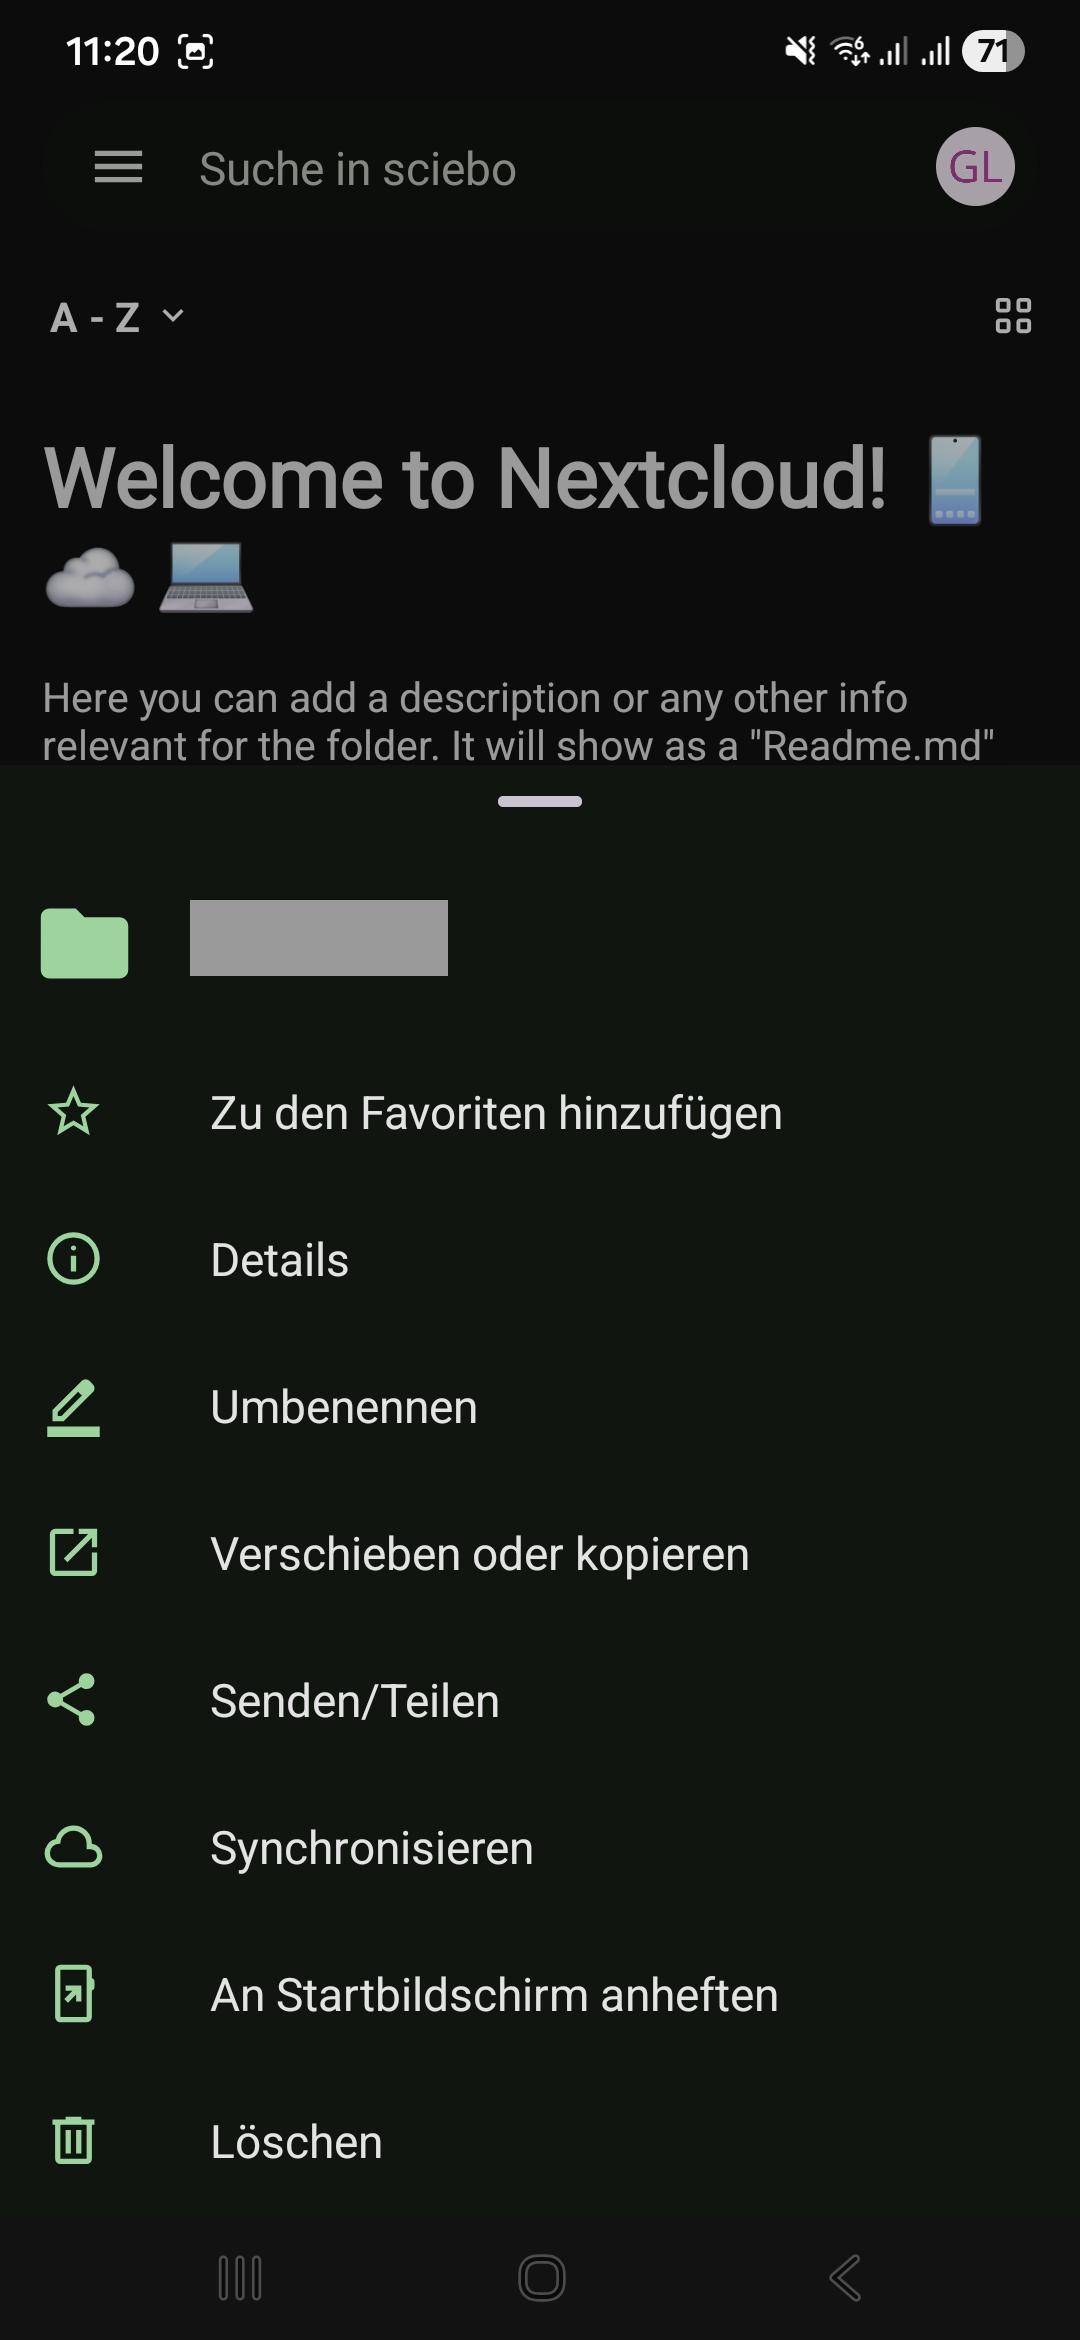
- Tap the three dots next to the file or folder to open the context menu.
- Tap the “Send/Share” menu entry.
- Tap the “Share” button.
- Enter the name of the desired user in the format “Last Name, First Name” into the “Add user or teams” field.
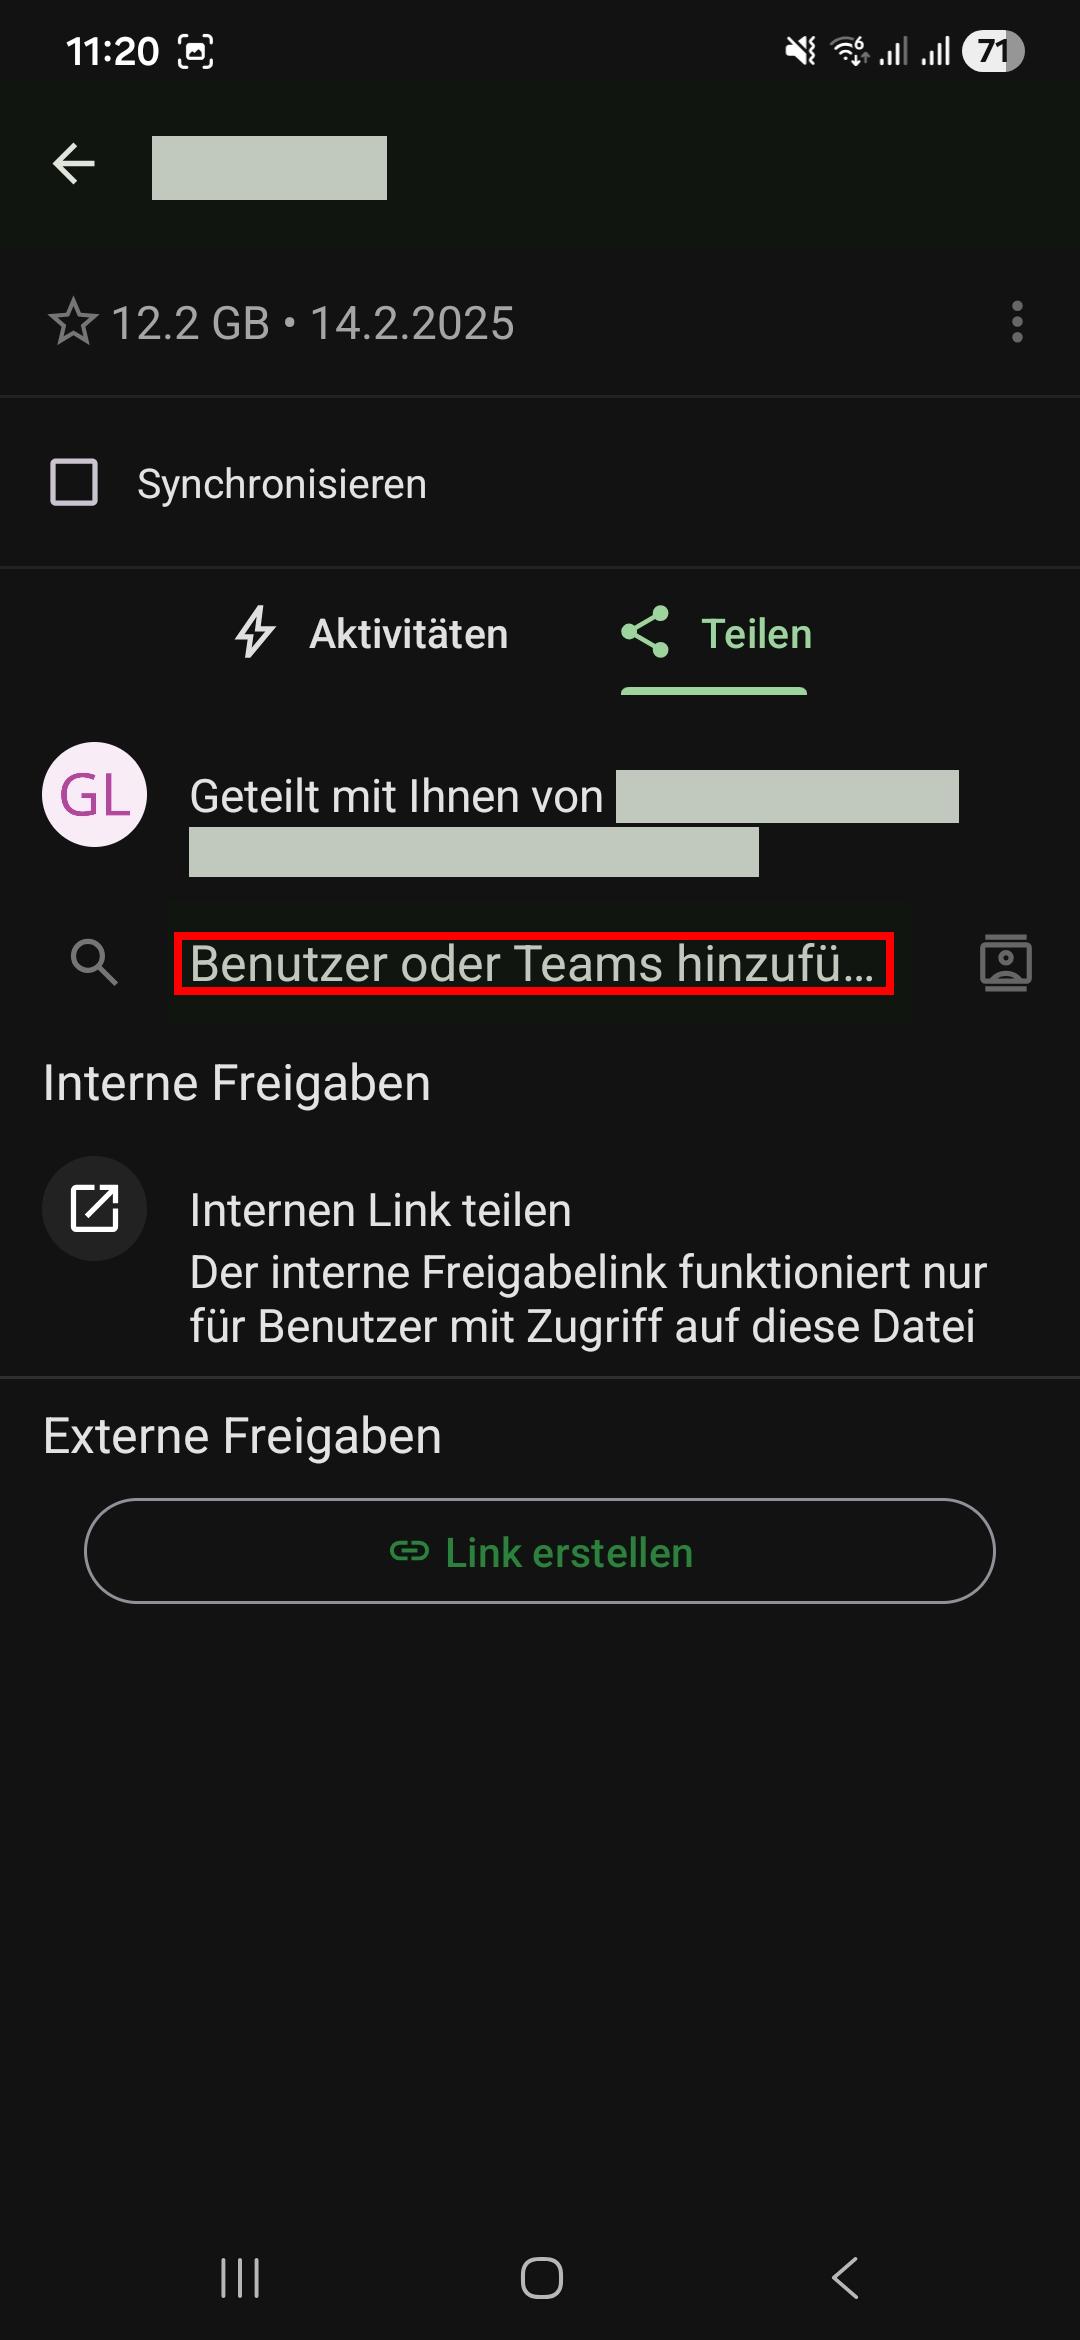
- Set the person’s editing rights. Adjust the rights as needed. Click “Next”.

- Close the sharing menu by tapping the arrow in the upper menu bar.
You can see which people and groups a file or folder has been shared with at any time by calling up the sharing menu again. There you will find a corresponding list in which you can also manage editing rights and delete shares.
Sharing via Link
- Tap the three dots next to the file or folder to open the context menu.
- Tap the “Send/Share” menu entry.
- Tap the “Share” button.
- Tap the “Create link” button. A link will be created.
- Adjust the editing rights by tapping the three-dot icon next to the link and selecting “Settings”.

- Optional: Change the name of the link.
- Optional: Set a password to protect your data from unauthorized access.
- Optional: Set an expiration date to protect your data from unauthorized access.
- Tap “Share and copy link”.
- Close the sharing menu by tapping the arrow in the upper menu bar.
4.5 - Upload and download
Uploading Files
- Select the folder where you want to upload the file(s).
- Tap the “+” button at the bottom right. Two new buttons appear.
- Tap the button with the “Upload” symbol.
- Select “Files”. (You may now have to confirm that sciebo is allowed to access your photos/videos. The option “Allow access to all photos” is particularly uncomplicated. However, you can also restrict access to certain photos/videos via “Select photos…”).
- Select the desired file(s) and tap on “Select”. The files will now be uploaded to the sciebo server.
Downloading Files & Folders
- Tap the file or folder you want to download with your finger for a moment to select it.
- Tap the “download” symbol in the upper menu bar. The file or folder is now saved locally on your device. Downloaded items are marked in the app with a small green circle with a white “download” symbol.
Note: If you want to delete downloaded data locally, select the file or folder again and tap on the three dots in the upper menu bar. Select “Delete” and then “Local only”. The file remains in sciebo, but no longer takes up space on your device.
5 - Create and manage project boxes
In this brief HOW-TO, we will take you through the steps of applying for a Project Box and setting it up so that you can actually work with the files stored in the Project Box using your private Sciebo account.
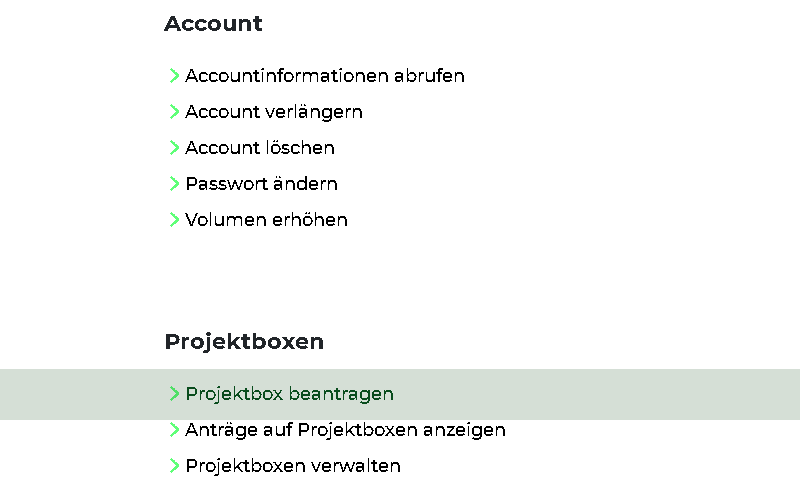
Apply for the project box
To request a project box, you must first submit the project box application in mysciebo. You will find the relevant field unter the heading Project boxes.
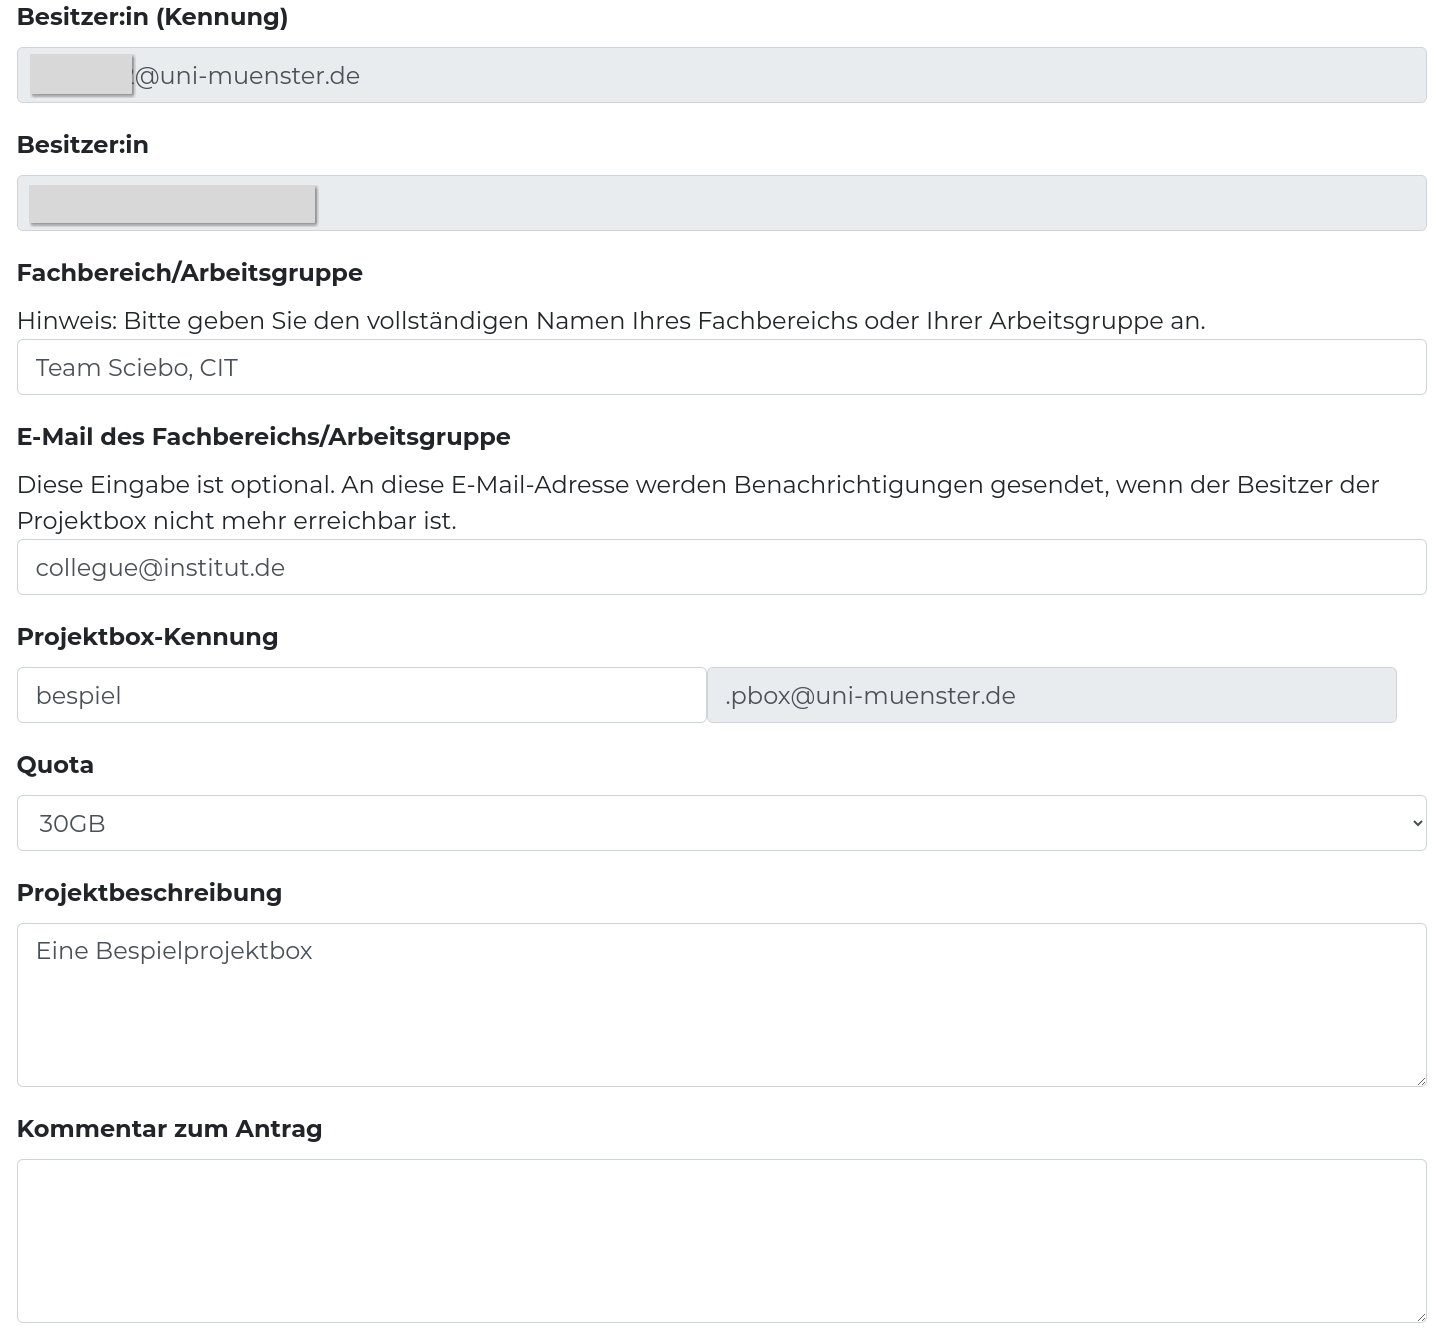
The form for the project box must be completed there; in the ‘Department/Workgroup’ field, please provide as precise a description as possible of the actual working group. Also enter the e-mail address of a person who can be contacted if you are unavailable in the “E-mail of Department/Workgroup” field. As the project box is not personalised, this makes it easier to reassign the data when you leave the university and the project box becomes orphaned.
Set up a password
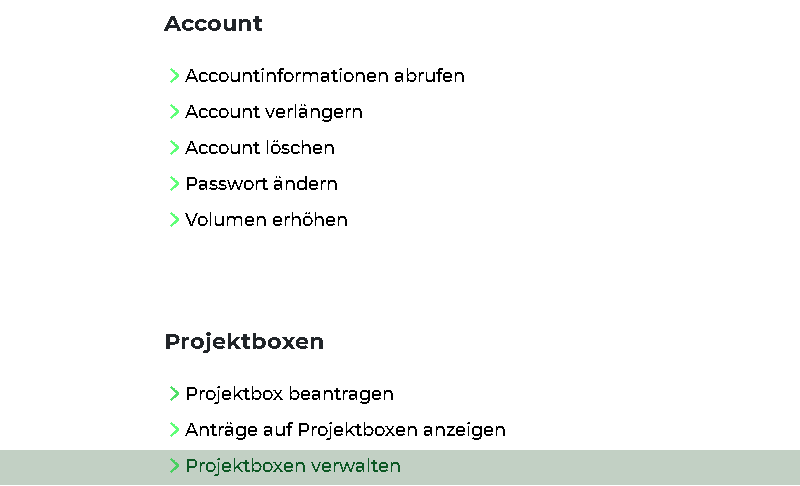
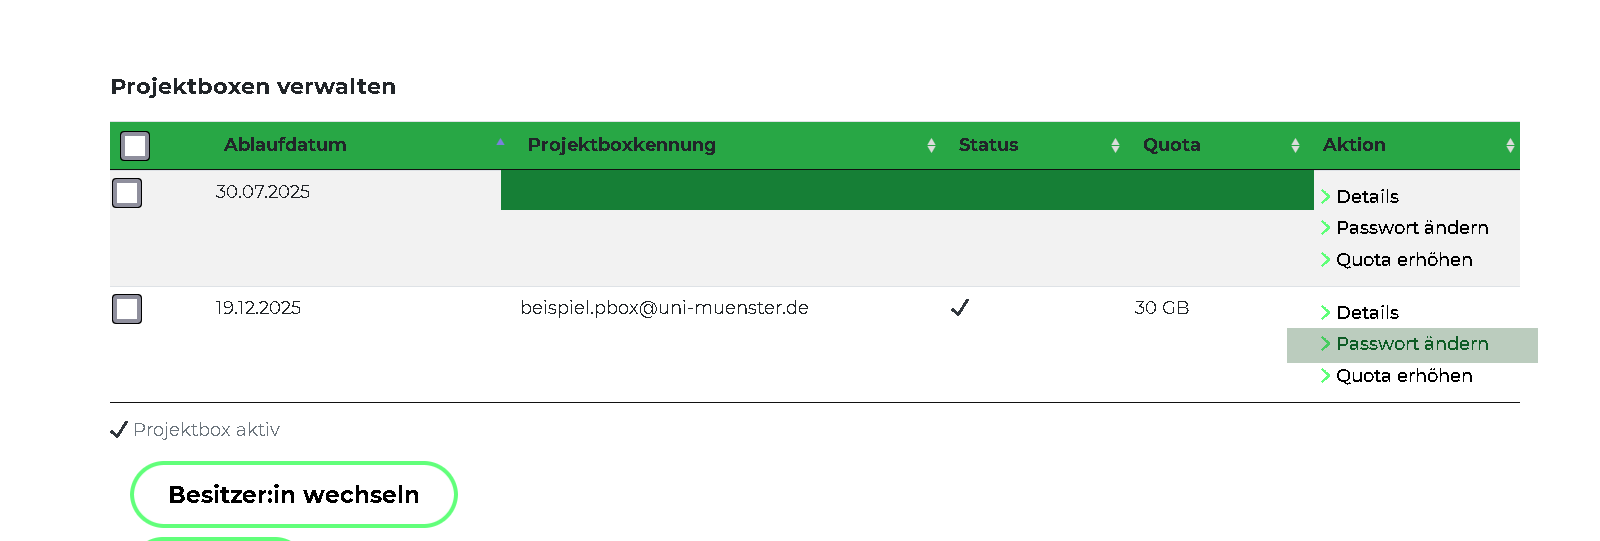
Once this request has been accepted, you can access the project box management menu in mysciebo by clicking on ‘Manage project boxes’:
Here you need to set a password for the project box.
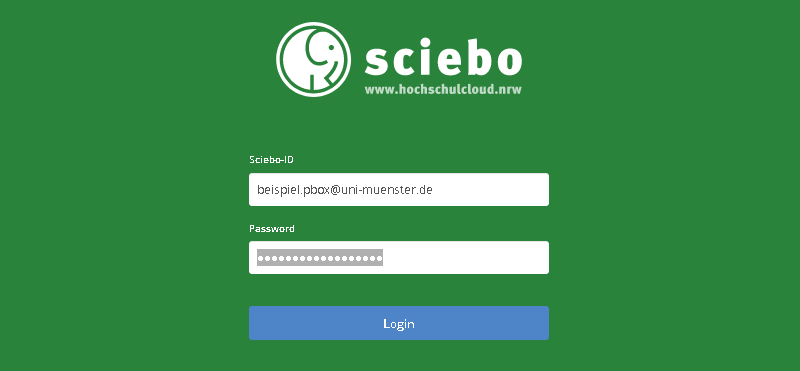
Log in to the project box and set up shares
Now you can log in to your own Sciebo instance with this project box. For me, this is
https://uni-muenster.sciebo.de. Please note
the .pbox@institute at the end of the project box name, for example .pbox@uni-muenster.de for the University of Münster.
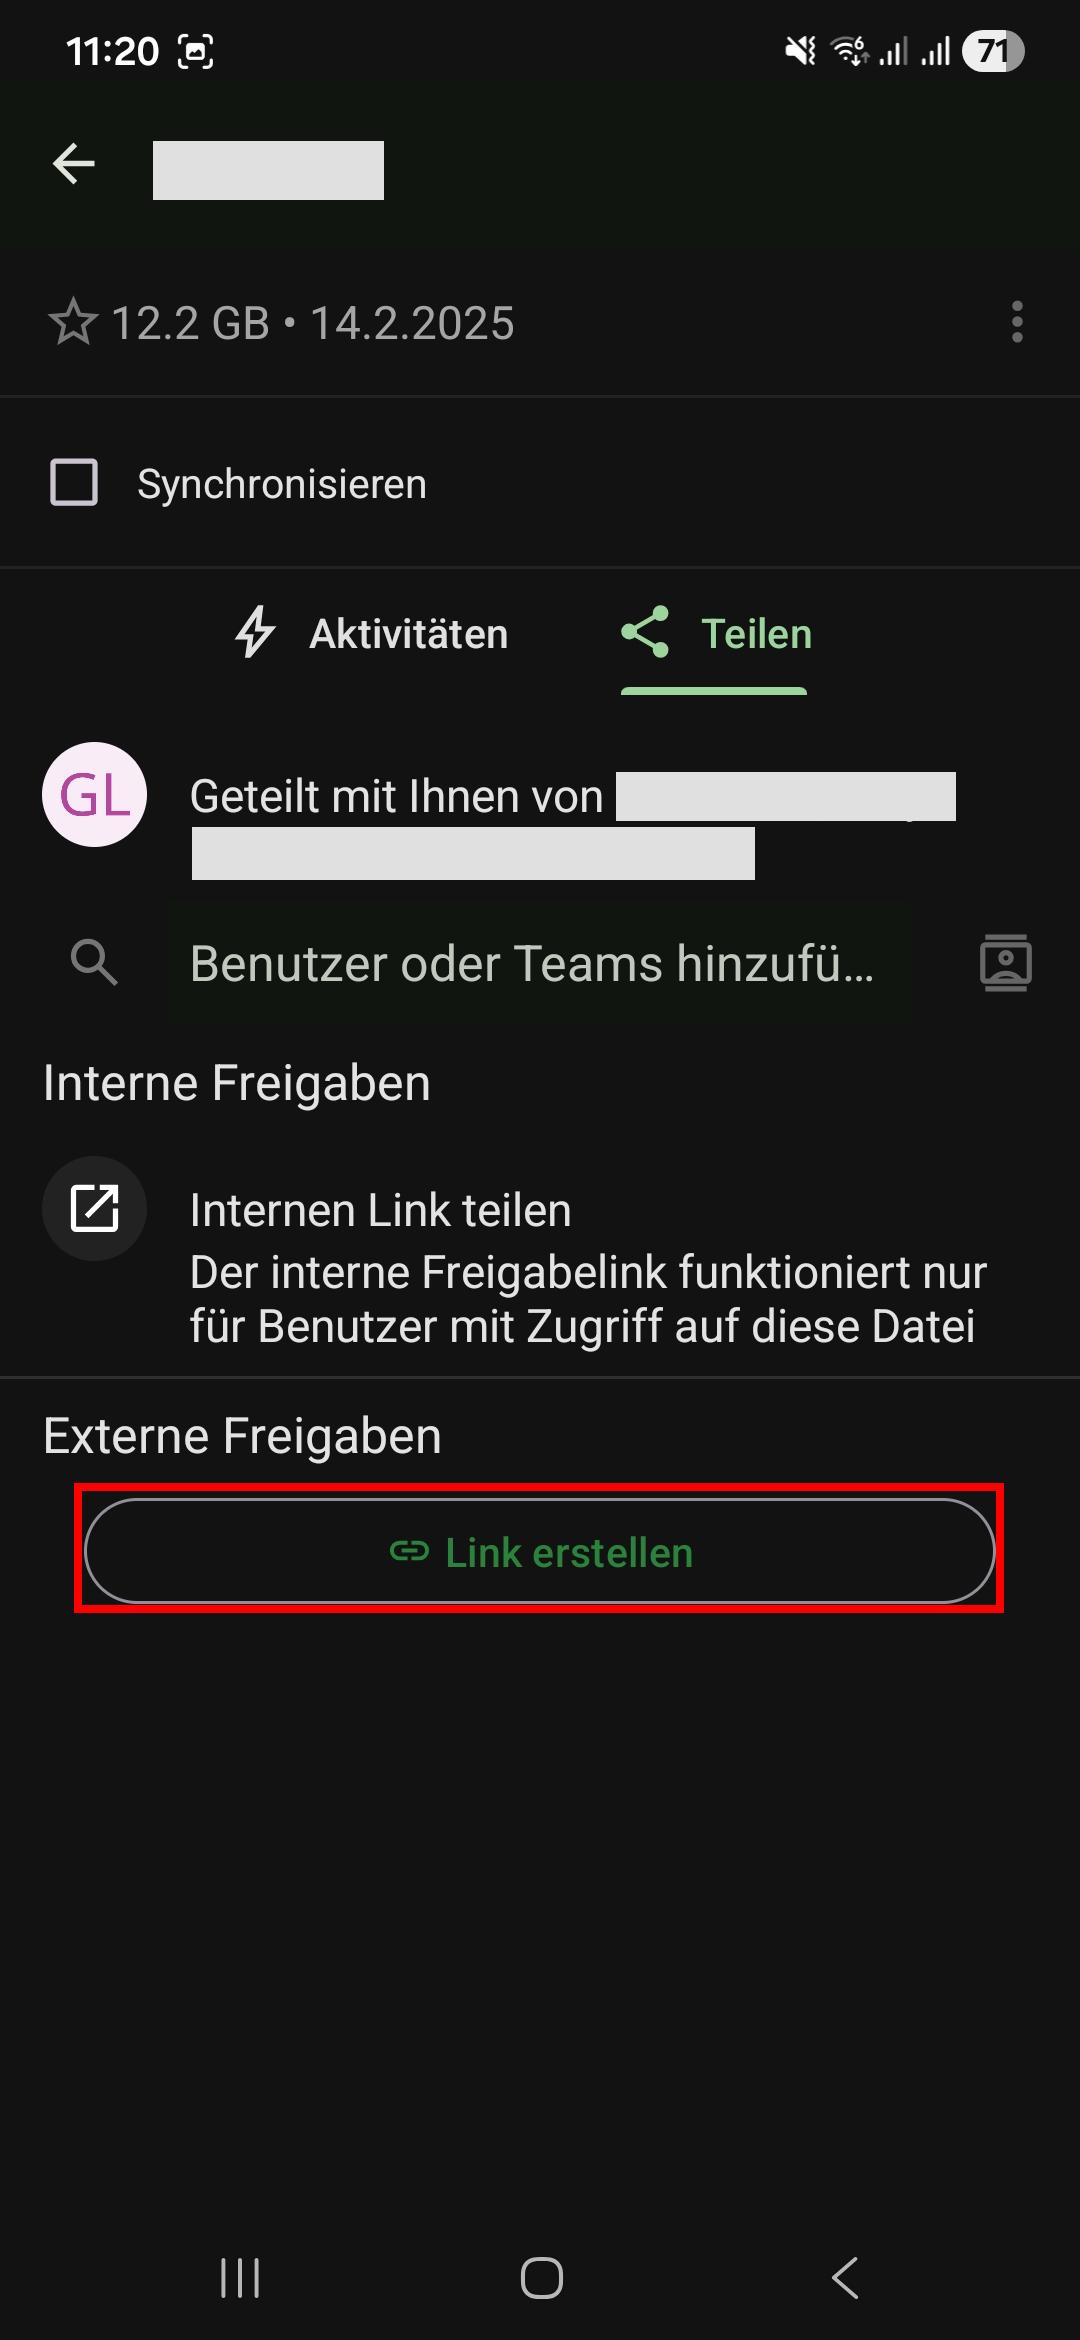
You can now set up a folder structure in the project box; it usually suffices to just have a folder, which you share with your personal Sciebo account:
You can set the permissions by clicking on the cogwheel next to the share. By default, everything is allowed; this makes sense for your personal account, as it enables you to share this project box folder with other project partners without having to log into the project box again.
6 - Groups

If you often share data with the same group of people, you can create a group for this in the web interface. You no longer have to share data with each person individually, but can simply select the group you have created. All members of the group automatically get access to the data. You can set the editing rights as usual when sharing. Note, however, that groups can only consist of members of your own participant institution.
Creating Groups
- Log in to the sciebo web interface.
- Click on your name in the upper menu bar and then on “Settings”.
- Select “Custom Groups”.
- Enter a new group name in the text field and click on “Create group”.
- The member menu opens on the right.
- In the text field, enter the name of a person you want to add to the group, following the principle “last name, first name”. Select the person from the list that appears. He or she is now added to the group. Repeat the process for all other persons.
Managing Groups
To manage your groups, you must log in to the web interface. Click on your name in the top menu bar, then on “Settings” and select “Custom groups”.
Notice
Please note that if you enable the Visible to everyone option under the Privacy section, this team will be visible to all users of this organization. Please only use this feature if absolutely necessary.Renaming a Group
- Move the mouse over the desired group. Click on the pencil symbol that appears next to its name.
- Change the name and confirm the change by pressing “Enter”.
Removing a Group
- Move the mouse over the desired group. Click on the bin symbol that appears.
- Click on “Yes” in the pop-up window to confirm the deletion.
Managing Group Members
To manage the members of one of your groups, you must log in to the web interface. Click on your name in the top menu bar, then on “Settings” and select “Custom groups”.
Adding Group Members
- Click on the group to which you want to add members. The members menu opens on the right.
- In the text field, enter the name of a person you want to add to the group, following the principle “last name, first name”. Select the person from the list that appears. He or she is now added to the group. Please be aware that currently only users from the same instance can be added to a group.
Changing Group Roles
Group members can be either “group owner” or “member”. Group owners have all editing options for the group (including deleting, renaming, adding/removing members). There can be more than one owner. Members, on the other hand, cannot make any changes to the group. By default, only the person who created the group is the group owner. If you want to change the roles, proceed as follows:
- Click on the group whose member roles you want to change. The members menu opens on the right.
- In the list of group members you can see which member has which role.
- Move the mouse over the desired person. Click on the pencil symbol to change the role. (If you want to give up your role as group owner, you must confirm this, as you can no longer make any changes once you have given up the role).
Removing Group Members
- Click on the group from which you want to remove members. The members menu opens on the right.
- Move the mouse over the desired person. Click on the bin icon that now appears.
- Click on “Yes” in the pop-up window to confirm the deletion.
Sharing with a Group
In principle, you can share with a group in the same way as with individual users. Follow the appropriate instructions depending on the platform (web interface, client or app) via which you want to share. You only need to note the following differences:
- Instead of the person’s name, enter the group name when sharing.
- You can only set editing rights for the group as a whole and not for individual group members.
7 - Guests

Projects often involve people who normally cannot use sciebo because they are not members of a participating institution. However, it is precisely here that a simple exchange of data is important. For this reason, there are guest IDs for these cases, which you as an employee can create yourself for your project partners.
Important!
Guests must log in at gast.sciebo.de, because they are not a member of an organisation that is part of sciebo!General Information
The guest’s e-mail address used for the invitation serves as the guest identifier. The sciebo web interface can be accessed by guests via gast.sciebo.de. Desktop client and apps can be used by guests for synchronisation. Guest IDs are valid for 12 months, renewal is possible. To do this, the guest must contact their sponsor, who can carry out the renewal via my.sciebo. After expiry, the guest ID is blocked and deleted after a further 3 months.
Guests can only use sciebo in a limited way, i.e. they do not have their own storage volume and cannot actively share data. To collaborate with guests, sciebo users must first share files and/or folders with them and give them the desired editing rights. Guests cannot create files or folders in their home directory, but only in folders shared with them. In this way, guests use the storage volume of the sciebo users who share with them.
Inviting Guests
Please note that it is not allowed to create guest IDs for members of the participant institutions.
- Log in to my.sciebo with your central user ID (not sciebo ID).
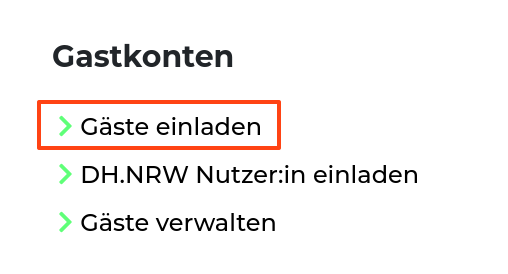
- Select the menu item “Invite guests”.
- Enter the name and e-mail address of the guest in the form. The e-mail address serves as the guest ID.
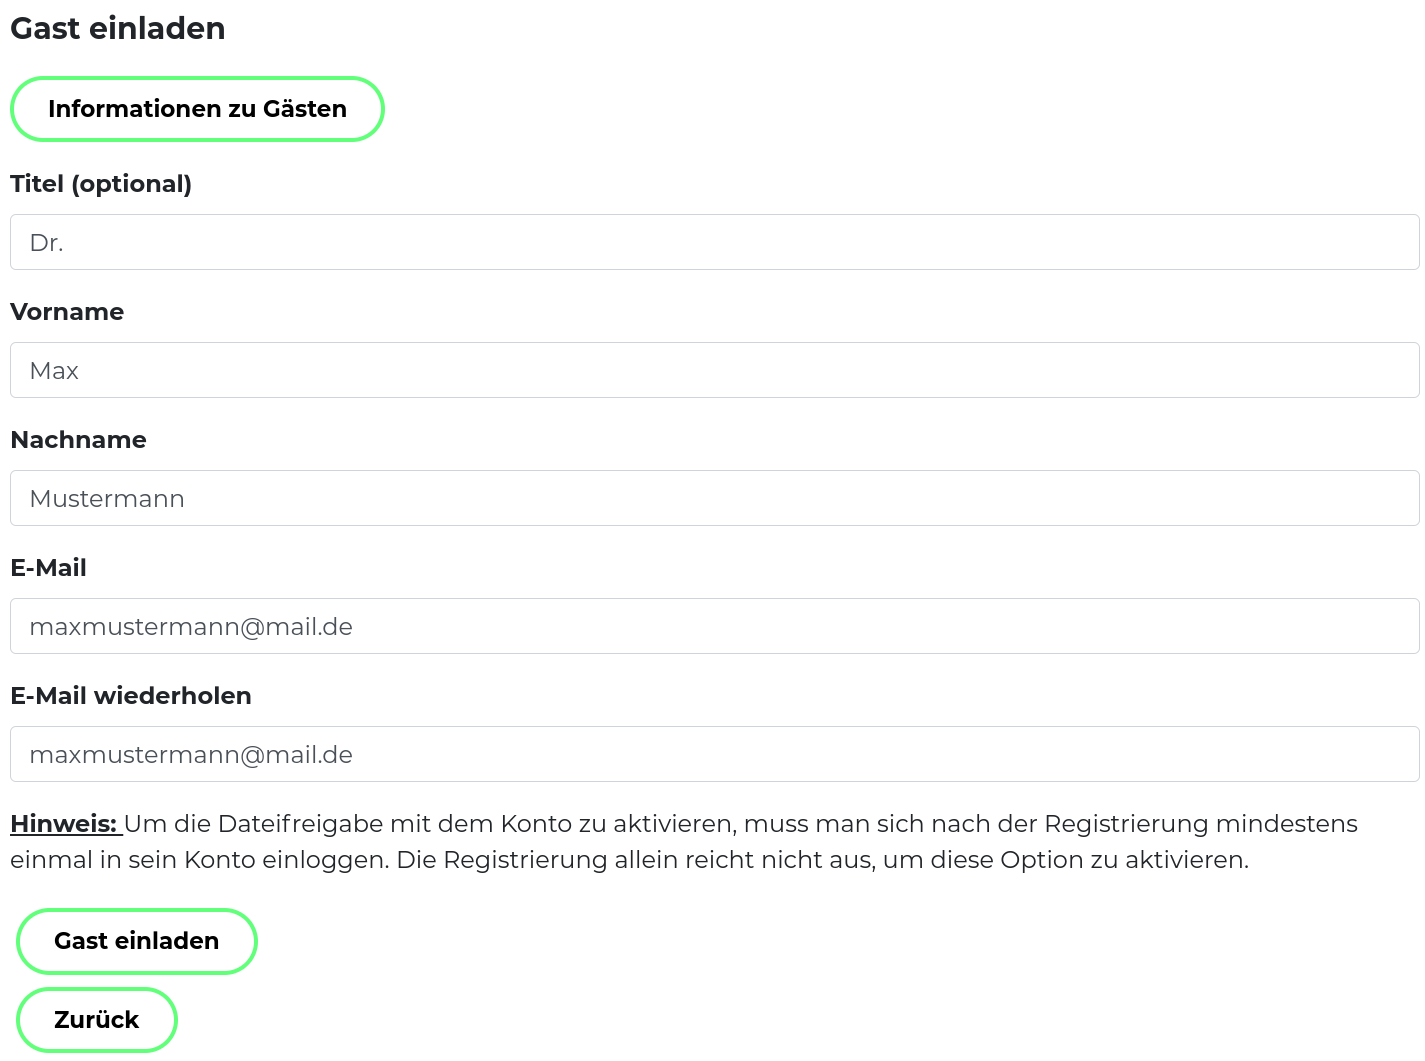
- Click on “Send invitation”. An invitation will now be sent by e-mail to the guest and a copy to yourself - as the guest’s so-called sponsor.
Note: If the guest has already been invited by someone else, you will automatically become the new sponsor. In this case, the previous sponsor will also be notified.
Account Activation as a Guest
In order to use your guest account, you must first set your password:
- Click on the link in the invitation email.
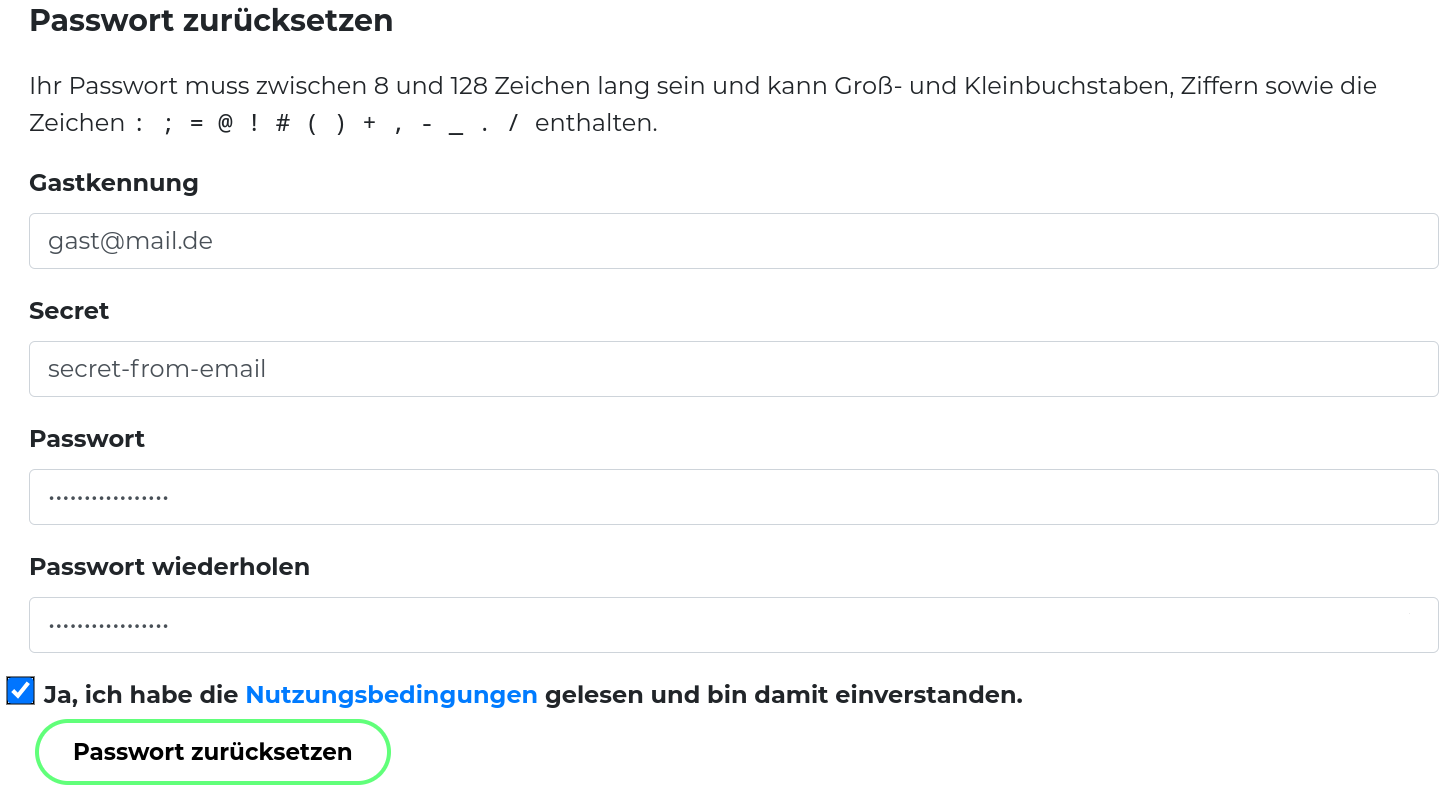
- Enter your sciebo ID. Your ID corresponds to your e-mail address via which you received the invitation.
- Enter the one-time password.
- Set a new password (at least 8 characters).
- Confirm the terms of use.
- Click on “Set password”.
- Log in to the sciebo web interface at gast.sciebo.de to activate your account.
Managing Guests
- Log in to my.sciebo with your central user ID (not with your sciebo ID).
- Select the menu item “Manage guests”. You will now see an overview of all guests you have invited.
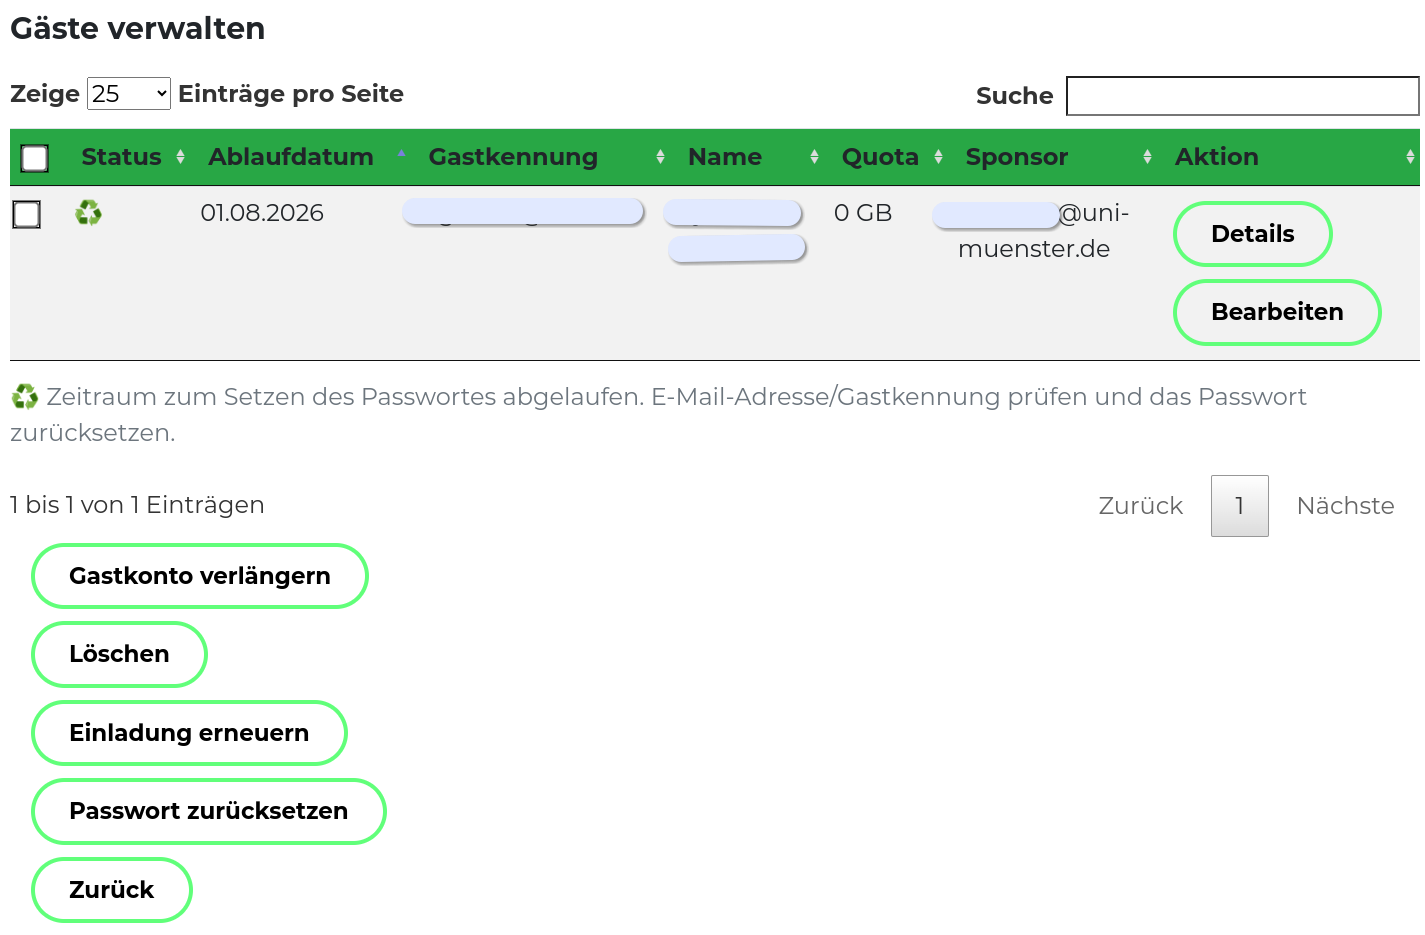
- You can perform the following actions here:
- Renew invitation (In case the guest did not accept the invitation in time).
- Renew guest ID (Renewal for another 12 months.)
- Reset password (In case the guest has forgotten his password. The guest can set a new password afterwards. He will automatically receive the necessary information by e-mail).
- Delete guest ID
Sharing with Guests
The prerequisite for sharing is that the guest has accepted your invitation and activated his or her account. The guest will only appear in the address book of the sharing dialogue the day after activation.
- (In the web interface, in the client or in the app) open the sharing dialogue for the file or folder you want to share.
- In the text box, enter the name of the guest following the principle “Last name, First name” or the guest ID. Select the guest from the list that appears. Pay attention to the addition “auf gast.sciebo.de”, because only with this note is the selection correct. (If the guest has deactivated the address book feature, enter Guest-E-Mail-Address@gast.sciebo.de directly). 1
- Decide what rights the guest will have regarding the file or folder you shared. The write permissions include “create”, “edit” and “delete”. We recommend that you disable the sharing permission (“can share”). You can change the rights at any time.
You can find more information on the topic of sharing files and folders with sciebo here.
-
Since Nextcloud version 31, searching the address book for shared folders to other institutions is unfortunately not possible. We hope the manufacturer will improve this in the foreseeable future. ↩︎